

Let it Glow Maker Advent Calendar Day #9: Ice Cold Coding!
It’s day #9 of the Let it Glow Maker Advent Calendar!
Today is another control component day, and it just wouldn't be right for us not to include a temperature sensor considering the cold snap you usually get at this time of year (and how fun they are to play with!).
The festive season is usually a chilly one, so we'll show you how to use this sensor to keep an eye on the winter temperatures whilst using our blinky components to give us visual indication of how hot or cold it is inside.
The sensor in today's box is a little smarter than some others, as it can measure both temperature and humidity and talks to our Pico in a different way using something called I2C. Don't worry, we'll explain it all!
Let’s get coding...
Box #9 Contents
In this box you will find:
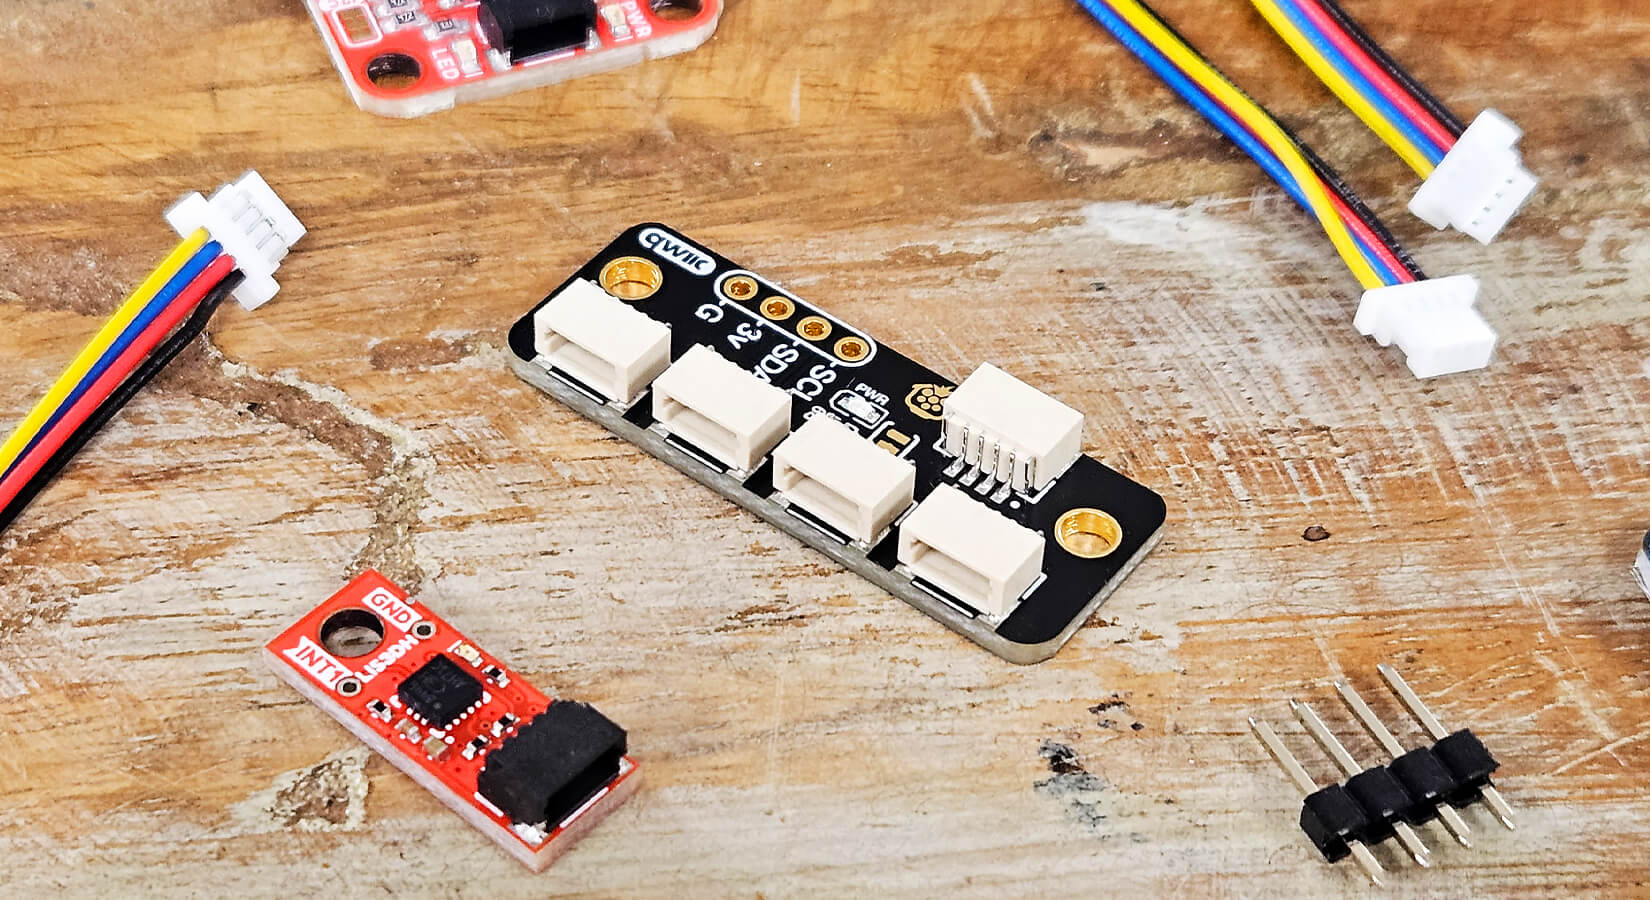
- 1x DHT20/AHT20 temperature and humidity sensor
- 4x Male to male jumper wires

Today’s Activities
Today we’re going to learn how to use this temperature sensor, using the readings in our code to print the information and drive our RGB LEDs.
There's a lot to learn today including some slightly more advanced stuff including I2C, library installation and dictionaries, so let's get cracking!
What is I2C?
I2C, sometimes referred to as IIC, stands for Inter-Integrated Circuit.
It's a communication protocol which allows multiple I2C devices to communicate to a controller like our Pico, passing data to it for us to use in our program.
I2C requires just two wires to communicate (along with 3.3V and GND wires for our sensor) and has benefits over some other communication options - but we won't bore you with that just now as it's not going to be relevant until you're much further along on your maker journey.
You can't use just any old GPIO pin for I2C either, you have to use the blue SDA or SCL pins, which you'll see on the Pico pin map.
To use I2C we also need to import it in our code, which we'll show you in just two ticks!
Construct the Circuit
As always, make sure your Pico is disconnected from the USB cable when working on the circuit.
Prepare the breadboard
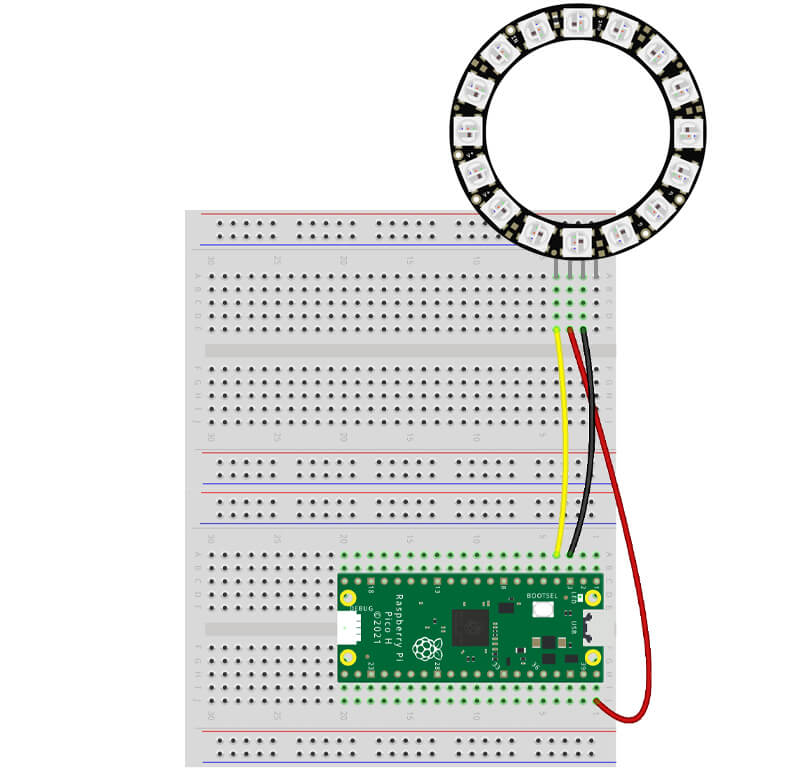
We'll be using our LED Ring with the temperature sensor, so keep that wired up the same as yesterday, and remove the slide potentiometer.
Here's your starting point:
Fit the temperature sensor
It's another easy component today, with just four pins to hook up. Just be gentle with it, those little legs don't like being forced!
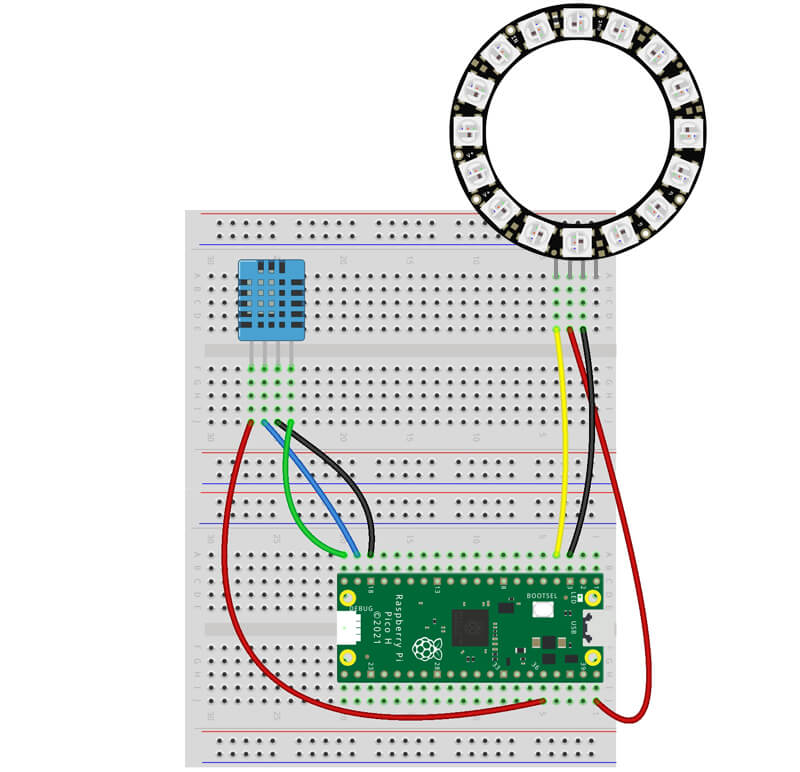
First fit the sensor to the right-hand side of your breadboard. You need the front (the side with holes that looks a bit like a tasty waffle) to be facing you.
Then wire it up, working from left to right with legs 1 to 4, as follows:
- Leg 1 (left) connects to 3.3V (physical pin 36)
- Leg 2 connects to SDA on GPIO 14 (physical pin 19)
- Leg 3 connects to GND (we're using physical pin 18)
- Leg 4 connects to SCL on GPIO15 (physical pin 20)
Your breadboard should look like this (your sensor will be black):
Tip: We're using SDA and SCL pins on GPIO 14 and 15, but if you look at the Pico pin map, you'll see that we could have used many others, such as GPIO10 and GPIO11 for example. The Pico has lots of I2C pins to choose from!
Install the code library
Before we can use the sensor, we need to install a library.
Until now we've just imported libraries that are already part of (built in to) MicroPython. Sometimes you'll want/need to use external libraries which require saving them on to your Pico first, then we can import them like we'd usually do at the start of a program.
DHT20 Library Installation
We're going to be using the excellent pico-dht20 library created by GitHub user flrrth.
We're not going to ask you to navigate the scary world of GitHub - instead we've copied the library code that you need and placed it below.
Copy the long code below over to Thonny in the usual way, but instead of running it, select File from the main menu, then Save As, then when a box appears asking where to save it, select 'Raspberry Pi Pico', call it dht20.py then select 'OK'.
# https://github.com/flrrth/pico-dht20

from machine import I2C
from utime import sleep_ms

class DHT20:
    """Class for the DHT20 Temperature and Humidity Sensor.

    The datasheet can be found at http://www.aosong.com/userfiles/files/media/Data%20Sheet%20DHT20%20%20A1.pdf
    """

    def __init__(self, address: int, i2c: I2C):
        self._address = address
        self._i2c = i2c
        sleep_ms(100)

        if not self.is_ready:
            self._initialize()
            sleep_ms(100)

            if not self.is_ready:
                raise RuntimeError("Could not initialize the DHT20.")

    @property
    def is_ready(self) -> bool:
        """Check if the DHT20 is ready."""
        self._i2c.writeto(self._address, bytearray(b'\x71'))
        return self._i2c.readfrom(self._address, 1)[0] == 0x18

    def _initialize(self):
        buffer = bytearray(b'\x00\x00')
        self._i2c.writeto_mem(self._address, 0x1B, buffer)
        self._i2c.writeto_mem(self._address, 0x1C, buffer)
        self._i2c.writeto_mem(self._address, 0x1E, buffer)

    def _trigger_measurements(self):
        self._i2c.writeto_mem(self._address, 0xAC, bytearray(b'\x33\x00'))

    def _read_measurements(self):
        buffer = self._i2c.readfrom(self._address, 7)
        return buffer, buffer[0] & 0x80 == 0

    def _crc_check(self, input_bitstring: str, check_value: str) -> bool:
        """Calculate the CRC check of a string of bits using a fixed polynomial.

        See https://en.wikipedia.org/wiki/Cyclic_redundancy_check
            https://xcore.github.io/doc_tips_and_tricks/crc.html#the-initial-value

        Keyword arguments:
        input_bitstring -- the data to verify
        check_value -- the CRC received with the data
        """

        polynomial_bitstring = "100110001"
        len_input = len(input_bitstring)
        initial_padding = check_value
        input_padded_array = list(input_bitstring + initial_padding)

        while '1' in input_padded_array[:len_input]:
            cur_shift = input_padded_array.index('1')

            for i in range(len(polynomial_bitstring)):
                input_padded_array[cur_shift + i] = \
                    str(int(polynomial_bitstring[i] != input_padded_array[cur_shift + i]))

        return '1' not in ''.join(input_padded_array)[len_input:]

    @property
    def measurements(self) -> dict:
        """Get the temperature (°C) and relative humidity (%RH).

        Returns a dictionary with the most recent measurements.

        't': temperature (°C),
        't_adc': the 'raw' temperature as produced by the ADC,
        'rh': relative humidity (%RH),
        'rh_adc': the 'raw' relative humidity as produced by the ADC,
        'crc_ok': indicates if the data was received correctly
        """
        self._trigger_measurements()
        sleep_ms(50)

        data = self._read_measurements()
        retry = 3

        while not data[1]:
            if not retry:
                raise RuntimeError("Could not read measurements from the DHT20.")

            sleep_ms(10)
            data = self._read_measurements()
            retry -= 1

        buffer = data[0]
        s_rh = buffer[1] << 12 | buffer[2] << 4 | buffer[3] >> 4
        s_t = (buffer[3] << 16 | buffer[4] << 8 | buffer[5]) & 0xfffff
        rh = (s_rh / 2 ** 20) * 100
        t = ((s_t / 2 ** 20) * 200) - 50
        crc_ok = self._crc_check(
            f"{buffer[0] ^ 0xFF:08b}{buffer[1]:08b}{buffer[2]:08b}{buffer[3]:08b}{buffer[4]:08b}{buffer[5]:08b}",
            f"{buffer[6]:08b}")

        return {
            't': t,
            't_adc': s_t,
            'rh': rh,
            'rh_adc': s_rh,
            'crc_ok': crc_ok
        }
Close the library file
Important! Once you've saved the library to your Pico, close the script tab down by selecting the 'X' on the tab, shown here:
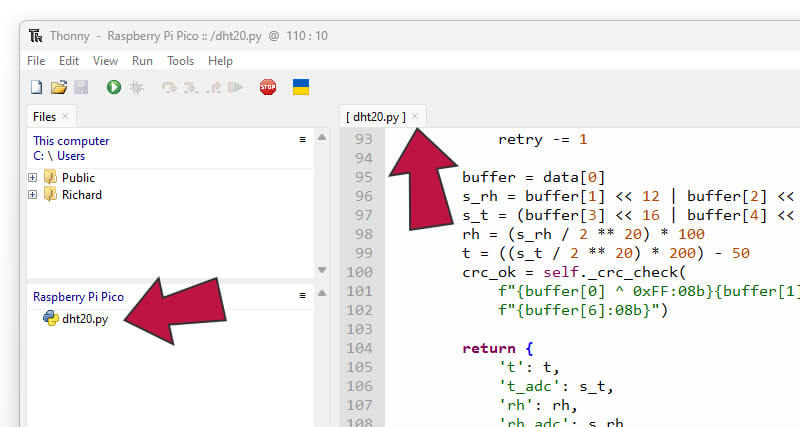
You will also see your saved library in the files sidebar, as pointed out above.
To open a new file ready for today's examples, select the 'New' icon (or select File > New):

Using the DHT20 library and dictionary
This particular library creates a dictionary of stored values from the sensor for us to use in our code, but what is a dictionary in MicroPython?
We covered lists previously, which were handy for storing data or variables and allowing us to quickly referencing them, using the list index, as and when we need to.
Dictionaries are also used to store information, and they also allow us to retrieve that information quickly, but they can be more useful when handling lots of data as each value is paired with a name (key) rather than an index number.
Confusing? You bet! Let's go off on a complete tangent and make it clearer with an example.
Dictionary vs List
Imagine we're keeping a record of every Christmas song we like. Our records for each track might include:
- Title
- Artist
- Supporting artist
- Album
- Year
- Label
- Rating
We could make a list for this data, the format would lay out like this:
song1 = [title, artist, supportingartist, album, year, label, rating]
...and a working example might be:
song1 = ["I Wish It Could Be Christmas Everyday", "Wizzard", "none", "none", "1973", "Warner Bro", 5]
That works...but it's going to be tricky remembering which index in that list relates to which field, and longer lists would be even more unmanageable!
A dictionary might be a better option, and would look like this:
song1 = {
  "title": "I Wish It Could Be Christmas Everyday",
  "artist": "Wizzard",
  "supportingartist": "none",
  "album": "none",
  "year": "1973",
  "label": "Warner Bro",
  "rating": 5,
}
Dictionary Key = handy!
Where the dictionary really shows its power, compared to a list, is when you want to grab data from it. You can use the name/key instead of a random index number that you're never going to remember!
Using our examples above, let's print the release year of our song.
First, using a list:
print(song1[4])
Now with a dictionary:
print(song1["year"])
See! The dictionary makes it a lot easier to grab the data you want as the key has a sensible, memorable name rather than an index.
Our only advice is don't force it. Lists are perfectly fine for lots of tasks, but now you have the dictionary option up your sleeve if you need it for a project.
Now, where were we...
Activity 1: Simple sensor reading test
Now that we understand dictionaries in MicroPython, let's start simple and run some code to grab readings from the sensor dictionary every five seconds, and print these to Thonny.
Double-check - did you close the library file tab down? If not, this is where things can go wrong, as you may accidentally overwrite the library if you try to run your script in the same tab. You need a new tab for your code.
The Code
To use our library, we need to import it, so we use from dht20 import DHT20 to do that.
Our code then sets up the I2C pins we're using, which isn't a lot different to how we've set up GPIO pins previously, however we then have a couple of lines setting up I2C and our I2C device (the sensor).
Every I2C device has an address - our sensor uses 0x38. You don't really need to worry about that just now, but just try to remember that if you ever want to run more than one I2C device in the future, you may need to check that the devices don't have the same address.
Our while loop then grabs data from the sensor by bringing the dictionary in, using measurements = dht20.measurements. Now we can access that data!
We then proceed to print each value from the dictionary by using the names (key) of each available item. Here's a list of the data available in the dictionary, taken from the library GitHub page:
| Key | Description |
| t | The temperature (°C) |
| t_adc | The 'raw' temperature value as produced by the sensor |
| rh | The relative humidity (%RH) |
| rh_adc | The 'raw' humidity value as produced by the sensor |
| crc_ok | The result of the Cyclic Redundancy Check (True or False) |
Run the code below and grab your first readings:
from machine import Pin, I2C
import time
from dht20 import DHT20

# Set up I2C pins
i2c1_sda = Pin(14)
i2c1_scl = Pin(15)

# Set up I2C
i2c1 = I2C(1, sda=i2c1_sda, scl=i2c1_scl)

# Set up DHT20 device with I2C address
dht20 = DHT20(0x38, i2c1)

while True:

    # Grab data from the sensor dictionary
    measurements = dht20.measurements

    # Print the data
    print(measurements['t'])
    print(measurements['t_adc'])
    print(measurements['rh'])
    print(measurements['rh_adc'])
    print(measurements['crc_ok'])

    # Wait 5 seconds
    time.sleep(5)
Activity 2: Readable readings!
Now that we know we can grab data from our library, let's format that data and add some other text to make it more useful/readable.
We'll add strings to our print statement readings to help identify what each number relates to, as well as rounding the readings to sensible values using the round function that we used previously.
We won't include the crc_ok (Cyclic Redundancy Check) line as we don't want to check for errors in our simple example (it's a simple True/False value to see if the data has gone whoopsie!).
We're also going to introduce formatted string literals to make our prints even fancier than before, so let's cover that quickly...
What are formatted string literals?
Formatted string literals, in simple terms, allow us to mix strings with Python variables (and any manipulation of those variables), and this all joins up at the end to make one very useful string (great for print lines!).
"But you already showed us how to add text next to a variable" we hear you cry! Yes we did, however formatted string literals are more powerful, as we're about to show you.
Here's an example
We want a print line which looks something like this: Temperature: 56.1°C.
That doesn't seem complicated until you realise what the code needs to do to achieve that. It would need to:
- Start with a string of "Temperature: "
- Grab the temperature reading from the dictionary
- Round the reading to 1 decimal place
- Inject the reading variable into the string
- Add "°C" to the end
Here's the line of code that can achieve that, using formatted string literals:
print(f"Temperature: {round(measurements['t'],1)}°C")
Let's break it down into pieces:
- print(f - string literals need an f after the first bracket
- "Temperature: - we start the string with simple text, inside the first inverted comma
- {round(measurements['t'],1)} - any data we want to inject into our string must go inside braces {}. Inside those braces we use the round function on our measurement temperature data ['t'], setting decimal places to 1.
- °C") - we end the line with the °C symbol and close the brackets and inverted commas
If that's a bit too busy for your liking, you could choose to round the data separately into a new variable beforehand. This causes an extra line of code, but makes things a bit more readable:
temperature = round(measurements['t'],1)
print(f"Temperature: {temperature}°C")
The Code
Now that we've covered formatted string literals, you should be able to see what's going on in the code example below.
We've added some print lines using formatted string literals for temperature and humidity, along with additional print lines for headings, blank spaces and dividers to display our data clearly. We also add some large gaps in some of our strings to align everything nicely.
Give it a try!
from machine import Pin, I2C
import time
from dht20 import DHT20

# Set up I2C pins
i2c1_sda = Pin(14)
i2c1_scl = Pin(15)

# Set up I2C
i2c1 = I2C(1, sda=i2c1_sda, scl=i2c1_scl)

# Set up DHT20 device with I2C address
dht20 = DHT20(0x38, i2c1)

while True:

    # Grab data from the sensor dictionary
    measurements = dht20.measurements

    # Print the data
    print("-- Environment ---------") # Heading
    print(f"Temperature:      {round(measurements['t'],1)}°C")
    print(f"Humidity:         {round(measurements['rh'],1)}%")
    print("------------------------") # Divider
    print("                        ") # Empty line

    # Wait 5 seconds
    time.sleep(5)
Activity 3: Temperature Indication Ring
Let's bring our LED ring back into the project and use it to show where temperature is on a scale.
Find your ambient temperature
The first thing you need to do is get a rough idea of the ambient temperature in your room, as this will be the mid-point in our scale.
Run the previous example and keep an eye on the temperature for a few minutes and make a note of where the temperature usually sits. Ours sat at around 20°C. We'll come back to this in a moment.
Temperature LED Index
We're going to create a simple variable for the temperature reading using temp = round(measurements['t']). Notice we don't use a number at the end to specify the decimal places? That's because we only want to deal with round numbers (integers) here.
This variable will drive our LED ring. Our rings have 12 LEDs, so we'll create a temperature dictionary with 12 keys (for each LED on our ring), placing our ambient temperature in position 6 (the index for the 7th LED at the top of the ring).
Here's an example using our ambient temperature of 20°C:
| Temperature | LED Index |
| 14 | 0 |
| 15 | 1 |
| 16 | 2 |
| 17 | 3 |
| 18 | 4 |
| 19 | 5 |
| 20 (our average temp) | 6 (middle LED) |
| 21 | 7 |
| 22 | 8 |
| 23 | 9 |
| 24 | 10 |
| 25 | 11 |
Working from this example and table above, when the temperature is 14°C, the 1st LED (index 0) will be lit. When the temperature is 23°C, the 10th LED (index 9) will be lit.
Now grab a pen and make your own scale based on your average temperature. Start by entering your ambient temperature next to index 6, then fill the rest of the table.
Code Breakdown
Now we need to put this all together! We'll split this one out as it's a bit more complicated.
The example below brings our neopixel library and associated setup lines back in.
We then create a temperature dictionary, which we're just going to use to convert temperatures into LED index values (there are other ways to do this, but we figure some dictionary practice makes sense today):
# Create a temperature/LED dictionary for our scale
# Temperature is the key (left), LED index is the value (right)
LEDdict = {
  14: 0,
  15: 1,
  16: 2,
  17: 3,
  18: 4,
  19: 5,
  20: 6, # Top-middle LED (index 6 / LED #7) for 20°C
  21: 7,
  22: 8,
  23: 9,
  24: 10,
  25: 11,
}
Our while loop grabs the temperature data from the dht20 dictionary, and we round this to a whole number in a new variable called temperature:
# Grab data from the sensor dictionary
measurements = dht20.measurements

# Create a rounded variable for the temperature
temperature = round(measurements['t'])
Then we start an if statement that checks if the temperature reading is not in our dictionary (14 to 25). If we don't do this, when the temperature goes so high or low that it takes our LED index outside of the possible range of our LED ring, the program will fall over!
if temperature not in LEDdict:

    pass
    print("*** Out of temperature range ***")
If the temperature is within our dictionary range, the else statement will trigger instead.
We then say "take that temperature value as a key, and use it with our dictionary to find what LED index should be used for that temperature". This creates a new variable LEDindex with the index value from the dictionary.
# Use our temperature variable with our dictionary
# To convert it from the temperature to the LED index
LEDindex = (LEDdict[temperature])
We fire out a few print lines to allow us to check the data and variables:
# Print the temperature and index
print("Temperature:",temperature)
print("LED index:  ",LEDindex)
print("----------------")
We then clear the LEDs quickly, before proceeding to light the LED that matches the index:
# Clear the ring
ring.fill((0,0,0))
ring.write()

ring[LEDindex] = (10,0,0) # Light the index LED
ring.write() # Write the LED data
Full program
That was a LOT to take in, so we suggest running the full example below, watching it work and having a few additional reads through the script and description above.
Try opening a window or gently blowing a hair dryer over the sensor (from at least ~45cm away) and watch the values and LEDs change.
from machine import Pin, I2C
import time
from dht20 import DHT20
from neopixel import NeoPixel

# Set up I2C pins
i2c1_sda = Pin(14)
i2c1_scl = Pin(15)

# Set up I2C
i2c1 = I2C(1, sda=i2c1_sda, scl=i2c1_scl)

# Set up DHT20 device with I2C address
dht20 = DHT20(0x38, i2c1)

# Define the ring pin number (2) and number of LEDs (12)
ring = NeoPixel(Pin(2), 12)

# Create a temperature/LED dictionary for our scale
# Temperature is the key (left), LED index is the value (right)
LEDdict = {
  14: 0,
  15: 1,
  16: 2,
  17: 3,
  18: 4,
  19: 5,
  20: 6, # Top-middle LED (index 6 / LED #7) for 20°C
  21: 7,
  22: 8,
  23: 9,
  24: 10,
  25: 11,
}

while True:

    # Grab data from the sensor dictionary
    measurements = dht20.measurements

    # Create a rounded variable for the temperature
    temperature = round(measurements['t'])

    if temperature not in LEDdict:

        pass
        print("*** Out of temperature range ***")

    else:

        # Use our temperature variable with our dictionary
        # To convert it from the temperature to the LED index
        LEDindex = (LEDdict[temperature])

        # Print the temperature and index
        print("Temperature:",temperature)
        print("LED index:  ",LEDindex)
        print("----------------")

        # Clear the ring
        ring.fill((0,0,0))
        ring.write()

        ring[LEDindex] = (10,0,0) # Light the index LED
        ring.write() # Write the LED data

    # Wait 2 second before looping again
    time.sleep(2)
Day #9 Complete!
We'll end it there today as we've probably exhausted your brains with those final activities!
There you have it, now you can keep an eye on your internal environment when that snow starts to fall (fingers crossed), and see how humid different rooms get when you close windows or hang the washing indoors!
We ran some examples with the LED ring, but there's lots of ways you can use your growing stash of components with these sensors:
- Use with the bar graph display for a 5-stage humidity indicator
- Use with the blocky LED as a general warning light if the temperature or humidity goes over or under a certain value
- Change RGB LED colours based on temperature ranges
- Use it with...something in one of the future boxes (shh!)
Recap time – What did we cover today?
- Wiring a temperature sensor
- What I2C is and how it works
- SDA and SCL I2C pins on the Pico
- Installing libraries
- Using and creating a dictionary
- Dictionaries vs Lists
- Formatted string literals
Keep everything as it is until the morning, where we'll unwrap the next blinky component. See you then!
We used Fritzing to create the breadboard wiring diagram images for this page.


28 comments
The Pi Hut
@ab – It’s usually a wiring issue, such as a jumper wire not quite making a connection, or simply the wrong hole. We usually suggest starting over with a clean breadboard, but if that still doesn’t work, please get in touch with the team via support.thepihut.com and they will help you with that.
@ab – It’s usually a wiring issue, such as a jumper wire not quite making a connection, or simply the wrong hole. We usually suggest starting over with a clean breadboard, but if that still doesn’t work, please get in touch with the team via support.thepihut.com and they will help you with that.
ab
Hello, my LED ring doesn’t seem to be lighting up. I’ve tried it with yesterday’s code and its still not working. It was working yesterday and there are no visible hardware issues. Why could this be and what can I do to fix it?
Hello, my LED ring doesn’t seem to be lighting up. I’ve tried it with yesterday’s code and its still not working. It was working yesterday and there are no visible hardware issues. Why could this be and what can I do to fix it?
Dr Passmore
Had the same issue as:
@AleM and @Tim – We haven’t seen this error before, but it looks like this happens when the sensor can’t be read for some reason. This might be a wiring issue, so we’d start by shutting everything down, re-wiring the circuit and triple-checking it, and then trying again. If it’s still not working, please contact support for a replacement via support.thepihut.com
Turns out my sensor was connected backwards
Simon
@Rob, I liked this idea so I’m going to try it out and share with the class!
The first thing I decided is that I knew is that I would need to turn off the LED above the LEDindex. So I removed the lines:
Clear the ringring.fill((0,0,0))
and added the following which loops through the leds from index to the length of the LEDdict, sets them each to 0,0,0 and then writes the changes to the ring afterwards:
for x in range(LEDindex, len(LEDdict)):
ring[x] = (0,0,0)
ring.write()
So far so good, immediately I notice the first 5 LEDs are off. Simple! One more loop from 0 to LEDindex while we are turning on lights should do the trick!
I remove the line:
ring[LEDindex] = (10,0,0) # Light the index LED
and add a new loop from 0 to the index LED:
for x in range(0, LEDindex):
ring[x] = (10,0,0)
Cool! Looks like it’s working here. My next idea would be to change the colour based on temp, I’m pondering how to get this done right now.
Sarah Wathan
Run program 1 and 2 and in both cases get the message below dont know how to fix
Traceback (most recent call last):
File “”, line 13, in
File “dht20.py”, line 17, in init
File “dht20.py”, line 27, in is_ready
OSError: [Errno 110] ETIMEDOUT
Run program 1 and 2 and in both cases get the message below dont know how to fix
Traceback (most recent call last):
File “”, line 13, in
File “dht20.py”, line 17, in init
File “dht20.py”, line 27, in is_ready
OSError: [Errno 110] ETIMEDOUT
Rob
Would there be an example of how to light up all of the LEDs to the index LED, kind of like a graph? For example, if the temp is 18, then the first 8 LEDs would light up. If the temp is 21, then the first 8 LEDs would light up?
Would there be an example of how to light up all of the LEDs to the index LED, kind of like a graph? For example, if the temp is 18, then the first 8 LEDs would light up. If the temp is 21, then the first 8 LEDs would light up?
The Pi Hut
@Odhran – Try adding time.sleep(2) before the while loop starts, this might help.
@Odhran – Try adding time.sleep(2) before the while loop starts, this might help.
Odhran
Hi, I keep on getting an error on the first activity:
Traceback (most recent call last):
File “”, line 13, in
File “dht20.py”, line 17, in init
File “dht20.py”, line 27, in is_ready
OSError: [Errno 110] ETIMEDOUT
Did you figure out what was wrong here?
Hi, I keep on getting an error on the first activity:
Traceback (most recent call last):
File “”, line 13, in
File “dht20.py”, line 17, in init
File “dht20.py”, line 27, in is_ready
OSError: [Errno 110] ETIMEDOUT
Did you figure out what was wrong here?
The Pi Hut
@Jim – Thanks for letting us know, fixed :)
@Jim – Thanks for letting us know, fixed :)
Jim
Another excellent little project.
a wee typo has crept in:
going to use be using
probably should be:
going to be using
Another excellent little project.
a wee typo has crept in:
going to use be using
probably should be:
going to be using
Lori's Robot's
I had a blast with this one. Added temp changing colors using the dictionary and I included the conversions to deg F since I am in the US. I used a more “fancy” print so that the shell does not fill up with data and a “try/except” so that you can leave the program cleanly with . Thanks for the great calendar!
Let it Glow Advent Calendar – Day 9 Ring and Temperature Sensor Weather Station Lori Pfahler December 17, 2023from machine import Pin, I2C
Set up I2Cfrom utime import sleep
from dht20 import DHT20
from neopixel import NeoPixel
i2c1 = I2C, scl = Pin(17)) Set up DHT20 device with I2C address
dht20 = DHT20 Some extra sleep to allow sensor to initialize – probably not needed
sleep(1) Define the ring on pin number 22 and number of LEDs = 12
ring = NeoPixel(Pin(22), 12) Temperature is the key, LED index is first item in “value” list RGB code is second item in the value list
LEDdict = {
62: [0, (0, 0, 100)], # too cold, blue
63: [1, (0, 0, 100)],
64: [2, (0, 0, 100)],
65: [3, (0, 0, 100)],
66: [4, (0, 100, 0)], # nice temp, green
67: [5, (0, 100, 0)],
68: [6, (0, 100, 0)], # Top-middle LED (index 6 / LED #7) for 68°F
69: [7, (0, 100, 0)],
70: [8, (0, 100, 0)],
71: [9, (0, 100, 0)],
72: [10,(0, 100, 0)],
73: [11,(100, 0, 0)], # too hot, red
} print title line
print(“Lori’s Weather Station Data:”)
try:
Grab data from the sensor dictionarywhile True:
measurements = dht20.measurements use some variables to make it easier to read code
temp_C = measurements[‘t’]
temp_F = (temp_C * 1.8) + 32
tempLookup = round(temp_F)
humid = measurements[‘rh’] if measurements[‘crc_ok’]: if tempLookup not in LEDdict: print(f"Temperature: {temp_F:3.1f}°F, {temp_C:3.1f}°C | Humidity: {humid:3.1f}% | Temp Out of Range", end = ‘\r’) Clear the ring
ring.fill((0,0,0))
ring.write() else: print(f"Temperature: {temp_F:3.1f}°F, {temp_C:3.1f}°C | Humidity: {humid:3.1f}% | Temp In Range ", end = ‘\r’) Use our temperature variable with our dictionary To convert it from the temperature to the LED index
LEDindex = LEDdict[tempLookup]0 Clear the ring
ring.fill((0,0,0)) Light the index LED
ring[LEDindex] = LEDdict[tempLookup]1
ring.write() Wait 2 seconds
sleep(2)
except KeyboardInterrupt:
Clear the ringring.fill((0,0,0))
ring.write()
Karen
I got confused trying to find the place to save the dht20 file. The instructions say unplug the Pico – then you won’t find it.
After doing the wiring, reconnect the Pico and press Stop. The Raspberry Pi Pico section will magically appear.
Thanks for that @Mark
I got confused trying to find the place to save the dht20 file. The instructions say unplug the Pico – then you won’t find it.
After doing the wiring, reconnect the Pico and press Stop. The Raspberry Pi Pico section will magically appear.
Thanks for that @Mark
Mark
If you can’t find the place to save on a Mac, make sure you have pressed Stop in Thonny first, then do Save As, otherwise you’ll continually be taken to your root folder which isn’t right.
If you can’t find the place to save on a Mac, make sure you have pressed Stop in Thonny first, then do Save As, otherwise you’ll continually be taken to your root folder which isn’t right.
Neil Thompson
For those getting the following message double check that you have the sensor wired up correctly as I was getting the same and found that the jumpers were out by one pin.
File “”, line 13, in
File “dht20.py”, line 17, in init
File “dht20.py”, line 27, in is_ready
OSError: [Errno 5] EIO
For those getting the following message double check that you have the sensor wired up correctly as I was getting the same and found that the jumpers were out by one pin.
File “”, line 13, in
File “dht20.py”, line 17, in init
File “dht20.py”, line 27, in is_ready
OSError: [Errno 5] EIO
The Pi Hut
@REP – Try disconnecting your Pico and waiting a few seconds, then plug it in again. It’s rare but we saw it once today, seems the I2C lines get a bit muddled.
@REP – Try disconnecting your Pico and waiting a few seconds, then plug it in again. It’s rare but we saw it once today, seems the I2C lines get a bit muddled.
REP
I’m getting the following message when I run the code, this has only just started happening:
Traceback (most recent call last):
File “”, line 13, in
File “dht20.py”, line 17, in init
File “dht20.py”, line 27, in is_ready
OSError: [Errno 5] EIO
I’m getting the following message when I run the code, this has only just started happening:
Traceback (most recent call last):
File “”, line 13, in
File “dht20.py”, line 17, in init
File “dht20.py”, line 27, in is_ready
OSError: [Errno 5] EIO
The Pi Hut
Weekend’s over, let’s reply to your comments!
@David – Did you name the file exactly as described, without any change to uppercase/lowercase etc? That’s a common issue. Also see Simon’s comment re making sure the code saves inside the file (you can double-click any of the Pico’s files to open/edit and have a look inside)
@Simon – Great tip, thanks for you comment.
@Giles – Yes we’re using Fritzing. We had to get a bit creative on some calendar days as not all of the components are available in Fritzing, so we move things to Photoshop and create them ourselves (such as the block LED and slider) or search the forums for custom parts already made by the community. re your other comment, in Fritzing select Window and make sure you tick Parts and Inspector. Then use the search at the top of the parts window to find the things you need. Sometimes you need to try a few different search terms to find the right bits.
@Mike – You copy the program over to the usual script window in Thonny (the top-right window, as if you were going to run the code). But instead of running it, you select File > Save as and save it to the Pico with the file name indicated. That then saves the library onto your Pico ready for us to use in our script.
@AleM and @Tim – We haven’t seen this error before, but it looks like this happens when the sensor can’t be read for some reason. This might be a wiring issue, so we’d start by shutting everything down, re-wiring the circuit and triple-checking it, and then trying again. If it’s still not working, please contact support for a replacement via support.thepihut.com
@Vife – You can run a small program to search the I2C bus for devices, which then shows the address. We didn’t include how to do this because we’re trying to keep things as simple as possible (and we know what the address of these parts are already). There’s some example I2C scan code in the description over at https://github.com/T-622/RPI-PICO-I2C-LCD/tree/main. FYI you need to make sure you change the code to match the SDA, SCL and BUS values.
Tim
I can’t get past the first activity. Everything seems to be connected correctly, and I’ve copied and pasted the code, to ensure I hadn’t mistyped anything, but I’m just getting the following:
“Traceback (most recent call last):
File “”, line 13, in
File “dht20.py”, line 17, in init
File “dht20.py”, line 27, in is_ready
OSError: [Errno 110] ETIMEDOUT"
Vife
Thanks ! where did you found the address 0×38 ? it’s not on the pico map or the sensor… Also, how much is the sensor reliable ? I guess there is an accepted error range ? Just asking because this sensor read 25 C* and my alarm clock which also read temperature read 23C*. Which one to believe ;) ??
Thanks fo your comments
AleM
During the first task I keep getting this error, even though I followed the steps correctly. Am I doing something wrong?
Traceback (most recent call last):
File “”, line 13, in
File “dht20.py”, line 17, in init
File “dht20.py”, line 27, in is_ready
OSError: [Errno 110] ETIMEDOUT
During the first task I keep getting this error, even though I followed the steps correctly. Am I doing something wrong?
Traceback (most recent call last):
File “”, line 13, in
File “dht20.py”, line 17, in init
File “dht20.py”, line 27, in is_ready
OSError: [Errno 110] ETIMEDOUT
Giles
Hi @PiHut,
Would you be able to share where you got the parts for Fritzing from? I have found the pico but struggling with 5 DIP switch, bar LEDs, ring LED, pretty button caps etc.
Thank.
Hi @PiHut,
Would you be able to share where you got the parts for Fritzing from? I have found the pico but struggling with 5 DIP switch, bar LEDs, ring LED, pretty button caps etc.
Thank.
Mike
I am completely lost. I copied the the file dht20.py and pasted it the box labelled shell. Saved it as instructed. IT is not clear where you paste the program. I am using a Mac and the picture you show of the file structure does not look like the one illustrated.
When I tried to run the programme it failed at line 3. I have no idea what is going on. Tried again. Now it says:-
Traceback (most recent call last):
File “”, line 1, in
NameError: name ‘temperature’ isn’t defined
Where do you paste the code? In the shell panel?
Help please.
Mike
Giles
Ah – just read its Fritzing !!
Doh!
Ah – just read its Fritzing !!
Doh!
Giles
Hello @piHut,
What tool are you using to do the breadboard layout diagrams please? I’m working on a project to use all of the components from the 2023 calendar simultaneously. I’m intending to share it but want to make a nice diagram of the wiring. I’ve failed to find anything that looks as pretty as your diagrams.
Thanks!
SIMON
Good test today. I couldn’t get this to work, but somehow my code didn’t save to dht20.py, so tried again and it worked. So if you have a ’can’t import’ error, try opening the .pny file in thonny, and check the code is there before cosing it again. Love this project though. Works great now. Thanks.
Good test today. I couldn’t get this to work, but somehow my code didn’t save to dht20.py, so tried again and it worked. So if you have a ’can’t import’ error, try opening the .pny file in thonny, and check the code is there before cosing it again. Love this project though. Works great now. Thanks.
TimR
Great tutorial! I have long struggled with getting data out of a sensor as borrowing other people’s code is often not the route to success. You have given me a very helpful insight into how to go about this and I hope I can build on this with other sensors.
Great tutorial! I have long struggled with getting data out of a sensor as borrowing other people’s code is often not the route to success. You have given me a very helpful insight into how to go about this and I hope I can build on this with other sensors.
David
Traceback (most recent call last):
File “”, line 3, in
ImportError: no module named ‘dht20’
seems like Thonny never even looks at the current directory for ‘dht20.py’
Traceback (most recent call last):
File “”, line 3, in
ImportError: no module named ‘dht20’
seems like Thonny never even looks at the current directory for ‘dht20.py’
Brew
Team another excellent start to my day. Super interesting.
I’ve tried to evolve the code a little so the LED colour changes depending on the temperature
I’m going to keep going to see if I can work out how to light up all the LEDs in the range 0-LEDindex.
from machine import Pin, I2C
Set up I2C pinsimport time
from neopixel import NeoPixel
from dht20 import DHT20
i2c1_sda = Pin(14)
i2c1_scl = Pin(15) Set up I2C
i2c1 = I2C Set up DHT20 device with I2C address
dht20 = DHT20 Define the ring pin number (2) and number of LEDs (12)
pixels = 12
ring = NeoPixel(Pin(2),pixels)
r = 0
g = 0
b = 0
ring.fill((r,g,b))
ring.write Create a temperature/LED dictionary for our scale Temperature is the key (left), LED index is the value (right)
LEDdict = {
14: 0,
15: 1,
16: 2,
17: 3,
18: 4,
19: 5,
20: 6, # Top-middle LED (index 6 / LED #7) for 20°C
21: 7,
22: 8,
23: 9,
24: 10,
25: 11,
}
count = 1 # Set counter so we can see the reading tick over
while True:
Grab data from the sensor dictionarymeasurements = dht20.measurements Create a rounded variable for the temperature
temperature = round(measurements[‘t’]) if temperature not in LEDdict: pass print(“* Out of temperature range *”) else: Use our temperature variable with our dictionary To convert it from the temperature to the LED index
LEDindex = (LEDdict[temperature]) Print the data print(“t———”,measurements[‘t’]) print(“t_adc—”,measurements[‘t_adc’]) print(“rh——-”,measurements[‘rh’]) print(“rh_adc-”,measurements[‘rh_adc’]) print(“crc_ok-”,measurements[‘crc_ok’])
#print(“- Environment -———-”) # Heading
#print(f"Temperature: {round(measurements[‘t’],1)}°c")
#print(f"Humidity: {round(measurements[‘rh’],1)}%") Reformat and make a string literal (mix variables and manulipulation of variable and text)
print(f"Temperature: {round(measurements[‘t’],1)}°c, Humidity: {round(measurements[‘rh’],1)}%“)
print(”LED index:“, LEDindex)
print(”count:“, count)
print(”————————————“) # Divider
print(” ") # Empty line Clear the ring
ring.fill((0,0,0))
ring.write if temperature <= 18.5: # Chilly Colour r = 0 g = 0 b = 10 elif temperature <= 20.0: # Mid Colour r = 20 g = 10 b = 0 elif temperature >= 20.1: # Hot r = 10 g = 0 b = 0 ring[LEDindex] = (r,g,b) # Light the index LED ring.write() # Write the LED Data count = count +1 # advance the count time.sleep(2) # wait 2 secconds