
Let it Glow Maker Advent Calendar Day #8: Rainbow Ring!
It’s day #8 of the Let it Glow Maker Advent Calendar!
Today we're playing with addressable LEDs again, but this time in the format of an RGB LED ring - it's another The Pi Hut team favourite!
These rings are a very popular LED format as you can make some really interesting patterns and effects with them, and even build them into projects as a multi-colour light source.
Enough talk - let's get straight into the blinky...
Warning: Some of today's activities contain fast flashing lights which may not be suitable for those with photosensitive epilepsy.
Box #8 Contents
In this box you will find:
- 1x 12-LED RGB Ring
- 3x Male to male jumper wires

Today’s Activities
Today we’re going to learn more about addressable LEDs and how we can chain them together to make some really fun light patterns.
We already know how to set up and use a single addressable LED (from day #6) so we'll be expanding on that whilst re-using some of the functions and tricks we've learnt so far.
First - a quick intro to the LED ring in today's box...
What is an RGB LED ring?
These LED rings are simply twelve addressable LEDs in a row, in a handy ring shape printed circuit board (PCB). Each LED is connected to the previous thanks to the IN and OUT data pins these LEDs have.
This means we can control all twelve of them, individually, using just a single GPIO pin from our Pico.
You already know about RGB and all that fun stuff from day #6 - this ring is standard RGB, not GRB - so let's jump straight into showing you how to control your fancy new LED ring!
Construct the Circuit
As always, make sure your Pico is disconnected from the USB cable when working on the circuit.
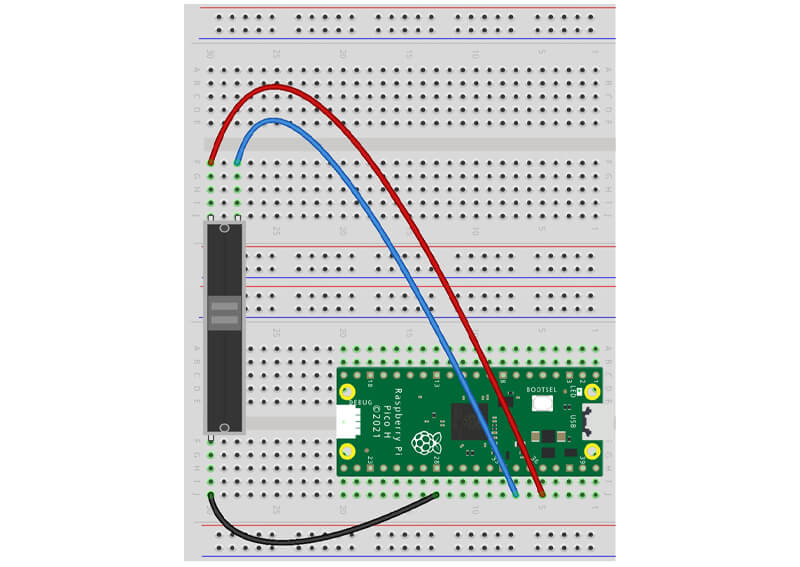
Prepare the breadboard
We're not using any other components today (the ring demands our full attention!) but we'll leave the slider in place from yesterday because we think you might want to play with that later...
Here's your starting point:
Connect the LED Ring
This is a nice easy component to connect, with fixed legs and only three wires to hook up.
First we need to fit the ring facing forwards at the top-right corner of your breadboard. Just slot it in, easy!
Then we need to wire up the first three pins only (we don't connect the fourth pin as this is the Data OUT for daisy-chaining with other addressable LEDs):
- The first (left) pin is Data IN. We connect this to GPIO 2 (physical pin 4)
- The second pin is 5V. We connect this to VBUS (physical pin 40)
- The third pin is GND. We connect this to any GND pin (we've used physical pin 3)
You should have something like this:
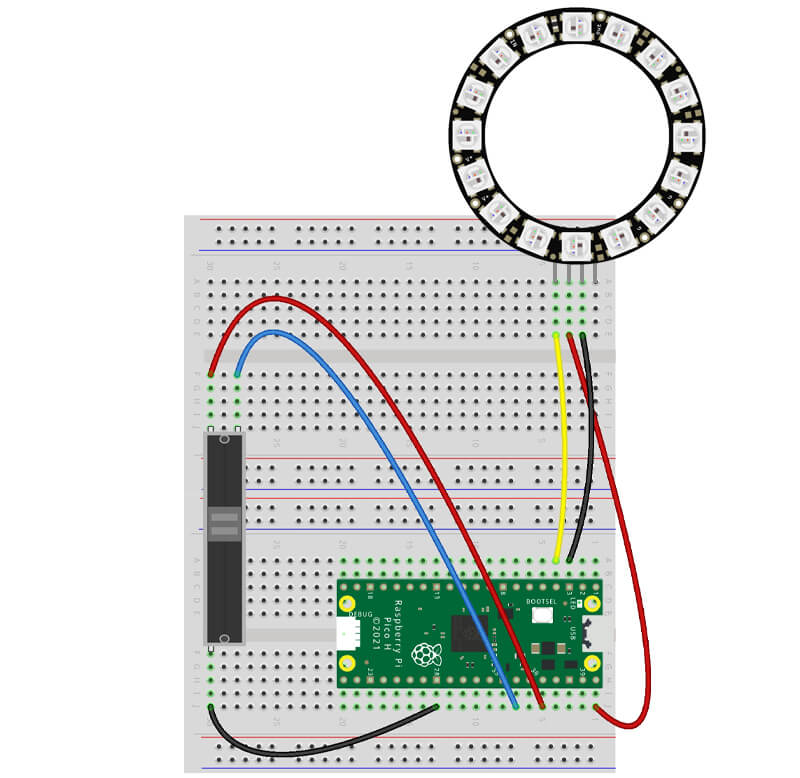
Tip: Take a look at the rear of the LED ring - it has the pins conveniently labelled on the PCB! Not all components come with such luxuries...
Activity 1: Single LED control
A quick first activity to show you the minor difference you need to make in your LED ring code compared to the single RGB LED in day #6.
We still import the neopixel library, and we set up the ring in the same way, however the setup line now needs to be altered to reflect how many LEDs are in the chain. We'll now use ring = NeoPixel(Pin(2), 12) which is specifying GPIO2 for data in, and 12 LEDs in the ring. Simple!
Then to tell our code which LED in the ring we would like to light up, we can simply send ring[0] = (10,0,0). This is going to light up the first LED, as the 0 is specifying the first LED in the index (remember, indexes start at zero).
Note: Do you remember from day #6 how the RGB value changed the intensity of the light? These LED rings can be VERY bright, so for most examples we're going to stick to low intensity (around 10) to save the strain on your eyes!
Run the code example below, and try changing that ring[0] number to a different value (up to 11):
# Imports
from machine import Pin
from neopixel import NeoPixel

# Define the ring pin number (2) and number of LEDs (12)
ring = NeoPixel(Pin(2), 12)

# Select the first LED (0)
# Set the RGB colour (red)
ring[0] = (10,0,0)

# Send the data to the ring
ring.write()
If you need to turn it off...
If you want to turn off the LEDs at any stage, just set the RGB colours to (0,0,0) for the entire ring with ring.fill((0,0,0)) like the example below.
We'll be adding this to the start of the example programs to 'clean up' any LEDs still on from the previous program:
from machine import Pin
from neopixel import NeoPixel

ring = NeoPixel(Pin(2), 12)

ring.fill((0,0,0)) # 'fill' addresses all LEDs
ring.write()
Activity 2: Multiple LEDs
Lighting up multiple LEDs is super easy too - just add another line for each LED you want to write.
In the basic example below we light up LEDs 1, 4, 7 and 10 blue, which in our index starting at zero, is 0, 3, 6 and 9:
# Imports
from machine import Pin
from neopixel import NeoPixel
import time

# Define the ring pin number (2) and number of LEDs (12)
ring = NeoPixel(Pin(2), 12)

# Turn off all LEDs before program start
ring.fill((0,0,0))
ring.write()
time.sleep(1)

# Send data to four LEDs
ring[0] = (0,0,10)
ring[3] = (0,0,10)
ring[6] = (0,0,10)
ring[9] = (0,0,10)

ring.write()
...or use a list!
You know how lists work - we learnt about them on day #4. We can create a list of the specific LEDs in the index we want to light up, then refer to that list in our code.
The example below achieves the same outcome as the one above, just using a list and for loop instead. Sometimes one method will be better than another depending on the project/situation:
# Imports
from machine import Pin
from neopixel import NeoPixel
import time

# Define the ring pin number (2) and number of LEDs (12)
ring = NeoPixel(Pin(2), 12)

# Create a list of the LEDs to use
myleds = [0,3,6,9]

# Turn off all LEDs before program start
ring.fill((0,0,0))
ring.write()
time.sleep(1)

for i in myleds:
    ring[i] = (0,0,10)
    ring.write()
Activity 3: A little delay for effects
Adding a simple short delay can transform your LED code from simply 'lighting up' to a pattern!
Take the code above for example - if we add just one time.sleep(1) line at the end of the code inside our for loop, the LEDs will light one after the other.
This is because the for loop will run for each item in our list. Without a delay, it's so fast you don't realise it's happening and they look like they're turning on all at the same time:
Give it a try:
# Imports
from machine import Pin
from neopixel import NeoPixel
import time

# Define the ring pin number (2) and number of LEDs (12)
ring = NeoPixel(Pin(2), 12)

# Create a list of the LEDs to use
myleds = [0,3,6,9]

# Turn off all LEDs before program start
ring.fill((0,0,0))
ring.write()
time.sleep(1)

for i in myleds:
    ring[i] = (0,0,10)
    ring.write()
    time.sleep(1)
Activity 4: Spinning lights with while loops
What if we add the code above into a while True loop that runs forever, reduce the time delay slightly, and also clear the ring after each iteration in the for loop?
That will give us the effect of an LED lighting one after the other in a constant cycle! Each LED in the list is lit up for as long as we set the delay, then cleared, then the next LED in the list does the same - over and over again (as the while True loop will restart the for loop).
Here's the code for that with some added commentary - give it a try!
# Imports
from machine import Pin
from neopixel import NeoPixel
import time

# Define the strip pin number (2) and number of LEDs (12)
ring = NeoPixel(Pin(2), 12)

# Create a list of the LEDs to use
myleds = [0,3,6,9]

# Turn off all LEDs before program start
ring.fill((0,0,0))
ring.write()
time.sleep(1)

while True:

    for i in myleds:

        ring[i] = (0,0,10)
        ring.write()

        # Show the light for this long
        time.sleep(0.3)

        #Clear the ring at the end of each loop
        ring.fill((0,0,0))
        ring.write()
Activity 5: Bouncing lights
You've used the reverse method a couple of times now, but let's use it again with our ring as it can help make some really cool effects.
Our light is going to bounce from one side to the other, simply by adding a second for loop with the LED sequence reversed.
The first for loop will work through the list, lighting each LED in turn, then once that loop has finished, it'll move on to the next part of the code which is our second for loop - it's pretty much identical apart from the reversed function making the LEDs run backwards.
As this is all in a while True loop, it'll keep bouncing back and forth - cool! Give it a try (we also changed the colour):
# Imports
from machine import Pin
from neopixel import NeoPixel
import time

# Define the strip pin number (2) and number of LEDs (12)
ring = NeoPixel(Pin(2), 12)

# Turn off all LEDs before program start
ring.fill((0,0,0))
ring.write()
time.sleep(1)

while True:

    for i in range(12):

        ring[i] = (5,0,5)
        ring.write()

        # Show the light for this long
        time.sleep(0.09)

        #Clear the ring at the end of each loop
        ring.fill((0,0,0))
        ring.write()

    for i in reversed (range(12)):

        ring[i] = (5,0,5)
        ring.write()

        # Show the light for this long
        time.sleep(0.09)

        #Clear the ring at the end of each loop
        ring.fill((0,0,0))
        ring.write()
Activity 6: The spinning wheel of colour!
Already sounds fun right?!
This example uses the same concepts as above, but we keep the LEDs lighting in a continuous cycle round and round again, and each time we get back to the first LED we change the colour.
We'll use the random method for the colours because we just think that's more fun than using a set list. We've also bumped up the max RGB intensity to 100 for this example, as it shows off the colours a bit better (go to 255 if you want!).
The code inside the while loop first sets some random numbers (integers) for our RGB colours (with a max range of 100), then jumps into a for loop which then lights the LEDs in turn. Once the for loop is over, our while True loop starts the process all over again.
Here's the code:
# Imports
from machine import Pin
from neopixel import NeoPixel
import time
import random

# Define the strip pin number (2) and number of LEDs (12)
ring = NeoPixel(Pin(2), 12)

# Turn off all LEDs before program start
ring.fill((0,0,0))
ring.write()
time.sleep(1)

while True:

    # Create random RGB values
    r = random.randint(0,100)
    g = random.randint(0,100)
    b = random.randint(0,100)

    for i in range(12):

        # Light each LED a random colour
        ring[i] = (r,g,b)
        ring.write()

        # Show the LED for this long
        time.sleep(0.05)

        #Clear the ring at the end of each loop
        ring.fill((0,0,0))
        ring.write()
...or a full colour version!
Rather than having a single LED spinning in a circle, you can fill the ring with each colour as it goes round.
All you need to do is delete the last three lines of the previous example - go on, try it!
If the ring isn't cleared at the end of each loop, it'll fill with colour instead. Easy!
Activity 7: The double random ring!
Another neat example that doesn't use a lot of code is a program that selects a random LED from our ring, displays a random colour on it, then selects the next LED and so on. If you run this fast enough it looks really good!
The best bit? It's using knowledge and functions you've already learnt - great for practice!
Our while loop uses the random function to select an LED from our ring using the index (0-11), then creates three random RGB colour variables between 0 and 50.
All we do then is inject those variables into our usual code to drive the LED ring, using ring[randomled] = (r,g,b). Give it a try:
# Imports
from machine import Pin, ADC
from neopixel import NeoPixel
import time
import random

# Define the strip pin number (2) and number of LEDs (12)
ring = NeoPixel(Pin(2), 12)

# Turn off all LEDs before program start
ring.fill((0,0,0))
ring.write()
time.sleep(1)

while True:

    # Select a random LED
    randomled = random.randint(0,11)

    # Create random RGB values
    r = random.randint(0,50)
    g = random.randint(0,50)
    b = random.randint(0,50)

    # Light the random LED in a random colour
    ring[randomled] = (r,g,b)
    ring.write()

    # Show the light for this long
    time.sleep(0.05)

    #Clear the ring at the end of each loop
    ring.fill((0,0,0))
    ring.write()
Day #8 Complete!
Phew! Lots of examples there, and there's a lot more you can do with these LED rings depending on how far you want to take the code. Feel free to bump up the examples to the full 255 RGB brightness for some really impressive blinky!
It was another good day for re-using things you've already learnt and using them in new, fun ways. We'll be doing more with our RGB LEDs before the calendar is over.
Note: We didn't remove the slider from yesterday's box as we thought you might like to try your hand at coding that for a speed control, colour selector or...something else! All the knowledge and examples you need can be found in the previous box articles (or maybe, just maybe, we'll show you how in a future box...)
It's recap time – what did we cover today?
- Wiring an RGB LED ring
- Referencing individual/multiple addressable LEDs in a chain
- Different light effects:
- Simple individual light addressing
- Light chasing (single LED/full colour)
- Spinning lights
- Bouncing lights
- Random lights and colours
Leave your circuit as it is for now, we'll give you instructions on what to do with it at the start of tomorrow's box. You'll probably want to play some more with the LED ring before then anyway...
See you in the morn'!
We used Fritzing to create the breadboard wiring diagram images for this page.


26 comments
Dan Salt
Congrats on an awesome calendar, PiHut!!
A ring, that lights up, with tutorial code that simulates a light spinning around (?!?!!)
…. there was really only ever one way my 90’s/00’s childish brain was going to go…. LET’S TURN IT INTO A STARGATE!
https://github.com/DanSalt/piadvent2025/blob/main/Day08-STARGATE.py
Richard
@Harlan – That’s great! I had to reformat the code with spaces, comments etc but ten minutes later it’s working, very nice! :)
@Harlan – That’s great! I had to reformat the code with spaces, comments etc but ten minutes later it’s working, very nice! :)
Pavel
Here is the code I made that creates an infinitely spining rainbow:
Importsfrom machine import Pin
from neopixel import NeoPixel
import time
noLEDs = 12
Between 0.1 – 1.4steps = 20
brightness = 0.5 Define the strand pin number (2) and number of LEDs (15)
ring = NeoPixel(Pin(2), noLEDs)
ring.fill((0,0,0))
ring.write()
time.sleep(1)
rainbow = [
[180, 0, 0], # Red
[180, 60, 0], # Red-Orange
[180, 120, 0], # Orange
[180, 180, 0], # Yellow
[120, 180, 0], # Yellow-Green
[0, 180, 0], # Green
[0, 180, 120], # Green-Cyan
[0, 180, 180], # Cyan
[0, 120, 180], # Blue-Cyan
[0, 0, 180], # Blue
[120, 0, 180], # Purple
[180, 0, 120] # Magenta → loops back to red
]
for colour in rainbow:
for i in range(3):
colour[i] = int(colour[i] * brightness)
def transitionOneStep(colour1, colour2, i, pixel):
gstep = (colour20 – colour10) / steps
bstep = (colour21 – colour11) / steps
rstep = (colour22 – colour12) / steps
ring[pixel] = ((colour10 + int(gstep * i), colour11 + int(bstep * i), colour12 + int(rstep * i)))
i = 0
while True:
i += 1
for j in range(steps):
for pixel in range(noLEDs):
colour1 = rainbow[(i + pixel) % noLEDs]
colour2 = rainbow[(i + 1 + pixel) % noLEDs]
transitionOneStep(colour1, colour2, j, pixel)
ring.write()
The Pi Hut
@ James-jr – Please get in touch via support.thepihut.com and we’ll help with checking your wiring and/or getting a replacement out to you.
@ James-jr – Please get in touch via support.thepihut.com and we’ll help with checking your wiring and/or getting a replacement out to you.
james-jr
my ring will not light at all and i have tried many times of re wiring and looking for faults
my ring will not light at all and i have tried many times of re wiring and looking for faults
Harlan
I have designed a code so that you can use your slider with this ring and it has many more colours than the code for day #7. Check this out on your own one. It uses the same breadboard layout as in the images today.
Importsimport time
from machine import Pin, ADC
from neopixel import NeoPixel Set up the slider on ADC pin 28
potentiometer = ADC)
#Set Up The RGB Ring
Define a few basic RGB colour variablesring = NeoPixel(Pin(2), 12)
red = 255,0,0
green = 0,255,0
blue = 0,0,255
amber = 213, 132, 33
orange = 165,42,42
white = 240,140,255 Create a variable for our reading
reading = 0
while True:
reading = potentiometer.read_u16() # Read the potentiometer value and set this as our ‘reading’ variable value print(reading) # Print the reading value time.sleep(0.1) # short delay if reading <= 10000: # If reading is less than or equal to 10000 ring.fill((red)) ring.write() elif 10000 < reading < 20000: # If reading is between 10000 and 20000 ring.fill((green)) ring.write() elif 20000 < reading < 30000: # If reading is between 20000 and 30000 ring.fill((blue)) ring.write() elif 30000 < reading < 40000: # If reading is between 30000 and 40000 ring.fill((amber)) ring.write() elif 40000 < reading < 50000: # If reading is between 40000 and 50000 ring.fill((orange)) ring.write() elif reading >= 60000: # If reading is greater than or equal to 60000 ring.fill((white)) ring.write()I have designed a code so that you can use your slider with this ring and it has many more colours than the code for day #7. Check this out on your own one. It uses the same breadboard layout as in the images today.
Importsimport time
from machine import Pin, ADC
from neopixel import NeoPixel Set up the slider on ADC pin 28
potentiometer = ADC)
#Set Up The RGB Ring
Define a few basic RGB colour variablesring = NeoPixel(Pin(2), 12)
red = 255,0,0
green = 0,255,0
blue = 0,0,255
amber = 213, 132, 33
orange = 165,42,42
white = 240,140,255 Create a variable for our reading
reading = 0
while True:
reading = potentiometer.read_u16() # Read the potentiometer value and set this as our ‘reading’ variable value print(reading) # Print the reading value time.sleep(0.1) # short delay if reading <= 10000: # If reading is less than or equal to 10000 ring.fill((red)) ring.write() elif 10000 < reading < 20000: # If reading is between 10000 and 20000 ring.fill((green)) ring.write() elif 20000 < reading < 30000: # If reading is between 20000 and 30000 ring.fill((blue)) ring.write() elif 30000 < reading < 40000: # If reading is between 30000 and 40000 ring.fill((amber)) ring.write() elif 40000 < reading < 50000: # If reading is between 40000 and 50000 ring.fill((orange)) ring.write() elif reading >= 60000: # If reading is greater than or equal to 60000 ring.fill((white)) ring.write()Tom
@Trevor Dodson
Just came back here and saw your comment. I have made the clock repository public. Sorry about that.
https://github.com/FoolishGalatian/LetItGlowDay8Clock
@Trevor Dodson
Just came back here and saw your comment. I have made the clock repository public. Sorry about that.
https://github.com/FoolishGalatian/LetItGlowDay8Clock
David
I fancied using the pot to spin the lights: https://pastebin.com/raw/sM1mAfvc
I fancied using the pot to spin the lights: https://pastebin.com/raw/sM1mAfvc
Em
I got this calendar as a gift and this little ring is by far my favourite piece! Is there a way to rig it up to my pi 4b and/or a code library so I can use it there? I’m thinking maybe a download complete indicator, safe shutdown indicator or just a general blinky hat. It seems a shame to leave it in my bits box! I’m a complete noob so I don’t know what to look for!
I got this calendar as a gift and this little ring is by far my favourite piece! Is there a way to rig it up to my pi 4b and/or a code library so I can use it there? I’m thinking maybe a download complete indicator, safe shutdown indicator or just a general blinky hat. It seems a shame to leave it in my bits box! I’m a complete noob so I don’t know what to look for!
Jason
Hi! Really enjoying these projects, even if I am a little late! I was just wondering if it is possible to start the spinning ring of colour on a button push? i’m having lots of errors trying to work it out myself!
Hi! Really enjoying these projects, even if I am a little late! I was just wondering if it is possible to start the spinning ring of colour on a button push? i’m having lots of errors trying to work it out myself!
Trevor Dodson
@Tom
It appears your repo isn’t public so the code can’t be viewed. Too bad I was interested to see how you implemented the solution. Happy coding!!
@Tom
It appears your repo isn’t public so the code can’t be viewed. Too bad I was interested to see how you implemented the solution. Happy coding!!
Tom
I made a rudimentary clock using 3 LED’s on the ring to represent the hour (green), minute (red), and second (blue) hands on a clock. Since there are only 12 lights on the ring, the second hand updates every 5 seconds and the minute hand updates every 5 minutes, so I would not use it to make your next event, or you might be late.
There are some topics that we have not covered in the Let it Glow! tutorials including in the clock program, so sorry about that, but if you have questions, let me know.
https://github.com/FoolishGalatian/LetItGlowDay8Clock
The Pi Hut
@János Meggyesi – that is SO cool! Thanks for sharing
@János Meggyesi – that is SO cool! Thanks for sharing
János Meggyesi
Hi guys, since i really enjoyed having fun with this LED ring, I have designed a christmas tree lamp based on it. I have created a 3D printable version, you can find it here: https://www.thingiverse.com/thing:6404173. Have fun! :)
Hi guys, since i really enjoyed having fun with this LED ring, I have designed a christmas tree lamp based on it. I have created a 3D printable version, you can find it here: https://www.thingiverse.com/thing:6404173. Have fun! :)
The Pi Hut
@Rob – If you’ve already re-wired and tried new pins, it may be a faulty unit :( Please get in touch via support.thepihut.com and we’ll help with a replacement.
@Rob – If you’ve already re-wired and tried new pins, it may be a faulty unit :( Please get in touch via support.thepihut.com and we’ll help with a replacement.
Rob
Hello, really enjoying the tasks, and I am completely new to all this! I am afraid that I cannot get the ring to light up, even on the first task. I have tried reconnecting everything, and moving the ring to a different part of the breadboard, but no luck so far. Are you able to offer any suggestions?
Many thanks in advance!
Karen
I like your thinking @Chuck, I’ve turned mine around as well – much better.
I like your thinking @Chuck, I’ve turned mine around as well – much better.
Chuck
Having a lot of fun with this day.
I inverted the ring pins and turned it around so the wires were not in the way of the bottom led. Worked a treat! You weren’t kidding about it being bright. I turned it away in a dark room and put it to 255,255,255 and it was like day time!
Having a lot of fun with this day.
I inverted the ring pins and turned it around so the wires were not in the way of the bottom led. Worked a treat! You weren’t kidding about it being bright. I turned it away in a dark room and put it to 255,255,255 and it was like day time!
The Pi Hut
Weekend’s over, let’s reply to your comments!
@Jim – thanks Jim, fixed :)
@Matthew – We tried a few times but it was proving very difficult to get the code examples to format on a page/same page nicely. We don’t remove these articles though, so they will be here when you need them.
@Renan – Hmm that’s odd. The only thing I can think of is if there’s some kind of formatting error or additional character somewhere in the print line. I would suggest opening a new tab and copying over the example again, then trying that. The NeoPixel library is now built into MicroPython so there should be no reason for it to be missing or pulling errors.
@Brew – Odds n’ evens are covered in day #10 :)
@REP – There are some discussions online about this (such as https://forum.micropython.org/viewtopic.php?t=6109), however the built-in library we’re using for our ring doesn’t seem to mention/offer HSV control (here’s a couple of links for that – https://docs.micropython.org/en/latest/esp8266/tutorial/neopixel.html and https://docs.micropython.org/en/latest/library/neopixel.html#module-neopixel)
REP
Hi guys,
Just wondering if there is a way to use HSV within NeoPixel? Can’t seem to find anything online about it.
Cheers
Hi guys,
Just wondering if there is a way to use HSV within NeoPixel? Can’t seem to find anything online about it.
Cheers
Brew
This was a great day, I’ve played with NeoPixels before but always had to resort to the example files to run these kind of effects as I couldn’t work out how to make it all dace. Today I found I was beginning to see and understand where the code was going rather than just copy it out and be I pressed with the result.
I’d like to know how I can make alternate LEDs flash say odds/evens or say every 3 so one could have a r,g,b and then have it step along. Appreciate that’s a bit beyond what one could do in a day of the calendar.
Top work all!
Renan
i keep getting -→
Traceback (most recent call last):
File “”, line 2, in
ImportError: can’t import name NeoPixel
And dont know why
i keep getting -→
Traceback (most recent call last):
File “”, line 2, in
ImportError: can’t import name NeoPixel
And dont know why
Matthew
I’m loving the advent calander this year but I do wish there was a PDF version of the instructions that I could print out and keep.
I’m loving the advent calander this year but I do wish there was a PDF version of the instructions that I could print out and keep.
Jim
small typo in the description of Activity 3, tuning instead of turning
small typo in the description of Activity 3, tuning instead of turning
Graham Hillson
I think this is a really well thought out product. I did some coding on the Pi about year ago, but after a years break Id really forgotten much that I learned, but this has helped me get right back into it. Id like to give a big thanks to the person that wrote the instructions, these are really clear and friendly with a touch go humour. Absolutely ideal for this. Having written technical guides in my dim and distant past, and I know that doing this and getting the information accurate and easy to understand is far from easy. Id like to see PiHut develop these calendars and maybe market bolt ons for other areas, like weather tracking, robots etc. Anyway, great job, thanks
I think this is a really well thought out product. I did some coding on the Pi about year ago, but after a years break Id really forgotten much that I learned, but this has helped me get right back into it. Id like to give a big thanks to the person that wrote the instructions, these are really clear and friendly with a touch go humour. Absolutely ideal for this. Having written technical guides in my dim and distant past, and I know that doing this and getting the information accurate and easy to understand is far from easy. Id like to see PiHut develop these calendars and maybe market bolt ons for other areas, like weather tracking, robots etc. Anyway, great job, thanks
Vife
Excellent ! Epic ! Massive ! I love this ring. I got your fist calendar, so I thought I wouldn’t need this one, but I’m very happy I did buy it.. can’t wait to open this year second one : the 12 projects… thank you for the X-mas magic..
Excellent ! Epic ! Massive ! I love this ring. I got your fist calendar, so I thought I wouldn’t need this one, but I’m very happy I did buy it.. can’t wait to open this year second one : the 12 projects… thank you for the X-mas magic..