

Let it Glow Maker Advent Calendar Day #1: Let's Get Started!
Welcome to day #1 of Let it Glow – your 12-day maker advent calendar packed with blinky stuff and other components to control your blinky things with!
Everyone’s welcome here – absolute beginners, experienced coders and everyone in between. Over the next twelve days this calendar will gently introduce you to the Raspberry Pi Pico, MicroPython and electronics by making fun projects every day!
Don’t panic – our daily guides assume no prior knowledge or experience. We’ll hold your hand along the way and gradually increasing the complexity box by box, re-using the things you learn in the previous ones.
At the end of this calendar you’ll have the skills, reference material and a great selection of fun components to create your own projects with! Welcome to your new favourite hobby!
Getting Started
If you haven’t done so already, whip box #1 out of your snazzy calendar and take out the contents.
You’ll notice this box is larger than most of the others – this allowed us to include everything you need to get set up and ready for the following days.
Box #1 Contents
In this box you will find:
- 1x Raspberry Pi Pico H (with headers pre-soldered)
- 1x 1m Micro-USB cable
- 2x 400-point solderless breadboards

Today’s activity
Today is all about getting you set up with your Raspberry Pi Pico, getting familiar with the board, and running a few light projects to warm you up for the rest of the calendar.
Those of you who completed our 12 days of Codemas Calendar last year will already be familiar with a lot of today’s content, but it’s a great refresher if you haven’t played with your Pico for a while.
What is a Raspberry Pi Pico?
The Raspberry Pi Pico is a powerful, flexible microcontroller board from, you guessed it, Raspberry Pi - the same folks who brought us the Raspberry Pi 5 and Raspberry Pi Zero.
The Raspberry Pi Pico is a different kind of Raspberry Pi though - it's a microcontroller board, not a microcomputer. The brain of the Pico is the RP2040 microcontroller chip, the little black square in the middle.
Whereas you might use a Raspberry Pi 5 (which has an operating system) to play games, write stories and browse the web, the Raspberry Pi Pico is designed for physical computing projects where it can control components such as LEDs, buttons, sensors, motors and even other microcontrollers.
The board has lots of pins around it called GPIO (General Purpose Input Output) pins, which allow you to connect all sorts of components to make projects. These are controlled by code that you write. A map of the Pico's pins is available here.
Don't worry too much about the different pins and labels just yet, we'll be covering this over the next twelve days, linking back to this again and again.

The Pico can use many different programming languages, however the most popular is MicroPython which is what we'll be using.
The board has a Micro-USB port which gives it power and allows it to communicate to our computer for programming. There's a lot more to this little board, but we'll keep to the basics for now.
Isn’t there a Pico W with WiFi/Bluetooth?
Yes there is! The Pico W looks very similar but offers connectivity options for more advanced projects that need to connect to the internet or other devices.
We didn’t include the Pico W in this calendar as beginners won’t need connectivity options whilst learning the ropes, and it also helped to keep the calendar as accessible as possible.
Once you’ve completed the twelve days and have a good understanding of the basics, you may want to look into the Pico W to take your projects further.
Software Setup
We’re going to install software called Thonny, which will allow us to program the Pico with MicroPython.
MicroPython is an smaller, more efficient version of the Python 3 programming language, designed to be used with microcontroller boards such as the Raspberry Pi Pico. If you've programmed with Python previously, MicroPython will feel very familiar - but don't worry - we're going to guide you every step of the way.
Thonny is a Python IDE. An IDE is an Integrated Development Environment. IDEs help us to write code by giving us lots of helpful features to avoid errors, make our code more readable and lots of other benefits.
Note: the screenshots below are from October 2023. The version numbers or appearance may change slightly, but the overall process should remain the same.
Download Thonny
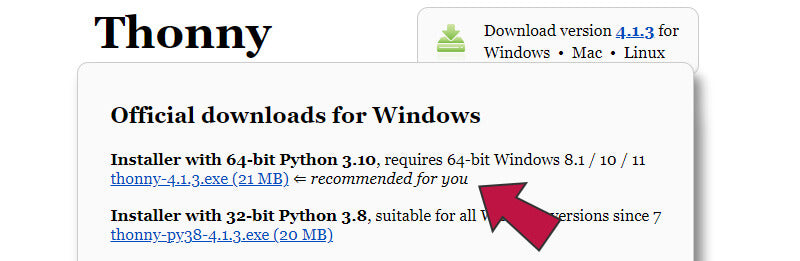
So, let's get Thonny! Head over to https://thonny.org/ and look for this little box:

If you hover over the system you’re using (we’re using Windows in this example) you should see some options, with a recommended option based on the system you’re using.
For us, using a 64-bit version of Windows, it’s recommending the 64-bit version. Your system may be different, so usually it’s best to just go with the version the website recommends:
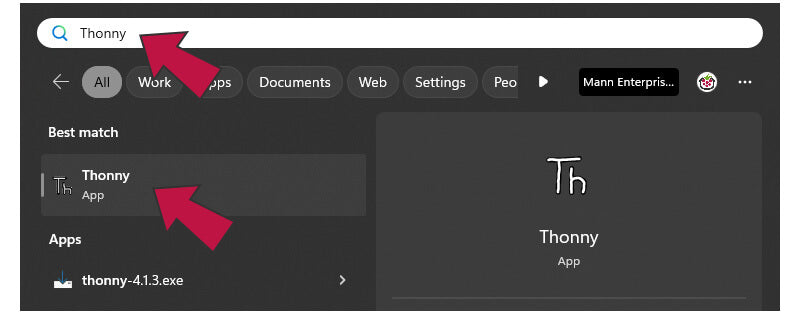
Download the correct version for your computer then open the file to start the installation.
Thonny installs like most programs, and will ask you to accept the license agreement and confirm where to install it. We kept all the options as default and it took just under a minute to install.
Once installed, select ‘Finish’ and then open the program. In Windows 10/11 you can select the Windows Start button and just type in ‘Thonny’:
Install MicroPython on the Raspberry Pi Pico
We now need to install the MicroPython firmware on the Raspberry Pi Pico. This gives the Pico the basic software it needs to run MicroPython code that we'll send to it later.
**Important Note** A handful of customers experienced an issue when using the method we have suggested below (SSL errors and other unfestive nasties).
Give it a try, but if you have trouble installing MicroPython on your Pico, try the other method here instead.
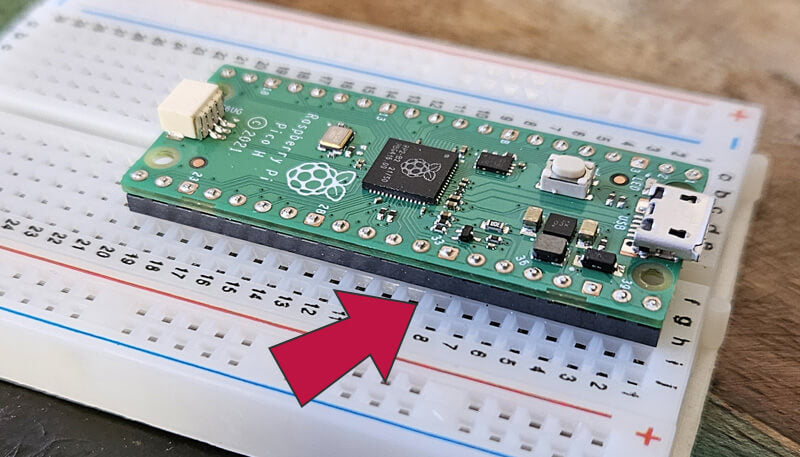
Before we do that, let's fit the Pico into the first breadboard with the USB port at the end where the number 1 is, then plug the Micro-USB cable into the Pico.
Your Pico should be fully inserted so that you can't see any of the metal legs/pins - it can take a wiggle and some firm, even pressure, and this is completely normal with breadboards like these. The black plastic on the underside of the Pico should sit flush with the top of the Breadboard, like this:
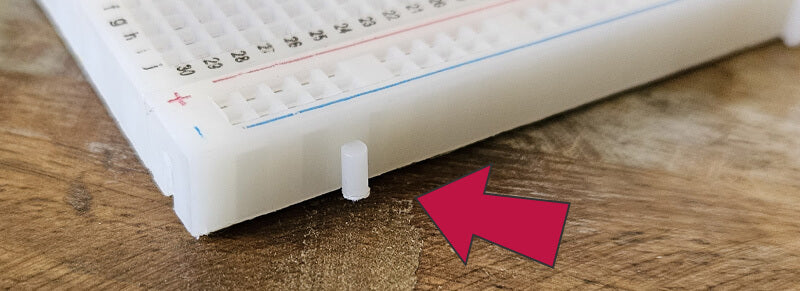
Once your Pico is fitted to the first breadboard, snap the second breadboard on to it to create one, larger breadboard (we join two breadboards like this to give us lots of room for your projects later on).
To do this, locate the little lugs and slots along the edge and simply push them together (a bit of pressure is required here). Make sure the breadboard numbering goes in the same direction.
Now locate the little button on top of your Pico. This is the ‘BOOTSEL’ button which, when held in whilst connecting the cable at the same time, allows us to install different firmware to the Pico:

Hold down that button whilst plugging in the USB cable into your computer’s USB port at the same time. You may see it pop up as a new device on your computer but just ignore that for now.
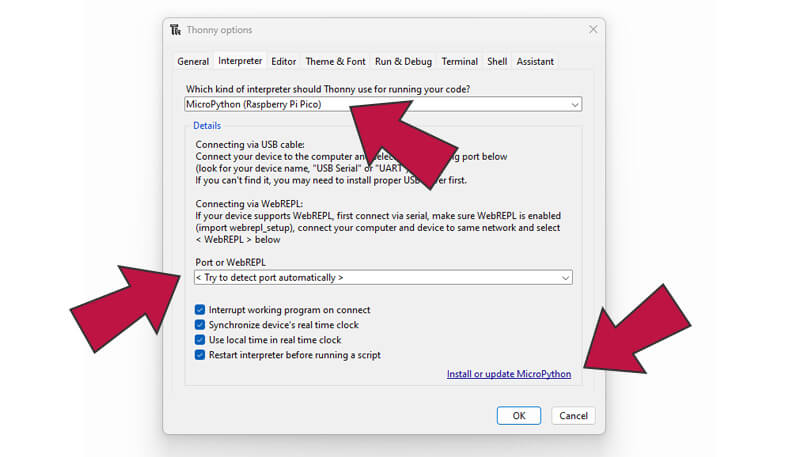
In Thonny, at the bottom-right-hand corner, click the text (the text can vary) and then select 'Configure interpreter':

You’ll now be presented with a dialogue box. Select the same options as per the screenshot below, and then select 'Install or update MicroPython':
A new dialogue box will appear. Select the RPI-RP2 target volume, Raspberry Pi Pico / Pico H variant, and whatever the latest version is available (at the time of writing it was 1.21.0):
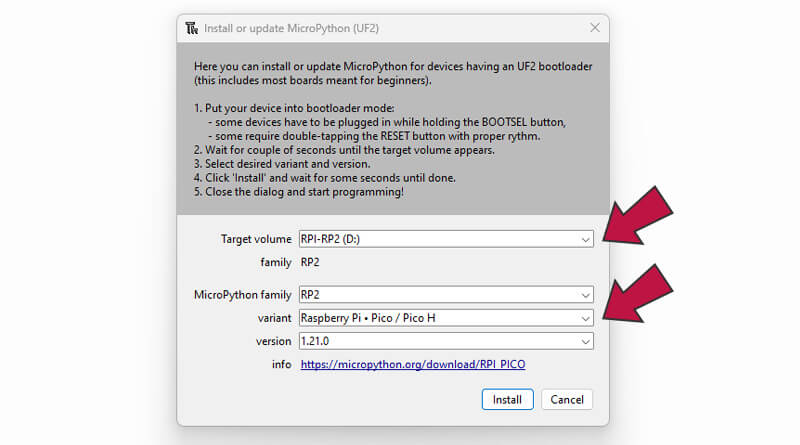
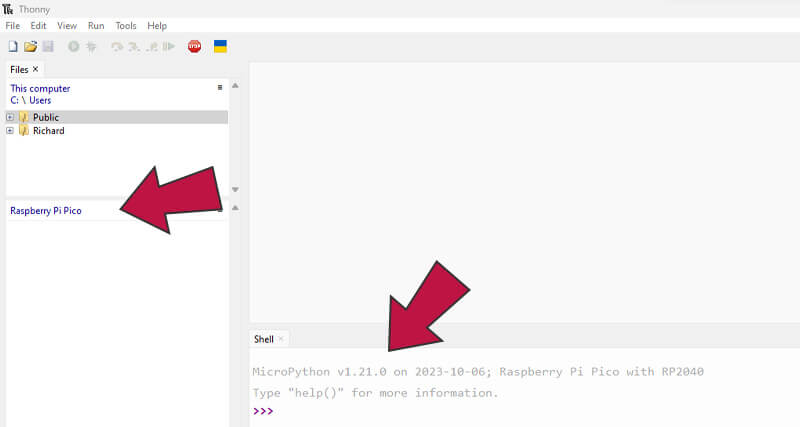
Select ‘Install’ and you’ll see a small progress bar whilst it installs. Once complete, select OK/Close and you should see 'MicroPython (Raspberry Pi Pico)' and a COM port number showing in the bottom-right corner of Thonny like this:

You should now also see a ‘Raspberry Pi Pico’ panel on the left-side of Thonny, and information in the bottom-right 'Shell window', like the example below.
Tip: If you don't see your Pico on the left, or even that panel at all, try selecting 'View' from the top navigation bar, and selecting 'Files'.
That’s the setup out of the way, we’re ready to code!
Activity 1: Hello World!
The first thing we're going to do is get our Pico talking to us. We're going to tell it to print a message to us, specifically "Hello, World" which is a traditional first project for those new to coding.
When we tell the Pico to ‘print’ the words (known as a 'string' of text), they are then displayed in the Shell window (the box at the bottom of Thonny).
The print function is something you’ll use a LOT when programming. It’s a useful tool to see what’s happening with a program, which part of a program is running and can help when fixing problems with projects (debugging).
There are many other built-in functions in MicroPython...we'll be showing you more shortly!
Shell or script?
There are two ways to run this command - directly into the shell window or via a script. But what are these new words, what are the differences, and why would you use one over the other?
Whilst a lot can be said here, let's keep it simple:
- A shell is an interface that allows us to execute commands one at a time. We type in the command, execute it, and the operating system does what we asked it to do.
- A script is a file containing a series of commands (code). The script can then be run which will execute all the commands in order. It's not interactive in the same way as the shell, but you can save your script as a text file (.py) to return to later on.
The majority of projects and activities we'll be doing as part of the calendar will be run in scripts.
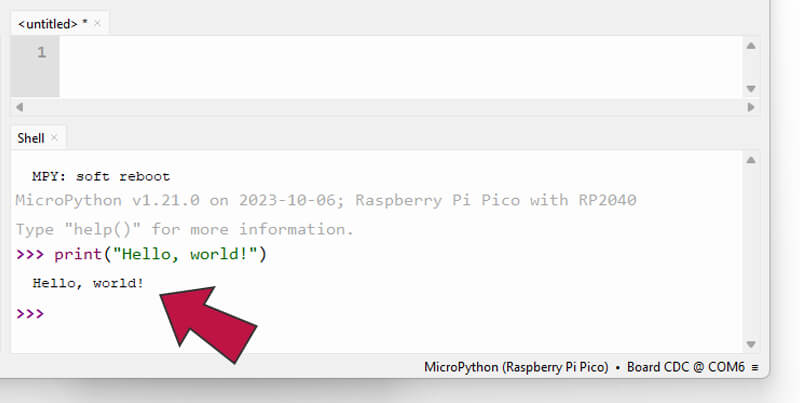
Hello Shell!
In the shell window (the bottom-right window), copy/paste or type in the following line after the >>> and then hit the Enter key on your keyboard.
Tip: all of our code examples throughout this calendar will show a little 'Copy' button on the right when you hover over them. You can click that to copy the code rather than trying to select it all manually.
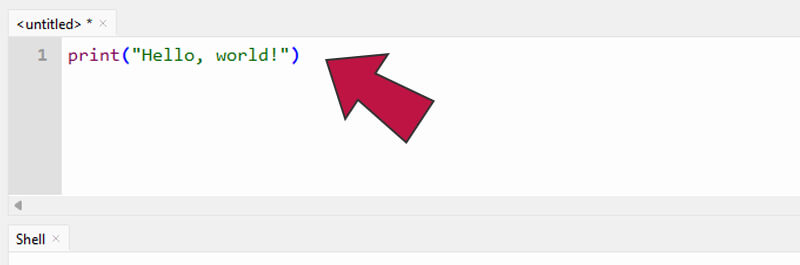
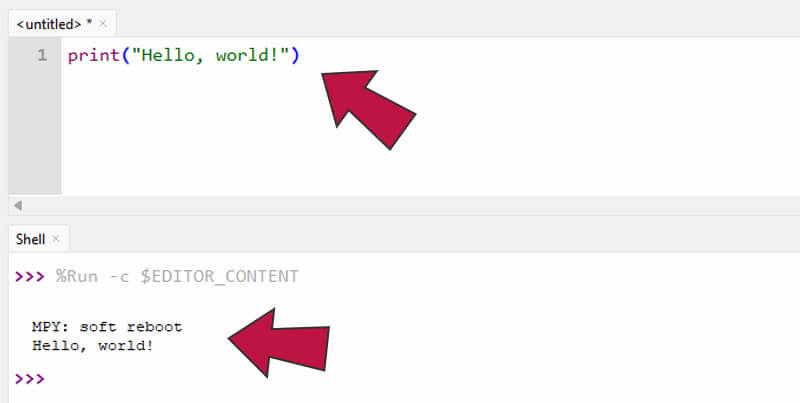
print("Hello, world!")
To confirm, you should be looking at this part of Thonny and have entered the line like as follows:
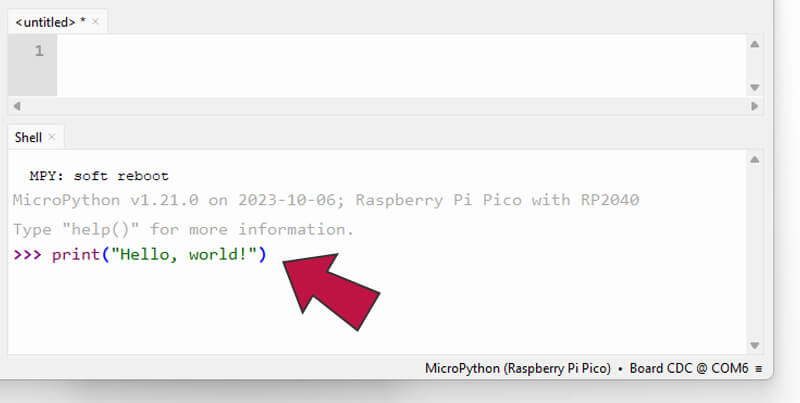
Your shell window will now execute that command, which is to print the string, and should look like this:
Why not try changing the text inside the inverted commas to something else, try your name or similar.
Hello Script!
We've now completed the traditional Hello World exercise by entering a command in the shell window, but what if we want to create a script for that?
It's actually very easy when you just want to do something simple like printing some text - just enter the same line into the box above in Thonny, and then run it using the little green button in the toolbar.
Here is where you enter the code for a script (we'll be doing this a LOT):
And the result/output of our script will show in the Shell windows below it:
Activity 2: Simple Maths in the Shell
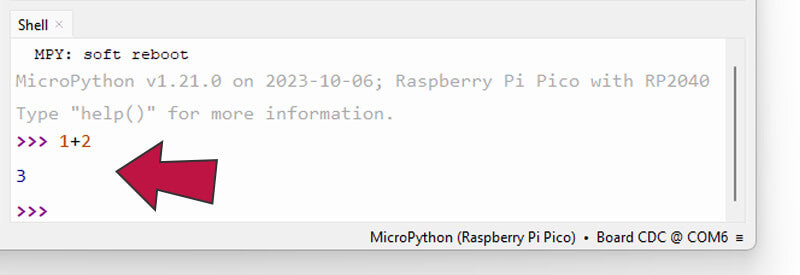
Let's come back to the Shell window for a moment and play with some maths. Numbers are a common theme in coding, used in many ways from counting numbers to time delays to display coordinates and much more.
We can use the Shell window to crunch numbers for us, in the same way we would in our code/script.
Basic Maths
Let's try a simple one to start - enter 1+2 in the shell window and hit enter. You will see 3 as the result below the command you entered, like the example image below.
What you're doing here is using an an operator (the +) with two values (the numbers):
More Maths Operators
As you can imagine, there are many more operators for maths and more advanced ways to use them. Let's have a go at a few more:
Try using:
- The minus (-) operator. Enter 5-2 in the shell and hit enter. This is 5 minus 2, which will display a result of 3.
- The divide (/) operator. Enter 10/5 in the shell and hit enter. This is 10 divided by 5, which will display a result of 2.
- The multiply (*) operator. Enter 5*2 in the shell and hit enter. This is 5 multiplied by 2, which will display a result of 10.
We get it...this doesn't seem like fun yet, but we want you to get the hang of how the shell, scripts and some other basics work before we work on the fun stuff in the next 11 boxes. It's laying the foundations for some of the code we're going to be writing later on.
Activity 3: Onboard LED
Now that we're set up and know our way around Thonny, let's do a bit of blinky!
Whilst today's box didn't include any blinky bits to code with yet, there is a little LED built into the Raspberry Pi Pico that we can code to light up and flash.
This LED is internally connected to GPIO 25. This pin isn't one of the physical pins available around the edge of the board.
We can tell our program to turn this pin on and off whenever we like, which is a nice easy first hardware project and can be handy as an indicator for your own projects later on. This is the beginning of getting your code to control physical things!
Inputs and outputs
Our GPIO pins (the green ones from the pin map) can be set as inputs or outputs.
- We use inputs when we want something to send signals/voltage in to the Pico, like a button or a sensor
- We use outputs when we want the Pico to send signals/voltage out to something else, like LEDs or buzzers.
We’re going to use an output here, which will send voltage to the onboard LED to light it up.
Imports
Take a quick glance at the first line of the example code below. When we write code in Thonny, a lot of the time we need to add imports at the start.
Imports bring in code from other places (called 'modules' or 'classes') that we need to make our program work. Usually these are from built-in modules.
To use the GPIO pins, we always need to import Pin.
The Code
Take another look at the example below. So, what is it doing?
- The first line imports ‘Pin’ from the 'machine' module on the first line, which simply allows us to use the GPIO pins.
- The second line is setting up one of the pins to allow us to use it in our code. This sets up GPIO25 with the name ‘onboardLED’. We use Pin.OUT at the end there to tell MicroPython to set this pin as an output.
- The third line then finally sets that pin value to ‘1’ which is HIGH (on). 1 is always used for HIGH (on) and 0 is used for LOW (off).
from machine import Pin
onboardLED = Pin(25, Pin.OUT)
onboardLED.value(1)
Copy that code to your top-right panel, then hit the green run button. The LED should light up – hooray – you’ve controlled your first physical component!
Now try changing the 1 to a 0 - run the code again and it should turn the LED off. You can also try adding a print line at the bottom to show a message at the same time, like this:
from machine import Pin

onboardLED = Pin(25, Pin.OUT)
onboardLED.value(1)

print("Light on")
Notice we added some spaces between the lines to help with readability. This is perfectly fine to do and comes in handy when your code starts to grow arms and legs!
Day #1 Recap
It’s official, you’re now a maker! So what did we cover?
- Raspberry Pi Pico introduction
- Installing and setting up Thonny
- Basic MicroPython usage
- Shell usage
- Script usage
- Simple maths in Thonny
- Imports
- Controlling the Pico's onboard LED with code
- The Print function
Now, get some rest and a good night’s sleep. Tomorrow we will continue the fun with day #2 (no peeking).


27 comments
Enda
My daughter who is in her final year of a Masters in Robitic Engineering at Plymouth was excited for me . I have a green light . I perdict a deathstar by end of day 12 .
My daughter who is in her final year of a Masters in Robitic Engineering at Plymouth was excited for me . I have a green light . I perdict a deathstar by end of day 12 .
The Pi Hut
@Patrick- Awesome, glad you’re up and running 👍
@Patrick- Awesome, glad you’re up and running 👍
Patrick
After I manually mounted the Pico, I was able to install MicroPython using the Thonny UI. Not sure what I was doing wrong before, but I’m happily up and running!!
After I manually mounted the Pico, I was able to install MicroPython using the Thonny UI. Not sure what I was doing wrong before, but I’m happily up and running!!
The Pi Hut
@Patrick – have you tried the alternative method documented here – https://www.raspberrypi.com/documentation/microcontrollers/micropython.html#drag-and-drop-micropython?
Just make sure you’re using the correct UF2 file (you want the ‘Pico’ version – not the Pico 2 or Pico W) and give that a try.
@Patrick – have you tried the alternative method documented here – https://www.raspberrypi.com/documentation/microcontrollers/micropython.html#drag-and-drop-micropython?
Just make sure you’re using the correct UF2 file (you want the ‘Pico’ version – not the Pico 2 or Pico W) and give that a try.
Patrick
First of 2025? Off to a bad start, unfortunately. Can’t load software either way. Pico shows up as a device, so it’s alive, but no joy loading from Thonny and drag and drop seems to transfer the files, device disappears, no micropython in Thonny on reconnect. On Linux. It all worked last year with the other one. I’ll keep trying (tomorrow)
First of 2025? Off to a bad start, unfortunately. Can’t load software either way. Pico shows up as a device, so it’s alive, but no joy loading from Thonny and drag and drop seems to transfer the files, device disappears, no micropython in Thonny on reconnect. On Linux. It all worked last year with the other one. I’ll keep trying (tomorrow)
The Pi Hut
@David – We usually ‘pince’ the Pico on either side (along the pins) and wiggle it out a little at a time. Whilst it feels very ‘stuck’ in the breadboard, they do come out once you start lifting, and we’ve never managed to break a development board when removing from a breadboard. Go forth with confidence :)
@David – We usually ‘pince’ the Pico on either side (along the pins) and wiggle it out a little at a time. Whilst it feels very ‘stuck’ in the breadboard, they do come out once you start lifting, and we’ve never managed to break a development board when removing from a breadboard. Go forth with confidence :)
David
We found out on day#2 that we seated the Pi at the wrong end of the breadboard.
This means breadboard numbers don’t match Pi pin numbers. facepalm
I’d like to correct this rather than proceeding through the rest of the days in this state.
The Pi did require firm pressure to seat. I’m not confident about getting it out to reseat it.
Any advice?
Giles
@paddy if the chromebook already has vscode then my instructions should work for getting the Pico extension working: https://github.com/gilesknap/pico-xmas/tree/main
@paddy if the chromebook already has vscode then my instructions should work for getting the Pico extension working: https://github.com/gilesknap/pico-xmas/tree/main
Shaffy
Took me 3 days to do day one due to a niece that would not sit still when trying to explain what is what.
But her face lit up when the LED came on. :-)
Took me 3 days to do day one due to a niece that would not sit still when trying to explain what is what.
But her face lit up when the LED came on. :-)
Penny
great tutorial very easy and simple to use although had to start with sudo (like Paddys comment above!) – Penelope aged 10 going on 12.
great tutorial very easy and simple to use although had to start with sudo (like Paddys comment above!) – Penelope aged 10 going on 12.
paddy
Great. Struggled through with thonny (on ubuntu, needs to be started with `sudo` to access port) but as Giles says it would be much nicer to use vscode, which is already installed.
Great. Struggled through with thonny (on ubuntu, needs to be started with `sudo` to access port) but as Giles says it would be much nicer to use vscode, which is already installed.
Giles
@Charles Holding
For Chromebook you could give vscode a go. It works great on Linux and apparently can be installed on a Chromebook https://chromeunboxed.com/how-to-install-visual-studio-code-on-a-chromebook/
@Charles Holding
For Chromebook you could give vscode a go. It works great on Linux and apparently can be installed on a Chromebook https://chromeunboxed.com/how-to-install-visual-studio-code-on-a-chromebook/
The Pi Hut
@Brew – That’s a good suggestion, it’s on the list for this evening’s edits. Thanks
@Brew – That’s a good suggestion, it’s on the list for this evening’s edits. Thanks
Giles
Hi All,
I’m updating my GitHub project from last year to include new ideas for the 2023 Let It Glow calendar.
Take a look at https://github.com/gilesknap/pico-xmas/tree/main for the following:
- details on working with Linux (but Linux not required)
- details on using vscode instead of Thonny for a much more functional coding experience
- some additional code to try out some of the more advanced features of Micro Python with the Let It Glow hardware
- last years ideas for code for the 12 Days of Codemas
Charles Holding
Bought the calendar for my children.
I had to find an alternative to Thonny for their Chromebooks, as you can’t install Linux apps on managed devices.
Tried tinkerdoodle.cc first, which works ok but I’ve found the serial terminal a bit flakey which makes debugging challenging.
Have now moved to an Micro REPL android app, https://play.google.com/store/apps/details?id=micro.repl.ma7moud3ly&pcampaignid=web_share, which seems to work well and would also be suitable for development on a tablet (with a suitable OTG adapter).
Brew
Loving this, I confess I didn’t join the breadboards as I was not sure of which side, are we going long or adjacent? So a little drawing would have helped. Spoiler alert I waited for day 2 before joining.
Top work team!
Loving this, I confess I didn’t join the breadboards as I was not sure of which side, are we going long or adjacent? So a little drawing would have helped. Spoiler alert I waited for day 2 before joining.
Top work team!
RichardF
The Thonny software on my Linux Mint box is somewhat older than the one linked in the instructions (3.3.14 rather than 4.something) and it doesn’t have the same panes, but the process worked okay, with a couple of minor issues.
The Pi Pico doesn’t mount as a USB device when initially connected. It appears in the file manager, but isn’t mounted until clicked on. Until this happens Thonny has no idea it is there. Took a bit of fiddling, but that is part of the fun.
Pleasing getting the light to come on, and to go off again.
Roll on day 2…
Rb Box
If anybody is having difficulty joining the breadboards, remove a tiny bit of the adhesive tape on the back to clear the 3 slots and slide the two together down rather than trying to force them together.
If anybody is having difficulty joining the breadboards, remove a tiny bit of the adhesive tape on the back to clear the 3 slots and slide the two together down rather than trying to force them together.
Lenard G
I got the calendar for our son who has always been amazed by light things, so this is a very good hit with him. I trial ran the Pico setup using a Pico W I have for myself. Was a bit confused when the Pin(25, Pin.OUT) did not work there (need Pin(“LED”, Pin.OUT) for the W). Did not realize the onboard led was controlled differently on the W version. Of course this is not a problem when getting the calendar itself, but I wonder if you guys want to add a footnote or something if someone tries to follow along with the Pico W?
I got the calendar for our son who has always been amazed by light things, so this is a very good hit with him. I trial ran the Pico setup using a Pico W I have for myself. Was a bit confused when the Pin(25, Pin.OUT) did not work there (need Pin(“LED”, Pin.OUT) for the W). Did not realize the onboard led was controlled differently on the W version. Of course this is not a problem when getting the calendar itself, but I wonder if you guys want to add a footnote or something if someone tries to follow along with the Pico W?
Ian Grey
Great fun yesterday, took me two goes to get microPython across having to use the alternative method but nuked and tried again later and it worked fine when I followed the instructions more carefully.
I took a guess as to which side to clip the second breadboard (1 in 4 chance) and got it wrong! (Revealed on day 2).
Dave Payne
Maybe worth a mention that the reference to the COM port is Windows-specific. On my Mac I see “/dev/cu.usbmodem” and I’d expect something similar for Linux
Maybe worth a mention that the reference to the COM port is Windows-specific. On my Mac I see “/dev/cu.usbmodem” and I’d expect something similar for Linux
The Pi Hut
@Terry Mitchell – Yes the guides will stay online :)
@Terry Mitchell – Yes the guides will stay online :)
David Brain
Yeah, I got the SSL problem.
I had a bit of a panic when the direct transfer didn’t seem to register the first time either, and I couldn’t get the device to respond, but some plugging and unplugging of USB cables eventually got it to work, and I now have little green LED coming on and going off as instructed.
SIMON
Loving this. Really enjoyed the day 1 project with the kids. I suspect I had more fun than them.
Loving this. Really enjoyed the day 1 project with the kids. I suspect I had more fun than them.
Simon H
That was good fun. Now have a working Pico attached to my repurposed Ubuntu PC. Looking forward to day 2
That was good fun. Now have a working Pico attached to my repurposed Ubuntu PC. Looking forward to day 2
Kirian
print(“Hello everyone!”
print(“Thank you for that lovely Advents-calendar”
print(“Hello everyone!”
print(“Thank you for that lovely Advents-calendar”
Terry Mitchell
Hi, my daughter bought me the blinky lights advent calendar which I have just completed day 1. Unfortunately I will not have internet access next week, can you please confirm all instructions will be available for a couple of weeks?
Hi, my daughter bought me the blinky lights advent calendar which I have just completed day 1. Unfortunately I will not have internet access next week, can you please confirm all instructions will be available for a couple of weeks?