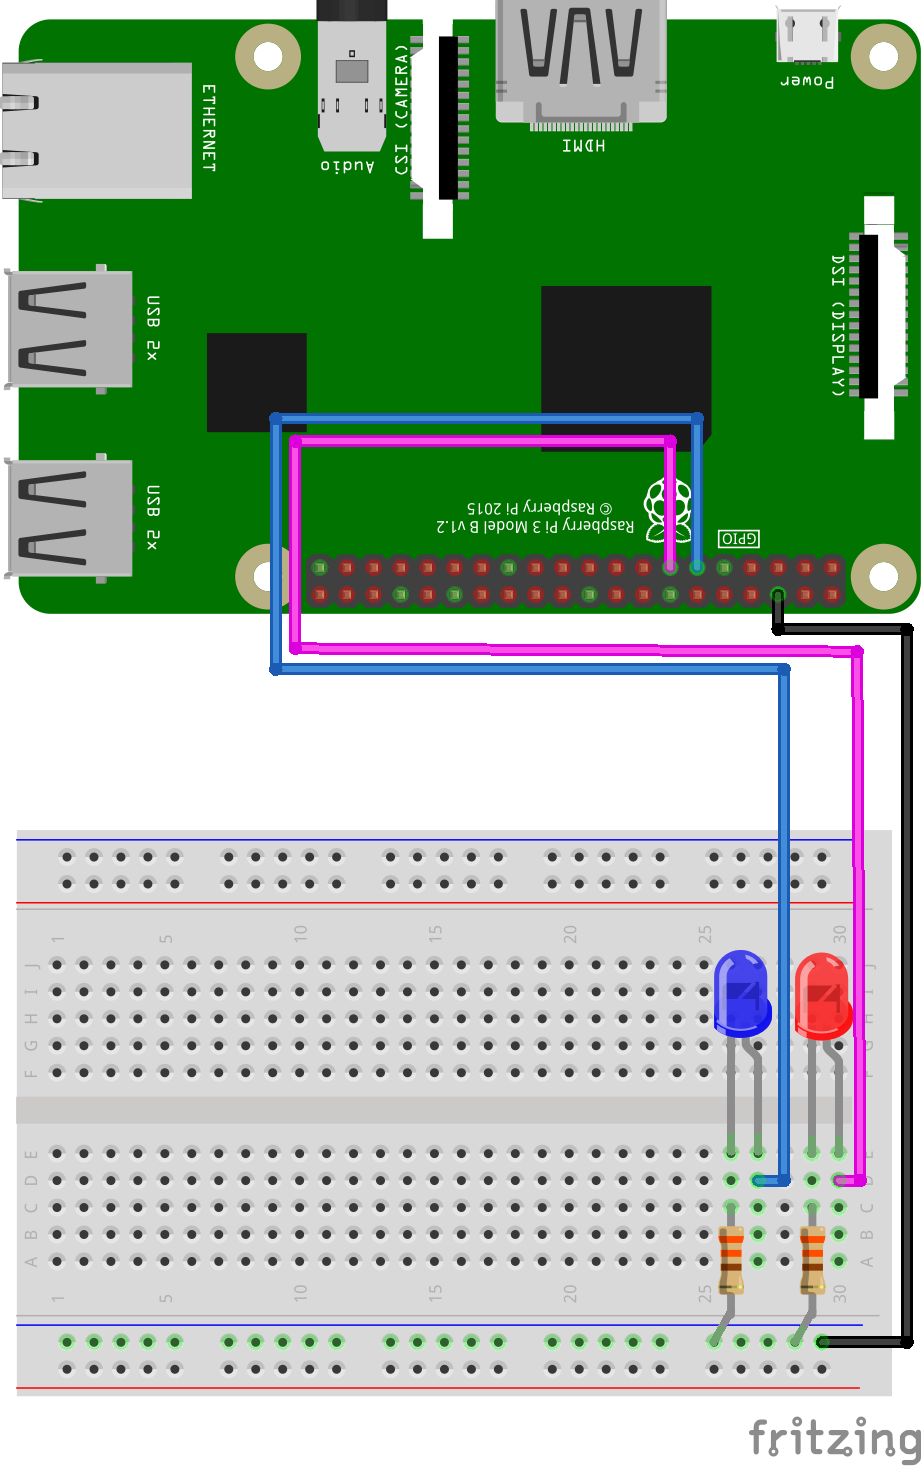
GPIO and Python (2/9) - LEDs
In this project you’ll learn how to turn on and off a LED
Things you will need:
Raspberry Pi + SD Card
Keyboard + Mouse
Monitor + HDMI Cable
Power Supply
Breadboard
1x Red LED
1x Blue LED
2x 330? Resistor
3x M/F Jumper Wire
Prerequisites:
Latest version of Rasbian installed on your SD Card
Raspberry Pi setup with a keyboard, mouse and monitor

1. Change the current directory to our gpio_python_code directory:
cd gpio_python_code

2. Start by creating a file for our led on script
touch 2_on.py

3. Then create a file for our led off script
touch 2_off.py

4. Edit the 2_on.py file using nano 2_on.py and add the following code
#!/usr/bin/python


import RPi.GPIO as GPIO # import a library


GPIO.setmode(GPIO.BCM) # set the pin numbering system to BCM


GPIO.setup(17,GPIO.OUT) # set GPIO17 as an OUTPUT

GPIO.setup(27,GPIO.OUT) # set GPIO27 as am OUTPUT


print "Lights on" # print to the screen so we know what’s going on


GPIO.output(17,GPIO.HIGH) # set GPIO17 high, 3v3 will now be active on that pin

GPIO.output(27,GPIO.HIGH) # set GPIO27 high, 3v3 will now be active on that pin

5. Exit and save the file, CTRL+x, Y, enter
6. Edit the 2_off.py file using nano 2_off.py and add the following code
#!/usr/bin/python


import RPi.GPIO as GPIO # import a library


GPIO.setmode(GPIO.BCM) # set the pin numbering system to BCM


GPIO.setup(17,GPIO.OUT) # set GPIO17 as an OUTPUT

GPIO.setup(27,GPIO.OUT) # set GPIO27 as am OUTPUT


print "Lights off" # print to the screen so we know what’s going on


GPIO.output(17,GPIO.LOW) # set GPIO17 low, 3v3 will now be de-active on that pin

GPIO.output(27,GPIO.LOW) # set GPIO27 low, 3v3 will now be de-active on that pin
7. Exit and save the file, CTRL+x, Y, enter
8. To turn your LEDs on, execute your 2_on.py script:
sudo python 2_on.py

You might see some warnings, for the sake if this tutorial you can ignore these.
They are just letting you know that the GPIO pins used in the script, may have already
been configured.
8. To turn your LEDs off, execute your 2_off.py script:
sudo python 2_off.py

You’ll probably see some warnings, for the sake if this tutorial you can ignore these.
They are just letting you know that the GPIO pins used in the script, may have already
been configured.


