Cluster HAT Case Assembly Guide
How to assemble our Cluster HAT Case for Raspberry Pi 4
What You'll Need:
1. The laser-cut parts of the case are protected by an adhesive film which needs to be removed before assembly (this is *very* therapeutic), simply peel it off.

2. Using the screws, attach the smaller 5mm m/f stand-offs to the bottom plate of the case.

3. Place your Raspberry Pi 4 Model B on top of these stand-offs with the SD card above the SD cutout and attach the 12mm m/f standoffs.

4. Place your Cluster HAT on top of your Raspberry Pi, be very careful to line up the GPIO pins correctly so that they are not bent. Then add the 35mm f/f standoffs. Now you can also add your Raspberry Pi Zero boards to the Cluster HAT.

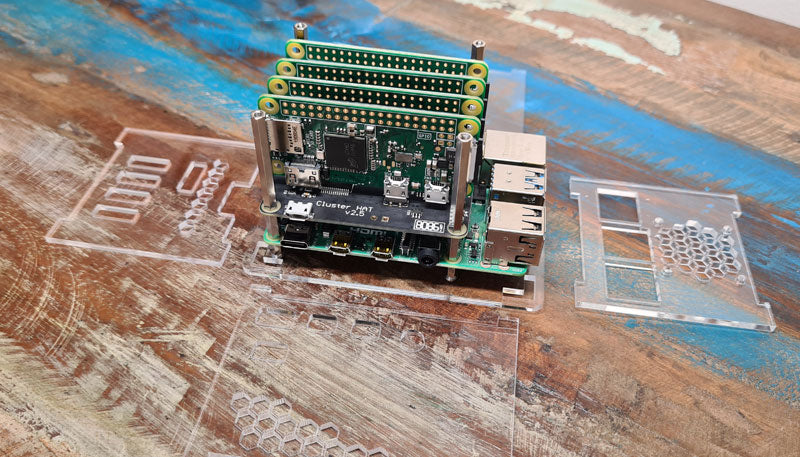
5. Pit stop! Here's a handy photo to show you how the side panels will slot together.

6. Finally, slot the side panels in place and drop the lid on top. Secure with the remaining four screws. be careful not to over tighten.

Viola! Case complete!
NOTE: Acrylic is a hard and stiff plastic which is sensitive to stress concentrations and shares a certain level of fragility with glass. Acrylic can scratch easily and should be cleaned with a mild solution of dish detergent and warm water. Never use cleaners unsuitable for acrylic. Never use a dry, abrasive cloth.


4 comments
John
Hello, is it possible to include how to install the fan?
Hello, is it possible to include how to install the fan?
John Porter
Yay, the fan cable barely reaches the port! That’s a lot of tension on those tiny wires!
Yay, the fan cable barely reaches the port! That’s a lot of tension on those tiny wires!
Kyle S
I second the ‘please include how to install the optional fan’. It is obvious where it is installed in the case, but it isn’t obvious which connector the wires are connected to.
The fan that is linked to in the case product page doesn’t have a sufficiently long wires.
https://www.pishop.us/product/5v-cooling-fan/
Tony Brack
Could you update this to include (optional) fan installation? It isn’t clear how to do this cleanly.
Regards,
Tony
Could you update this to include (optional) fan installation? It isn’t clear how to do this cleanly.
Regards,
Tony