
Raspberry Pi Plant Pot Moisture Sensor with Email Notification Tutorial
Today, we’ll be showing you how to use a moisture sensor and a Raspberry Pi to send you an email notification when your plant needs watering! Very useful if you're forgetful of your houseplants, but of course can be expanded exponentially for those with very green fingers!
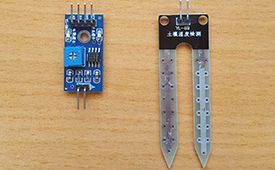
The sensor board itself has both analogue and digital outputs. The Analogue output gives a variable voltage reading that allows you to estimate the moisture content of the soil (using some maths!). The digital output gives you a simple "on" or "off" when the soil moisture content is above a certain value. The value can be set or calibrated using an adjustable on board potentiometer. In this case, we just want to know either "Yes, the plant has enough water" or "No, the plant needs watering!", so we'll be using the digital out. We'll set this value later at which you want the sensor to "trigger" a notification.
First things first, you will need:
- Raspberry Pi (Any model will do, we’ll be using a Zero in this demonstration)
- Moisture Sensor
- Something to stick the probes into (We will be using a plant)

Let’s start by wiring up the probes to the sensor. Simply connect the two pins on the probe to the side of the sensor that only has 2 pins. It doesn’t matter which way round the wires go.

Now let’s wire the sensor to the Raspberry Pi.
VCC --> 3v3 (Pin 1)
GND --> GND (Pin 9)
D0 --> GPIO 17 (Pin 11)


With everything now wired up, we can turn on the Raspberry Pi. Without writing any code we can test to see our moisture sensor working. When power is applied you should see the power light illuminate (with the 4 pins facing down, the power led is the one on the right).

When the sensor detects moisture, a second led will illuminate (with the 4 pins facing down, the moisture detected led is on the left).
So as a quick test, grab a glass of water (be very careful not to spill water!!) then place the probes into the water and see the detection led shine!

If the detection light doesn’t illuminate, you can adjust the potentiometer on the sensor which allows you to change the detection threshold (this only applies to the digital output signal)
Now we can see our sensor working, it’s time to calibrate it for your specific use.
In this example we want to monitor the moisture levels of our plant pot. So we want to set the detection point at a level so that if it drops below we get notified that our plant pot is too dry and needs watering. Our plant here, is a little on the dry side, but ok for now, if it gets any drier it’ll need watering.

I’m going to adjust the potentiometer to a point where the detection led just illuminates. As soon as I reach the detection point, I’ll stop turning the potentiometer. That way, when then moisture levels reduce just a small amount the detection led will go out.

That’s the sensor now calibrated, now it’s time to write some code using the digital output of the sensor!

The way the digital output works is, when the sensor detects moisture, the output is LOW (0V). When the sensor can no longer detect moisture the output is HIGH (3.3V).
We've written a script that sends us an email when the sensor can no longer detect moisture e.g. the pin goes high!
The script can be downloaded here. There's a few variables that need editing, for example you need to define the email address server etc.
If you want to do this directly on your Raspberry Pi, you can clone the git like so:
git clone git://github.com/modmypi/Moisture-Sensor
If you have downloaded the script, you will need to extract the zip file. To do this, you will need to make sure you have unzip installed:
sudo apt-get install unzip
Then unzip the file:
unzip master.zip
Then change your working directory to the location of the moisture.py script:
cd Moisture-Sensor-master
If you have git cloned, you will need to change the current working directory to the location of moisture.py, do this like so:
cd Moisture-Sensor
Now we need to make a few changes within the script, so open the script up in an editor:
nano moisture.py
Have a read through the comments in the script, and edit the various variables that have been defined.
To run the script simply run the following command from the same directory as the script:
sudo python moisture.py
So, if you've set all your variables, up and your potentiometer is set to the correct value, your Raspberry Pi will now email you when your plant's water is running dry!
To test, just set your potentiometer to high, and check your inbox!


7 comments
The Pi Hut
@John – Yes this is an older tutorial (from way back in 2017) and the world has moved on to Python3 now. Updating our older tutorials is on our radar, we’ll be cracking on with that when we have some folks spare to work on them.
@John – Yes this is an older tutorial (from way back in 2017) and the world has moved on to Python3 now. Updating our older tutorials is on our radar, we’ll be cracking on with that when we have some folks spare to work on them.
John
Just realized all this python code is outdated its Python2 so utterly useless as a tutorial i think???
Just realized all this python code is outdated its Python2 so utterly useless as a tutorial i think???
John W
I’m also having all sorts of issues with the python code i can detail all teh errors, but before i do that is there anywhere that i can down load the latest updated version of the python script please.
Also, how critical is it to successsfully clone the Git hub to the RPi as i times out with unable to download from Git, which is strange i can access GIT via my browser on the same machine.
Currently trying to run on RPi5 and Bookworm
Thanks
Elden Garrett
I’ve figured this out as of 20th of December, 2022.
KIP was correct that you should run the smptObj = smtplib.SMTP_SSL(smtp_host, SMTP_port) line. This is done in the first line of the try block within the sendEmail function.
This still wasn’t solving my problem.
Upon further investigation, I was trying to send an email from a Gmail account, which requires SMTP AUTH permissions. The way this is done at 20th December 2022, is to enable a device-specific password access to SMTP authorisation.
Go to your Gmail account security: https://myaccount.google.com/security
Within “Signing in to Google”, go “App passwords”.
This is where you can generate a new Mail password to be used by your Pi. The password will be used in the smtp_password line towards the beginning of the program.
smtp_port used was 465.
I never figured out how I could get this to work for a microsoft outlook account, but the issue was also to do with SMTP AUTH.
I hope this helps someone else trying to do this project in the future!
Elden Garrett
KIP would you please be able to elaborate where these lines of code should go in the script? I think I’m having the same problem as you.
KIP would you please be able to elaborate where these lines of code should go in the script? I think I’m having the same problem as you.
KIP
I earlier reported that I couldn’t get this to work. After some investigation of manuals I have found I needed to add SSL coding viz to smptObj = smtplib.SMTP_SSL(smtp_host, SMTP_port)
Maybe more discussion of where to find readable manuals and potential differences in set up woudl help.
Great, low cost project, many thanks.
KIP
Can’t get the email to work. Instead I get Error: unable to send email
Using the outgoing server info smtp.livemail.co.uk and port 465
any suggestions?
Can’t get the email to work. Instead I get Error: unable to send email
Using the outgoing server info smtp.livemail.co.uk and port 465
any suggestions?