

Let it Glow Maker Advent Calendar Day #6: See the RGB!
It’s day #6 of the Let it Glow Maker Advent Calendar!
Today is another blinky day and it's time to go multicolour with addressable RGB LEDs! The chunky LEDs in today's box can show different colours based on our code, which is just a whole lotta fun!
We need to pay special attention to wiring these up as they have four different-sized legs, and the way we code them is different, but it's day #6 and you're totally ready for this!
Let’s get started!
Warning: Some of today's activities contain fast flashing lights which may not be suitable for those with photosensitive epilepsy.
Box #6 Contents
In this box you will find:
- 2x 10mm RGB addressable LEDs
- 6x Male to male jumper wires
Today’s Activities
Today we’re going to learn how to use addressable RGB LEDs, how to wire them up code them and show different colours.
First, let's talk a bit more about what these special LEDs are...
What are Addressable RGB LEDs
The LEDs in your box are Addressable LEDs. These are are a special kind of LED that actually contain three small LEDs inside each one - one red, one green and one blue, which we mix to create lots of different colours with our code.
This is why it's called an RGB LED - Red, Green, Blue! We'll talk more about that in a moment.
Each of these LEDs has a tiny controller chip inside that allows us to address (talk to) them individually in our code. However, because of this, they need a microcontroller to tell them what to do.
With lots of these LEDs (or in other formats such as very long strips) you would usually have to worry about external power, resistors and other technicalities, however running just a couple of these means we don't need to worry about these distractions. We will be powering it them from a different pin this time though, the VBUS pin (physical pin 40) as this will provide the full 5V these LEDs need rather than the 3.3V pin we've used so far with standard LEDs.
Construct the Circuit
As always, make sure your Pico is disconnected from the USB cable when working on the circuit.
Prepare the breadboard
Clear the board! We're going to start fresh today without any other components or wires in our way, as this will be a day focussed purely on learning how to control RGB LEDs.
We're also going to be using some jumper wires from previous days.
Fit one LED
Each of your RGB LEDs has 4 legs. You'll notice that the legs are different lengths, which is by design to help us identify which is which.
Here's a map of the legs:
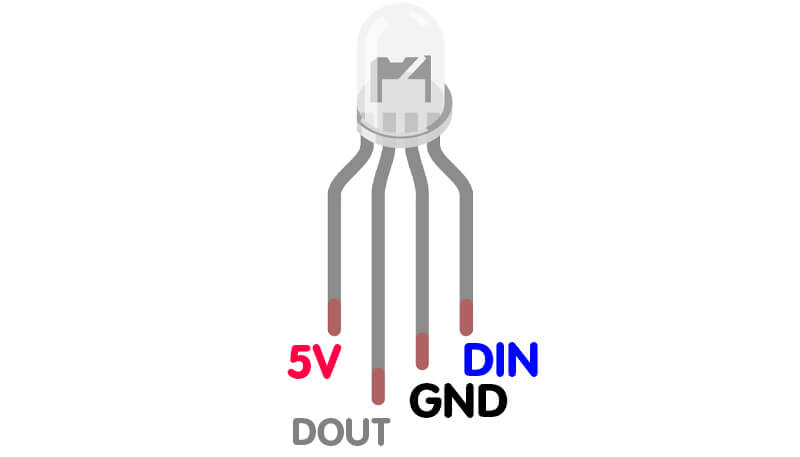
- Leg 1 = 5V
- Leg 2 = Data OUT (longest leg)
- Leg 3 = Ground
- Leg 4 = Data IN
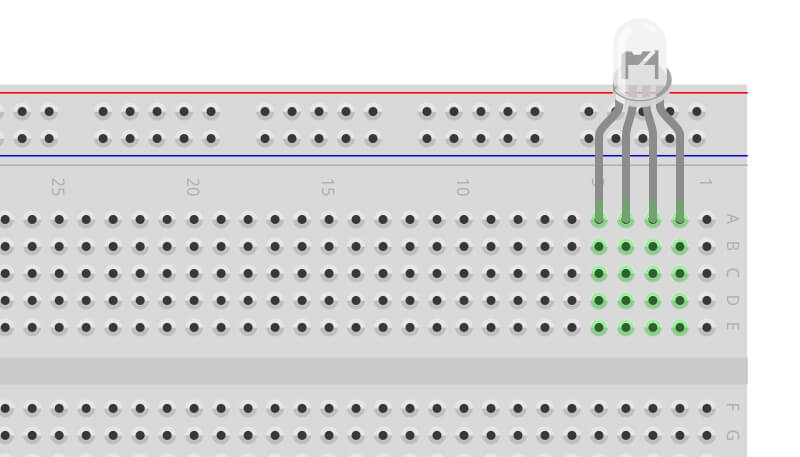
We're going to fit just one LED to start with, then add the other one later.
Fit the LED into your breadboard with the legs running from 1-4 (left to right). It can be a little tricky because the legs are different lengths - just take your time and don't force anything too much.
Your breadboard should look something like this:
Create Power Rails
Create a 5V power rail
Before we wire our LEDs, we're going to create a new power rail for 5V (VBUS) as we only have one of these VBUS pins on the Pico (we're going to need two of them when we introduce the other LED later on).
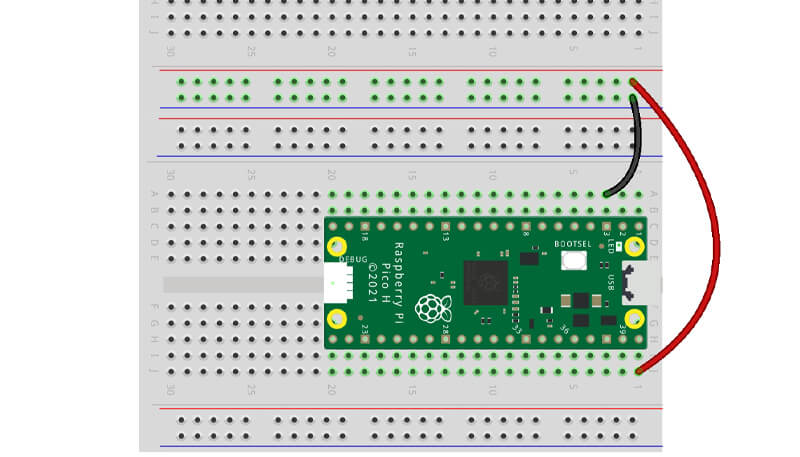
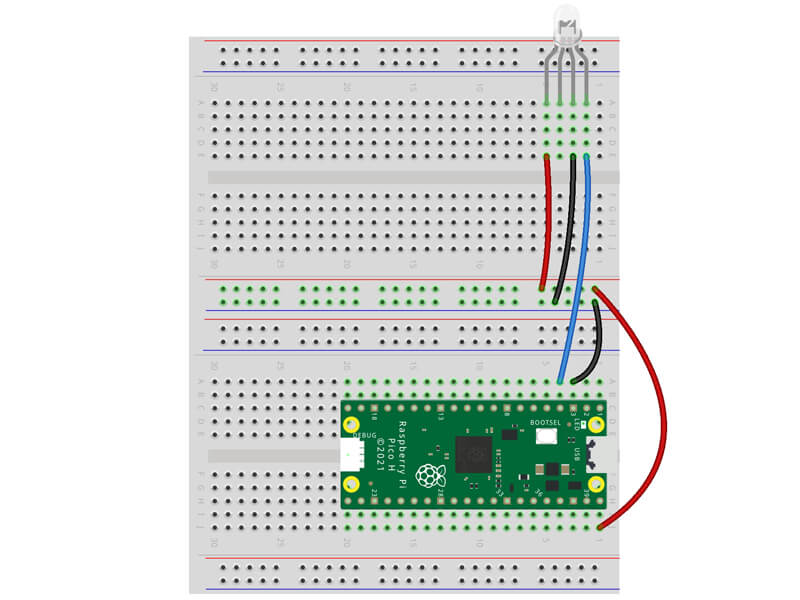
Grab a jumper wire and plug one end into VBUS on the Pico (physical pin 40), and connect the other end to the red power rail, like the image below.
Create a GND rail
Let's create a GND rail as well whilst we're at it. Connect the GND pin on physical pin 3 to the blue rail. Your rails should look like this:
Connect the LED pins
Time to wire up our LED:
- Connect leg #1 (the leftmost leg) to the 5V red rail
- Connect nothing to leg #2
- Connect leg #3 to the GND rail
- Connect leg #4 to GPIO2 (physical pin 4)
Your breadboard should look something like this:
Activity 1: Single colour test
We'll start with a simple test to make sure everything's wired up and working as it should, whilst also gently introducing the library we use for these LEDs. We're simply going to make our LED light up blue, and then turn off.
These LEDs can show lots of different colours as they are RGB LEDs - so let's cover that first...
What is RGB?
RGB stands for Red Green Blue - it's a colour system used in computing to display colours on a computer display.
The three colours can be combined to show a huge range of different colours. With RGB each of the three colours can be set to an intensity value between 0 and 255. As each of the three colours has 255 possible different intensity values, technically there are 16777216 possible colour combinations (although your eyes probably wouldn't notice the difference between a lot of these when they're used with LEDs).
RGB and LEDs
How does this relate to our RGB LED? Well, as we mentioned earlier, inside each of these clever LEDs are three smaller LEDS - one red, one green and one blue.
We send code to the LED to set the RGB intensity value for each internal LED allowing it to mix and show different colours. Cool huh?!
We're using GRB!
Whilst RGB is the general term used for these kinds of multicolour LEDs, they can come in a number of formats, and one of the is GRB.
You may have already guessed what this means - our LED's colour order is Green Red Blue i.e. GRB!
What does this mean for us? It just means the colour positions are different in our code. For example red, which is usually 255,0,0 (because it's all Red and none of the other colours) we need to swap the first two numbers around:
- RGB red is 255,0,0
- GRB red is 0,255,0
Our LEDs are also weird!
Despite testing samples before ordering thousands of these LEDs for our calendars, our supplier seemed to send us different LEDs that act...well...different!
Whilst they work in the circuit and we can make them show the main G, R and B colours as expected, they don't seem to mix standard colours correctly when we try colour codes that use more than one of the LEDs at a time (we're still scratching our heads on this one!).
To get around this, we've tested and listed colour codes for you in the example code below, so you still get lots of colours to play with, without having to worry about anything!
The Code
Our example code imports 'neopixel' which is the name of the library included in MicroPython to drive these kinds of addressable LEDs.
To set the LED up, we set the pin number for the LED (GPIO2) and the number of LEDs connected to this pin - just 1. We can now refer to it using 'GRBled' in our code.
To then send this instruction/data to the LED, we use GRBled.write(). This part is important - nothing will happen until we write the data!
In the example below, we use GRBled.fill((0,0,255)) to set the colour. The numbers in the rounded brackets are for the GRB value - we're using 0,0,255 which is blue at the brightest intensity.
Copy the example below over to Thonny, run the code, then try the following tasks to get the hang of things:
- Try changing the 255 to 10, what happens? It should reduce the intensity
- Try changing the GRB value to 150,0,0 - what happens? It should change the colour to green at ~medium intensity
# Imports
import time
from machine import Pin
from neopixel import NeoPixel

# Define the LED pin number (2) and number of LEDs (1)
GRBled = NeoPixel(Pin(2), 1)

# Fill the LED with blue (GRB)
GRBled.fill((0,0,255))

# Write the data to the LED
GRBled.write()
Activity 2: Multiple Colours
Let's show you a few tricks to help you manage colours a little easier, then we can move on to some really fun stuff!
Your program currently uses the GRB values to set a colour, but when you're looking back and reviewing your code it can be difficult to remember what colour each set of numbers relates to. A better way is to create colour variables with the colour's name.
Colour variables
We've used variables already, so you might have already guessed what we're going to do here.
We're going to add variables for lots of different colours. We can then use these colours in our code to easily change the colour by just using the colour's name - such as GRBled.fill((red)).
All we're doing here is 'injecting' the GRB colour code from a saved variable, we just need to create the variables before we try to use them.
The Code
Give the code below a try and then try changing the colour name in the brackets to one from our variables. The example below starts with 'green':
# Imports
import time
from machine import Pin
from neopixel import NeoPixel

# Define the LED pin number (2) and number of LEDs (1)
GRBled = NeoPixel(Pin(2), 1)

# Define some GRB colour variables
white = 240,140,255 #White-ish!
red = 0,255,0
green = 255,0,0
blue = 0,0,255
yellow = 255,175,150
orange = 238, 223, 105
pink = 150,150,200
purple = 40,100,255
iceblue = 150,25,200
unicorn = 175,150,255
bogey = 215, 100, 0

# Fill the LED with a colour variable
GRBled.fill((green))

# Write the data to the LED
GRBled.write()
Activity 3: Colour cycling
We now have a bunch of colours we can use, but we're not really making the most of that...yet!
We're now going to make things a little more interesting by creating a loop that cycles our LED through each of our colours. We'll use the things you've already learnt to far - lists, a while loop, variables and the range function!
We simply start a while loop, then inside that we start a for loop (remember the range function from day #2?).
The for loop says "for every colour in the list, do the following". The code inside that for loop is simply filling the LED with each colour from the list one after the other.
We use for colour in colours: but you may recall from day #2 that it doesn't matter what we enter here - we could use for i in colours:, for c in colours: or even for teddybear in colours: !
OK, copy the code below over and try it out. It's kinda festive!
# Imports
import time
from machine import Pin
from neopixel import NeoPixel

# Define the LED pin number (2) and number of LEDs (1)
GRBled = NeoPixel(Pin(2), 1)

# Define some GRB colour variables
white = 240,140,255 #White-ish!
red = 0,255,0
green = 255,0,0
blue = 0,0,255
yellow = 255,175,150
orange = 238, 223, 105
pink = 150,150,200
purple = 40,100,255
iceblue = 150,25,200
unicorn = 175,150,255
bogey = 215, 100, 0

# Define our colour list
colours = [white, red, green, blue, yellow, orange, pink, purple, iceblue, unicorn, bogey]

while True:

    for colour in colours:

        GRBled.fill((colour))

        GRBled.write()

        time.sleep(0.1)
Activity 4: GRB value range
Another way to play with colour is to tell your code to iterate over the GRB values. Each GRB value runs from 0 to 255, so we can use that in a for loop to make some cool effects!
Fading is a popular option here. We can make our colour codes run from 0 (OFF) to 255 (highest intensity), with a very short time delay to give the effect of fading in and out.
Our code includes a for loop, using for i in range(255): which is going to run from 0 to 255 each time it runs over the loop. Once it gets to the end of the range (255) the code will exit the for loop, and as this is all in a while True loop, it'll start all over again.
We then use i as one of the GRB colour codes, so that it uses that ever-changing value when setting the GRB colour. Give it a try!
# Imports
import time
from machine import Pin
from neopixel import NeoPixel

# Define the strip pin number (2) and number of LEDs (1)
GRBled = NeoPixel(Pin(2), 1)

while True:

    for i in range(255):

        GRBled.fill((i,0,0))

        GRBled.write()

        time.sleep(0.005)
Reversy percy!
What if we wanted the LED to fade back out again rather than jumping from 255 straight back to 0?
All we'd need to do is run another for loop after the first one, but tell it to work backwards through the numbers. Remember the reversed function we used way back in box #2? We're using that again, and we also changed the colour for the fade out so that it runs from green to red.
The for loop code block is almost identical, we just change the first line to for i in reversed (range(255)): - like this:
# Imports
import time
from machine import Pin
from neopixel import NeoPixel

# Define the strip pin number (2) and number of LEDs (1)
GRBled = NeoPixel(Pin(2), 1)

while True:

    for i in range(255): # Changes i by +1 each loop, from 0 to 255

        GRBled.fill((i,0,0)) # Uses the i value as the G in GRB

        GRBled.write()

        time.sleep(0.005) # Very short delay

    for i in reversed (range(255)): # Changes i by -1 each loop, from 255 to 0

        GRBled.fill((0,i,0)) # Uses the i value as the R in GRB

        GRBled.write()

        time.sleep(0.005) # Very short delay
Activity 5: Second LED and light passing
Now that you know how to use RGB LEDs, let's wire up the second one to allow you to display two colours at once (and whatever sequence you feel like coming up with).
Fit the LED to another free space on your breadboard (ideally near the first one with a gap between them), then follow the same wiring instructions as above with a different GPIO pin for the data IN connection.
Note: We're not going to daisy-chain these LEDs using the data IN/OUT legs as we just have two of them (and these particular LEDs don't seem to play nice with that).
Your breadboard should look like this after you've added the additional LED and wired it up. We've used GPIO5 (physical pin 7) for data:

Light passing!
Let's get our LEDs passing light to each other! We're using similar code to the last activity, with a few tweaks and changes.
Firstly, to use both RGB LEDs at the same time we need to set up each LED separately with a different GPIO pin number (like you did with the bar graph display previously).
Then, similar again to the bar graph, we just need to reference the different LED names in our code. We're using GRBled1 and GRBled2 for this.
The only other big difference is between the for loops we set the first LED to RGB colour 0,0,0 which turns it off. This helps give the impression that the light has 'jumped' to the other LED.
Copy it over to Thonny and give it a try for yourself:
# Imports
import time
from machine import Pin
from neopixel import NeoPixel

# Define the RGB LEDs
GRBled1 = NeoPixel(Pin(2), 1)
GRBled2 = NeoPixel(Pin(5), 1)

while True:

    # First LED fades in
    for i in range(255):

        GRBled1.fill((i,0,0))

        GRBled1.write()

        time.sleep(0.005)

    #Turn off the first LED
    GRBled1.fill((0,0,0)) # All zero = no light!
    GRBled1.write()

    # Second LED fades out (using reversed)
    for i in reversed (range(255)):

        GRBled2.fill((i,0,0))

        GRBled2.write()

        time.sleep(0.005)
Day #6 Complete!
You now have some fun RGB LEDs to play with, and a lot of tools to make them flash and dance however you want them to. We highly recommend just having a play if you have spare time this afternoon - see what sequences and colour patterns you can come up with.
There is more to cover on addressable LEDs...watch this space...
Recap time - today you have:
- Learnt about RGB colours, what it stands for, and how it works with electronics/code
- Learnt about RGB LEDs (and how some of them are GRB!)
- Created a circuit with GRB LEDs
- Learnt how to use the popular 'neopixel' library
- Re-used skills from previous days, such as:
- Lists
- Range function/for loops
- Variables
- While loops
- Reversed function
Tomorrow we jump back to a control component - something we can use in conjunction with our blinky bits to make a cool project with...we'll find out what it is bright and early in the morning...
Have a great evening, see you tomorrow!
We used Fritzing to create the breadboard wiring diagram images for this page.


34 comments
Astorec
Love the wee LEDS for this, looked into making them random colours on both so they fade in and out together. Kinda wish the tutorial showed that for the Random colours selection, that’s what I thought it might of gone into for the array of all the colours.
This is the While true I’ve got setup on mine if other people want to give it a check out. Need to have each colour defined and the array of colours:
while True:
Pick a random colour for each nodecolor1 = random.choice(colours)
color2 = random.choice(colours) Have them fade in and out together.
for i in range(101): We use 100 here to gauge the brighness untill we get to 100% brightness on each node
brightness = i / 100.0 Calulate the brightness for each value and set it to fill
GRBled1.fill((int(color10 * brightness), int(color11 * brightness), int(color12 * brightness)))
GRBled2.fill((int(color20 * brightness), int(color21 * brightness), int(color22 * brightness))) send it to each node
GRBled1.write()
GRBled2.write() time.sleep(0.01) time.sleep(0.5) same as before but we do it in reverse
for i in range(100, -1, -1):
brightness = i / 100.0 GRBled1.fill((int(color10 * brightness), int(color11 * brightness), int(color12 * brightness))) GRBled2.fill((int(color20 * brightness), int(color21 * brightness), int(color22 * brightness))) GRBled1.write() GRBled2.write() time.sleep(0.01)
A.J.
Do you have datasheet for these addressable RGB (or GRB) LEDs?
Do you have datasheet for these addressable RGB (or GRB) LEDs?
The Pi Hut
@Shaun @Alex – Sorry about that. Please send us a quick message via support.thepihut.com and they will help you with that.
@Shaun @Alex – Sorry about that. Please send us a quick message via support.thepihut.com and they will help you with that.
Alex
Opened the box but the 2 LEDs are nowhere to be found :(
Do I just submit a support request?
Opened the box but the 2 LEDs are nowhere to be found :(
Do I just submit a support request?
Shaun
Hi,
I’m really enjoying coding through the tutorials and seeing the project come to life! However, one of my RGB LED’s has arrived broken, please could I get a replacement sent out?
Kind regards,
Shaun
Hi,
I’m really enjoying coding through the tutorials and seeing the project come to life! However, one of my RGB LED’s has arrived broken, please could I get a replacement sent out?
Kind regards,
Shaun
The Pi Hut
A.J. – They’re readily available, however strips and rings always get the most attention and are far more common. We get these from the same supplier as our other WS281X products. The pinout ordering is a little different, but it’s still the usual DIN/DOUT/5V/GND pins like any other WS281X LED.
A.J. – They’re readily available, however strips and rings always get the most attention and are far more common. We get these from the same supplier as our other WS281X products. The pinout ordering is a little different, but it’s still the usual DIN/DOUT/5V/GND pins like any other WS281X LED.
A.J.
I’ve used strips and arrays of these before but never individual LEDs that look just like the ubiquitous common cathode/anode RGB LEDs. Where did you find these, especially with this curious pinout? All I’ve found have DIN on one end and DOUT on the other.
I’ve used strips and arrays of these before but never individual LEDs that look just like the ubiquitous common cathode/anode RGB LEDs. Where did you find these, especially with this curious pinout? All I’ve found have DIN on one end and DOUT on the other.
The Pi Hut
Steve – We’re sending serial data from the GPIO pin (a stream of 1s and 0s) into the DIN (data in) pin on the LED, which talks to the tiny controller chip inside the LED. That controller knows what to do with this data and can set each of the internal red/green/blue LEDs to the colours we have asked for.
If we have multiple addressable LEDs in a row, once the first LED has done its job, it passes the data to the next LED in line via their DOUT (data out) pin, and so on and so on.
GPIO pins on the Pico can communicate digital signals, analogue signals, serial data and more, both as inputs or outputs, with lots of clever things on top of that, such as built-in pull-up resistors – they’re very versatile!
There’s even PIO (Programmable I/O) allowing you to turn pins into whatever you need them to do. It’s an advanced topic and not covered in the calendar for that reason, but you can read more here: https://www.raspberrypi.com/news/what-is-pio/
Steve
At a physical layer what is the GPIO pin sending to the GRB led? Does it send three distinct values (representing the G, R, B values) in sequence and the GRB LED ‘knows’ to wait until it has received three values? Perhaps the PICO sends one value to ‘represent’ the 3 GRB values in the code? This leads on to what is a GPIO pin capable of outputting? Maybe I should google it myself!
At a physical layer what is the GPIO pin sending to the GRB led? Does it send three distinct values (representing the G, R, B values) in sequence and the GRB LED ‘knows’ to wait until it has received three values? Perhaps the PICO sends one value to ‘represent’ the 3 GRB values in the code? This leads on to what is a GPIO pin capable of outputting? Maybe I should google it myself!
9 yo Coder's Mum
Hello my son wanted to leave a message…
For fading out, I worked out that instead of using ‘for i in reversed (range(255)):’ you can also just use ‘-i’ in ‘GRBled.fill((i,0,0))’ so the code would look like this:
import time
from machine import Pin
from neopixel import NeoPixel
GRBled = NeoPixel(Pin(2), 1)
while True:
for i in (range(255)): GRBled.fill((-i,0,0)) GRBled.write() time.sleep(0.005)Hello my son wanted to leave a message…
For fading out, I worked out that instead of using ‘for i in reversed (range(255)):’ you can also just use ‘-i’ in ‘GRBled.fill((i,0,0))’ so the code would look like this:
import time
from machine import Pin
from neopixel import NeoPixel
GRBled = NeoPixel(Pin(2), 1)
while True:
for i in (range(255)): GRBled.fill((-i,0,0)) GRBled.write() time.sleep(0.005)Fellow Programmer
I Experimented with the code and made the color “unicorn” (Basically 175, 150, 255) fade out in a fun way. This is the code:
Importsimport time
from machine import Pin
from neopixel import NeoPixel Define the RGB LEDs
GRBled1 = NeoPixel(Pin(2), 1)
GRBled2 = NeoPixel(Pin(5), 1)
while True:
First LED fades infor i in range(255): GRBled1.fill((i,150,255)) GRBled1.write() time.sleep(0.005) #Turn off the first LED GRBled1.fill((175,150,255)) # All zero = no light! GRBled1.write() Second LED fades out (using reversed)
for i in reversed (range(255)): GRBled2.fill((i,150,255)) GRBled2.write() time.sleep(0.005)
prettypoly
I’m just curious why the DOUT pin does not seem to work? I have tried to connect the first LED’s DOUT to the second LED’s DIN, and used the following code and a single GPIO pin of the pico:
Initialize NeoPixel for 2 LEDsGRBleds = NeoPixel(Pin(2), 2)
while True:
Turn LED1 ON (Green) and LED2 OFFGRBleds0 = (255, 0, 0)
GRBleds1 = (0, 255, 0)
GRBleds.write()
time.sleep(1) Turn LED1 OFF and LED2 ON (Red)
GRBleds0 = (0, 0, 0)
GRBleds1 = (0, 0, 0)
GRBleds.write()
time.sleep(1)
This NeoPixel control code should be correct according to https://docs.micropython.org/en/latest/esp8266/tutorial/neopixel.html
But I could not get this to work.
Is this more of a hardware issue (did I miss any components, i.e., resistor between DIN and DOUT?) or a software issue (NeoPixel implementation in Micropython for pico does not support this)? Any idea?
Dan
Today I realised that you can set the NeoPixel.ORDER tuple so that you can interact with these LEDs in RGB mode, for better compatibility with later components. Not sure if this works for all configurations but it worked for me using a Visual Studio Code environment.
my_light = NeoPixel(…)
my_light.ORDER = (0, 1, 2, 3)
Default order is (1, 0, 2, 3) – set as above to address using RGB!
Adam Bryant
Just got around to getting back to this and I cant get the LED to operate and I have even tried new wires.
Just got around to getting back to this and I cant get the LED to operate and I have even tried new wires.
Jose Forest
Do you have the datasheet for that LED or at least the manufacturer part number ?
Do you have the datasheet for that LED or at least the manufacturer part number ?
David
Engage Pedantic Mode.
You want `range(256)` in place of `range(255)`. `range(256)` goes from 0…255.
Similarly(?), “As each of the three colours has 256 possible different intensity values”.
My 7 year only son and I are having great fun with these. Thank you!
Engage Pedantic Mode.
You want `range(256)` in place of `range(255)`. `range(256)` goes from 0…255.
Similarly(?), “As each of the three colours has 256 possible different intensity values”.
My 7 year only son and I are having great fun with these. Thank you!
Dave L
@brad @josh gordon
I managed to get it running, threw it up on github if you care to see what I did. Few things, missing () from the fill lines, were 2 should have been three. Change up the randint reference order as well to GRB vice RGB, not sure it would make any difference though in reality.
https://github.com/noisytwit/Let-It-Glow/blob/main/RGB%20LED%206.py
Brad
@Josh Gordon – Amazing, glad it’s not just me! I tried to show someone else the bizarre print fix and by the time I did, it had started working without it. So I was concerned it was some fever dream.
When it was working without the print command, it was embedded within some larger code, so at least it isn’t just printing numbers on a screen that fixes it. I’ve still got no idea what happened though.
Josh Gordon
@Brad – it looks like we encountered the same problem and the same weird fix at the same time! Your comment was not there when I started typng mine, but was after I submitted it.
@Brad – it looks like we encountered the same problem and the same weird fix at the same time! Your comment was not there when I started typng mine, but was after I submitted it.
Josh Gordon
@Michael
I tried your code, and for some reason it only lights up one LED, when the second one should light up neither does. For some reason putting print(led) in the code seems to fix it. Any ideas why? I don’t understand why printing the result of ‘led’ should affect the rest of the code.
for i in range(24):
r = random.randint(0,255)
g = random.randint(0,255)
b = random.randint(0,255)
led = random.randint(0,1)
print(led)
leds[led].fill((g,r,b))
leds[led].write()
time.sleep(0.5)
time.sleep(0.5)
GRBled1.fill((0,0,0))
GRBled1.write()
GRBled2.fill((0,0,0))
GRBled2.write()
Brad
@Michael – So I ran your code and came across the weirdest issue. Only the first LED is chosen for almost every cycle (I even upped it to range 100 to see it more). At some point towards the end, the second led seems to ‘catch up’ and starts also getting chosen. This happens every time.
But then here’s the weird bit … I added a print (led) command immediately after the led randomiser line. And suddenly everything works fine! Removing it makes it not work again. Does the code require the little timing break after the random selection? Someone explain this to me!
The Pi Hut
@Mark – Thanks, updated!
@Sean Burlington – Voltage-wise they’re 5V and we’re giving them 5V so there should be no issues there. Could be a bad pack you have – if you can fire a quick message to your support guys via support.thepihut.com they will help with that.
@Mark – Thanks, updated!
@Sean Burlington – Voltage-wise they’re 5V and we’re giving them 5V so there should be no issues there. Could be a bad pack you have – if you can fire a quick message to your support guys via support.thepihut.com they will help with that.
Michael
Some random fun. Surprised this isn’t activity 7. :) Fun to play with.
GRBled1 = NeoPixel(Pin(2), 1)
GRBled2 = NeoPixel(Pin(5), 1)
def act7():
s = 0.25
leds = [GRBled1, GRBled2]
for i in range(24):
r = random.randint(0,255)
g = random.randint(0,255)
b = random.randint(0,255)
led = random.randint(0,1)
leds[led].fill((g,r,b))
leds[led].write()
time.sleep(s)
time.sleep(s)
GRBled1.fill((0,0,0))
GRBled1.write()
GRBled2.fill((0,0,0))
GRBled2.write()
act7()
Sean Burlington
these are behaving very strangely for me – at first I thought one was faulty – swapping them over does seem to change behaviour but not fix it
Are they running close to voltage/current limits ?
I wonder if breadboard resistance is enough to trip them up sometimes ??
these are behaving very strangely for me – at first I thought one was faulty – swapping them over does seem to change behaviour but not fix it
Are they running close to voltage/current limits ?
I wonder if breadboard resistance is enough to trip them up sometimes ??
Mark
I think there are typos in the summary for Day 6 – instead of BRG we’ve been dealing with LEDs that are GRB, not BRG – so you might want to correct this, to avoid confusion
I think there are typos in the summary for Day 6 – instead of BRG we’ve been dealing with LEDs that are GRB, not BRG – so you might want to correct this, to avoid confusion
The Pi Hut
@Bill – We are looking at offering the parts as individual products for those who stumble across these daily guides and want to try one of them. Probably something we’ll look at in January now. We sell some similar products but they won’t be exactly the same.
@Bill – We are looking at offering the parts as individual products for those who stumble across these daily guides and want to try one of them. Probably something we’ll look at in January now. We sell some similar products but they won’t be exactly the same.
Bill
Is it possible to order more of the less used in the advent calendar?
Is it possible to order more of the less used in the advent calendar?
The Pi Hut
@Renan – That’s most likely a wiring issue, or something odd happening with the code. Try removing everything, starting again, and copying the code over fresh.
@Renan – That’s most likely a wiring issue, or something odd happening with the code. Try removing everything, starting again, and copying the code over fresh.
The Pi Hut
@paddy – A fair comment indeed. Whilst we usually lean more towards the “if it works, it works” side of things, this would have improved the code. Something for us to consider next time.
@paddy – A fair comment indeed. Whilst we usually lean more towards the “if it works, it works” side of things, this would have improved the code. Something for us to consider next time.
Renan
Sadly 1 of my led is acting very weird and light up in random letters instead of the green or whatever color is assigned in the code :(
Sadly 1 of my led is acting very weird and light up in random letters instead of the green or whatever color is assigned in the code :(
Richard Smith
Code to offset the second LED by one colour – I had fun tweaking the provide code :)
Importsimport time
from machine import Pin
from neopixel import NeoPixel Define the LED pin number (2) and number of LEDs (1)
GRBled = NeoPixel(Pin(2), 1)
GRBled2 = NeoPixel(Pin(5), 1) Define some GRB colour variables
white = 240,140,255 #White-ish!
red = 0,255,0
green = 255,0,0
blue = 0,0,255
yellow = 255,175,150
orange = 238, 223, 105
pink = 150,150,200
purple = 40,100,255
iceblue = 150,25,200
unicorn = 175,150,255
bogey = 215, 100, 0 Define our colour list
colours = [white, red, green, blue, yellow, orange, pink, purple, iceblue, unicorn, bogey]
colours2 = [bogey, white, red, green, blue, yellow, orange, pink, purple, iceblue, unicorn]
while True:
for colour, mycolour in zip(colours, colours2): GRBled.fill((colour)) GRBled2.fill((mycolour)) GRBled.write() GRBled2.write() time.sleep(0.3)Code to offset the second LED by one colour – I had fun tweaking the provide code :)
Importsimport time
from machine import Pin
from neopixel import NeoPixel Define the LED pin number (2) and number of LEDs (1)
GRBled = NeoPixel(Pin(2), 1)
GRBled2 = NeoPixel(Pin(5), 1) Define some GRB colour variables
white = 240,140,255 #White-ish!
red = 0,255,0
green = 255,0,0
blue = 0,0,255
yellow = 255,175,150
orange = 238, 223, 105
pink = 150,150,200
purple = 40,100,255
iceblue = 150,25,200
unicorn = 175,150,255
bogey = 215, 100, 0 Define our colour list
colours = [white, red, green, blue, yellow, orange, pink, purple, iceblue, unicorn, bogey]
colours2 = [bogey, white, red, green, blue, yellow, orange, pink, purple, iceblue, unicorn]
while True:
for colour, mycolour in zip(colours, colours2): GRBled.fill((colour)) GRBled2.fill((mycolour)) GRBled.write() GRBled2.write() time.sleep(0.3)paddy
This is all fun, and I feel a killjoy for mentioning it. But on the basis that you are trying to get newbies started with coding…
`white = 240,140,255`
is just a (slightly sloppy, but frequently seen) way of writing
`white = (240, 140, 255)`
so later on you are effectively writing
`GRBled1.fill(((240, 140, 255)))`
which IMHO is just too many brackets to make sense to a beginner.
much nicer to see
`GRBled1.fill(white)`
The Pi Hut
@Tom Collis – Oh no, sorry about that. Our support guys will arrange replacements for you, so you’ve already gone via the right route. Thanks.
@Tom Collis – Oh no, sorry about that. Our support guys will arrange replacements for you, so you’ve already gone via the right route. Thanks.
Tom Collis
Loved the previous days, but unfortunately today had the wrong contents. I’ve submitted a support request and I’m sure it will be promptly resolved.
Loved the previous days, but unfortunately today had the wrong contents. I’ve submitted a support request and I’m sure it will be promptly resolved.