

Let it Glow Maker Advent Calendar Day #5: Switch the DIP!
It’s day #5 of the Let it Glow Maker Advent Calendar!
Today we're using a new control component - things that we/our environment can interact with to trigger our code, which can then make our LEDs and other blinky bits light up.
The funny-looking red block in your box today is a 5-way DIP (Dual Inline Package) switch. Similar to the bar graph display in yesterday's box, this compact component is like having five ON/OFF switches in a teeny tiny package.
We can use them with our GPIO pins to select which part of a program runs, including colour, speed and other things, or we can use them in their most basic form as a simple break in a circuit.
Let’s get to it!
Box #5 Contents
In this box you will find:
- 1x 5-way DIP switch
- 5x Male to male jumper wires

Today’s Activities
Today we’re going to learn how to use this DIP switch, including wiring it up to your GPIO pins.
We'll use the five tiny switches to trigger different GPIO pins HIGH and LOW, and show you how to trigger your code using multiple switch positions.
First, let's tell you a little more about today's component...
How does a DIP Switch work?
Like most basic switches, this DIP switch works by simply making or breaking a connection, however it has five different connections in one.
The DIP switch has ten legs, five on both sides. These are in the format of a Dual-Inline Package (DIP) which allows it to be used in our breadboard with legs either side of the central break - great for prototyping projects with, especially when you need lots of switches but you don't have much breadboard space left!
Each switch lever has a leg either side. When you turn each switch on, it connects these two legs - simple.
Whilst the buttons you received in box #3 were momentary (only make the connection when being pushed down), these switches have little levers that set the state to ON or OFF (like a light switch) and stay in that position.
Construct the Circuit
As always, make sure your Pico is disconnected from the USB cable when working on the circuit.
Prepare the breadboard
The starting point for our breadboard will be how we left it yesterday, but we're going to remove the two buttons and their wires but keep the red 3.3V rail wire in place.
If you need to reassemble anything, go back and follow the instructions from the previous day(s) to get things where they should be.
Your starting point should look like this:

Fit the DIP Switch & GPIO wires
We'll fit the DIP switch where the buttons were before we removed them.
Gently push it into the rightmost set of holes, with the middle of the switch straddling the centre break. The legs on these switches aren't as thick as some other components, so don't be too forceful with it.
We'll then connect the lower legs to our GPIO pins. There are five numbered switches in total, so let's use the following pins for each (check the Pico pinout map to find your way):
- Switch 1 = GPIO6 (physical pin 9)
- Switch 2 = GPIO5 (physical pin 7)
- Switch 3 = GPIO4 (physical pin 6)
- Switch 4 = GPIO3 (physical pin 5)
- Switch 5 = GPIO2 (physical pin 4)
Note: The diagrams below show a blue DIP switch but you'll receive a red DIP switch in your box.
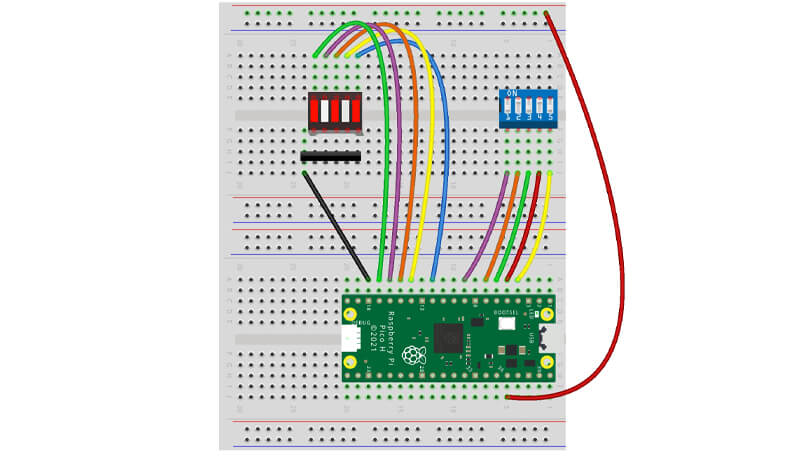
Connect the 3.3V pins
All of the top legs on the DIP switch will be connected to the 3.3V pin, as this is what will set our GPIO pins HIGH when we flick the switches.
You should have the top red rail connected to 3.3V already, so now all you need to do is connect a wire from each of the top legs to that rail. Use the spare jumper wires you have from the previous boxes that you're not currently using:
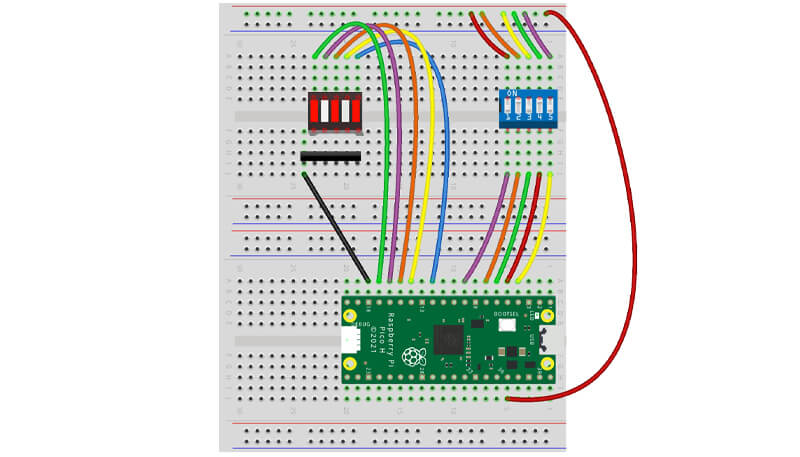
Smell a rat?
Congratulations, it's your first "rat's nest"! That's what us makers call a lot of wires all bunched together like this. It's something that can be difficult to avoid with busy projects.
We've got a lot of wires on our breadboard now, so the final thing you may want to do is just slightly adjust the cables so that they're out of the way of the DIP switch as much as possible, as we'll need to be able to get to it to run our activities.
Activity 1: DIP Switch 'ON' test
Our initial test program will test that our connections are good. We'll run a small program that prints every five seconds to tell us which switches are ON.
This will use everything you've already learnt so far - inputs, pull-downs, if statements and prints. Copy the code over and give it a try by changing the switch positions.
This can be tricky with our big squishy human fingers, so whilst supporting the body of the switch with one hand, us a cocktail stick, wooden skewer or similar pointy-but-not-dangerous item to change the switch positions (ideally not metal!).
If some switches aren't changing when you alter the position of the lever, you likely have a wire loose or fitted incorrectly:
from machine import Pin
import time

# Set up switch input pins
dip1 = Pin(6, Pin.IN, Pin.PULL_DOWN)
dip2 = Pin(5, Pin.IN, Pin.PULL_DOWN)
dip3 = Pin(4, Pin.IN, Pin.PULL_DOWN)
dip4 = Pin(3, Pin.IN, Pin.PULL_DOWN)
dip5 = Pin(2, Pin.IN, Pin.PULL_DOWN)

while True:

    if dip1.value() == 1:
        print("Switch 1: ON")

    if dip2.value() == 1:
        print("Switch 2: ON")

    if dip3.value() == 1:
        print("Switch 3: ON")

    if dip4.value() == 1:
        print("Switch 4: ON")

    if dip5.value() == 1:
        print("Switch 5: ON")

    print("-------------") # Print a divider

    time.sleep(5) # 5 second delay
Activity #2: DIP Switch 'ON or OFF' test
The above test script activity gets the job done, but it's not ideal to have the lines just disappear if the switch isn't on.
We can make our test program output a little more useful by simply adding else statements after each if statement, to tell our program to print something different if the switch isn't on.
Give this updated version of the code a try. You learnt about else statements yesterday so this should be easy to understand.
Note: There may be better (more code efficient) ways to achieve the same outcome, but we're keeping things as simple and clear as possible whilst we continue to learn.
from machine import Pin
import time

# Set up switch input pins
dip1 = Pin(6, Pin.IN, Pin.PULL_DOWN)
dip2 = Pin(5, Pin.IN, Pin.PULL_DOWN)
dip3 = Pin(4, Pin.IN, Pin.PULL_DOWN)
dip4 = Pin(3, Pin.IN, Pin.PULL_DOWN)
dip5 = Pin(2, Pin.IN, Pin.PULL_DOWN)

while True:

    # Switch 1
    if dip1.value() == 1:
        print("Switch 1: ON")
    else:
        print("Switch 1: OFF")

    # Switch 2
    if dip2.value() == 1:
        print("Switch 2: ON")
    else:
        print("Switch 2: OFF")

    # Switch 3
    if dip3.value() == 1:
        print("Switch 3: ON")
    else:
        print("Switch 3: OFF")

    # Switch 4
    if dip4.value() == 1:
        print("Switch 4: ON")
    else:
        print("Switch 4: OFF")

    # Switch 5
    if dip5.value() == 1:
        print("Switch 5: ON")
    else:
        print("Switch 5: OFF")

    # For each loop...
    print("-------------") # Print a divider
    time.sleep(5) # 5 second delay
Activity #3: DIP Switch 'ON or OFF' test - with LEDs
Let's bring our bar graph display back into the code to light up an LED on our display for each switch that's set to the ON position.
We need to bring our LED pin setup block back into our program, and then set each LED segment HIGH (1) or LOW (0) within each if statement.
You should be familiar with LEDs and HIGH/LOW values, so nothing here should be too scary. We've also removed the print lines as we're now using the LEDs for feedback on the switches (feel free to add them back in!).
Give the code below a try and see for yourself:
from machine import Pin
import time

# Set up switch input pins
dip1 = Pin(6, Pin.IN, Pin.PULL_DOWN)
dip2 = Pin(5, Pin.IN, Pin.PULL_DOWN)
dip3 = Pin(4, Pin.IN, Pin.PULL_DOWN)
dip4 = Pin(3, Pin.IN, Pin.PULL_DOWN)
dip5 = Pin(2, Pin.IN, Pin.PULL_DOWN)

# Set up LED pins
seg1 = Pin(13, Pin.OUT)
seg2 = Pin(12, Pin.OUT)
seg3 = Pin(11, Pin.OUT)
seg4 = Pin(10, Pin.OUT)
seg5 = Pin(9, Pin.OUT)

while True:

    # Switch 1
    if dip1.value() == 1:
        seg1.value(1)
    else:
        seg1.value(0)

    # Switch 2
    if dip2.value() == 1:
        seg2.value(1)
    else:
        seg2.value(0)

    # Switch 3
    if dip3.value() == 1:
        seg3.value(1)
    else:
        seg3.value(0)

    # Switch 4
    if dip4.value() == 1:
        seg4.value(1)
    else:
        seg4.value(0)

    # Switch 5
    if dip5.value() == 1:
        seg5.value(1)
    else:
        seg5.value(0)

    # For each loop...
    time.sleep(0.5) # half second delay
Activity #4: DIP Switch Program Selection
We're going to use our DIP switch to select a light pattern program to run on our bar graph display.
Our code will include separate blocks of code which make our display show different patterns. The light pattern that displays will depend on the switch positions on our DIP switch.
To do this we're going to create our own functions, so let's explain what they are first...
What are functions?
Functions are blocks of code that you can create and then call (use) at any time in your program. They're great for projects like this where we want our program to allow us to select which pattern (block of code) to run.
We can also use functions to run repeated blocks of code and reduce the size and complexity of our programs, but we'll come back to that in another activity.
Let's explain how functions work before we move on...
Writing a function
Below is an example of a simple function that prints 3 lines. We create a function by writing 'def' followed by a space and then the name we want to give our function (no spaces are allowed in the function name) .
We've called ours 'myfunction1'. You then add brackets (parentheses) at the end which can include any arguments if required (we're not using any in this example) followed by a colon (:).
Indentation is important again here - everything under the 'def' line must be indented to indicate that it's part of the function:
def myfunction1():
    print("This")
    print("is a")
    print("function")
Using Functions
So now that we have a function, how do we use it?
We can call (use) the function by simply using the function name followed by the brackets, like this:
myfunction1()
For our DIP switch project, we can create a number of functions with different code (light patterns) in them, and use our DIP switch with if statements to tell our program which one to run.
Limiting our if statements
The aim of this particular program is to only ever run one of our LED patterns in a loop. We don't want it to trigger multiple if statements (light patterns) one after the other like our test code does above.
The example below uses if statements to check if either of the first two switches are ON. If the first switch is ON, it will run the function we've placed under that particular statement.
It won't continue to check the other statement in this loop because we have used an elif statement for that. Yep, that's another new thing! Let's cover elif quickly...
The elif statement
The elif statement is short for 'else if'. If your first if statement isn't true, your code will then check each elif statement, in order, to see if any of those are true.
However, if one of the elif statements triggers, it will run the code block for that statement only and then stop checking the others in the loop (unlike regular if statements which keep checking each one after the other regardless of what happens).
This is helpful for our program, because we want it to return to the start of the loop after an if statement is triggered. This also means that if both switches are ON, the first switch will always run.
The Code
The example below includes everything we've just covered above. We've set up our bar graph pin numbers and created a list for them like we did yesterday. We then we define our two functions program1 and program2 which each contain a light sequence - we've re-used the LED scanning sequence from yesterday to keep things simple.
Then our while loop starts, which checks the button status and runs the function for that button if it is set to ON. The second button uses the elif statement, so it won't run if the first button is ON.
Copy the below over to Thonny and give it a go!
from machine import Pin
import time

# Set up switch input pins
dip1 = Pin(6, Pin.IN, Pin.PULL_DOWN)
dip2 = Pin(5, Pin.IN, Pin.PULL_DOWN)
dip3 = Pin(4, Pin.IN, Pin.PULL_DOWN)
dip4 = Pin(3, Pin.IN, Pin.PULL_DOWN)
dip5 = Pin(2, Pin.IN, Pin.PULL_DOWN)

# Set up LED pins
seg1 = Pin(13, Pin.OUT)
seg2 = Pin(12, Pin.OUT)
seg3 = Pin(11, Pin.OUT)
seg4 = Pin(10, Pin.OUT)
seg5 = Pin(9, Pin.OUT)

# Create a list of our LEDs
segments = [seg1, seg2, seg3, seg4, seg5]

# Create our first function
def program1():

    for led in segments:
        led.value(1)
        time.sleep(0.1)
        led.value(0)

# Create our second function
def program2():

    for led in reversed (segments):
        led.value(1)
        time.sleep(0.1)
        led.value(0)

# Start the main program loop
while True:

    # Switch 1
    if dip1.value() == 1:

        print("Program #1 running...")
        program1()

    # Switch 2
    elif dip2.value() == 1:

        print("Program #2 running...")
        program2()
Activity #5: Checking for multiple DIP Switch positions
We can make a few minor changes to our code to tell our program to only show a particular sequence if multiple switches are set to ON.
To do this, we can use and or or in our if statements. Let's jump straight into an example for these as they're very self-explanatory.
Using 'and' with if statements
Below is an amended version of our last code example. We've changed it so that program1 will only run if switch 1 and 2 are on, and program 2 will only run if switch 3 and 4 are ON.
All we do is use and between two conditions, checking for switch 1 and 2 at the same time, like this:
if dip1.value() == 1 and dip2.value() == 1:
Here's the amended version - copy it over to Thonny and give it a try:
from machine import Pin
import time

# Set up switch input pins
dip1 = Pin(6, Pin.IN, Pin.PULL_DOWN)
dip2 = Pin(5, Pin.IN, Pin.PULL_DOWN)
dip3 = Pin(4, Pin.IN, Pin.PULL_DOWN)
dip4 = Pin(3, Pin.IN, Pin.PULL_DOWN)
dip5 = Pin(2, Pin.IN, Pin.PULL_DOWN)

# Set up LED pins
seg1 = Pin(13, Pin.OUT)
seg2 = Pin(12, Pin.OUT)
seg3 = Pin(11, Pin.OUT)
seg4 = Pin(10, Pin.OUT)
seg5 = Pin(9, Pin.OUT)

# Create a list of our LEDs
segments = [seg1, seg2, seg3, seg4, seg5]

# Create our first function
def program1():

    for led in segments:
        led.value(1)
        time.sleep(0.1)
        led.value(0)

# Create our second function
def program2():

    for led in reversed (segments):
        led.value(1)
        time.sleep(0.1)
        led.value(0)

# Start the main program loop
while True:

    # Switch 1
    if dip1.value() == 1 and dip2.value() == 1:

        print("Program #1 running...")
        program1()

    # Switch 2
    elif dip3.value() == 1 and dip4.value() == 1:

        print("Program #2 running...")
        program2()
Using 'or' with if statements
Similar to above, we can simply change the and to an or to tell our code to check if one of the switches are ON, rather than both at the same time, like this:
if dip1.value() == 1 or dip2.value() == 1:
Here's the amended version - copy it over to Thonny and give it a try:
from machine import Pin
import time

# Set up switch input pins
dip1 = Pin(6, Pin.IN, Pin.PULL_DOWN)
dip2 = Pin(5, Pin.IN, Pin.PULL_DOWN)
dip3 = Pin(4, Pin.IN, Pin.PULL_DOWN)
dip4 = Pin(3, Pin.IN, Pin.PULL_DOWN)
dip5 = Pin(2, Pin.IN, Pin.PULL_DOWN)

# Set up LED pins
seg1 = Pin(13, Pin.OUT)
seg2 = Pin(12, Pin.OUT)
seg3 = Pin(11, Pin.OUT)
seg4 = Pin(10, Pin.OUT)
seg5 = Pin(9, Pin.OUT)

# Create a list of our LEDs
segments = [seg1, seg2, seg3, seg4, seg5]

# Create our first function
def program1():

    for led in segments:
        led.value(1)
        time.sleep(0.1)
        led.value(0)

# Create our second function
def program2():

    for led in reversed (segments):
        led.value(1)
        time.sleep(0.1)
        led.value(0)

# Start the main program loop
while True:

    # Switch 1
    if dip1.value() == 1 or dip2.value() == 1:

        print("Program #1 running...")
        program1()

    # Switch 2
    elif dip3.value() == 1 or dip4.value() == 1:

        print("Program #2 running...")
        program2()
Day #5 Complete!
We now have a few new tricks up our sleeve for controlling and running programs using switches - super-handy for when you come to design your own projects and need some element of physical interface and control.
Being able to control your completed program/project via buttons and switches is handy, but using functions to select which program to run opens up a lot of possibilities.
You could even use the switch positions like a pass code to run a program...oh the possibilities!
Recap time - another pat on the back is due, because today we:
- Learnt about DIP switches (and the difference between these and 'momentary' buttons)
- Built a DIP switch circuit
- Learnt about functions
- Expanded our if statement knowledge with:
- elif statements
- and and or
Today was another 'control' component, so this means tomorrow is a blinky day. What will it be...? Leave your circuit as it is for now, we'll tell you what to keep/remove in the morning.
See you after a good night's rest folks!
We used Fritzing to create the breadboard wiring diagram images for this page.


11 comments
dee taylor
hi, having a lot of issues getting the DIP switch into that spot, (it goes in fine on the other side of the lights and on the other breadboard, previously had some issues with the buttons in that same spot but thought it was due to their different pin shape(?)
i noticed the bottom of that breadboard is also no longer flat like the other which seems weird. are the half size breadboards for sale here the same type? (just wanna be 100% sure before i order a new one :])
Derek Hall
Ok I am a bit late to the party as its December 2024!……
Recently retired and wanted to keep mentally stimulated. So I got this Advent Calendar for a pressie for me. Really enjoying it, its a steep learning curve but the activities are clearly explained and the summary at the end of each “day” is very good.
The program in Activity 4 wouldn’t run. Until I put my specs on and I found I was switching 4 and 5 instead of 1 and 2! (Doh)
The Pi Hut
@Josh Gordon – Yes you’ll have enough for the rest of the calendar, you end up with a healthy stash for making projects with :) Happy to replace the broken cables – just ping us a quick message via support.thepihut.com
@Josh Gordon – Yes you’ll have enough for the rest of the calendar, you end up with a healthy stash for making projects with :) Happy to replace the broken cables – just ping us a quick message via support.thepihut.com
Josh Gordon
Hi, one of my connector cables broke – the end snapped off. I have enough at the moment by using ones provided in earlier boxes, but will I be one short by Box 12?
Hi, one of my connector cables broke – the end snapped off. I have enough at the moment by using ones provided in earlier boxes, but will I be one short by Box 12?
Mark Harrison
Here’s a modified version in which dip5 selects program1 followed by program2 for the ‘Knight Rider’ effect:
from machine import Pin
Set up switch input pinsimport time
dip1 = Pin(6, Pin.IN, Pin.PULL_DOWN)
dip2 = Pin(5, Pin.IN, Pin.PULL_DOWN)
dip3 = Pin(4, Pin.IN, Pin.PULL_DOWN)
dip4 = Pin(3, Pin.IN, Pin.PULL_DOWN)
dip5 = Pin(2, Pin.IN, Pin.PULL_DOWN) Set up LED pins
seg1 = Pin(13, Pin.OUT)
seg2 = Pin(12, Pin.OUT)
seg3 = Pin(11, Pin.OUT)
seg4 = Pin(10, Pin.OUT)
seg5 = Pin(9, Pin.OUT) Create a list of our LEDs
segments = [seg1, seg2, seg3, seg4, seg5] Create our first function
def program1(): for led in segments: led.value(1) time.sleep(0.1) led.value(0) Create our second function
def program2(): for led in reversed (segments): led.value(1) time.sleep(0.1) led.value(0)
def program3():
Start the main program loopprogram1()
program2()
while True: Switch 1
if dip1.value() == 1 or dip2.value() == 1: print(“Program #1 running…”) program1() Switch 2
elif dip3.value() == 1 or dip4.value() == 1: print(“Program #2 running…”) program2() elif dip5.value() == 1: program3()
Niclas Jacobsson
Hello
Just wanted to say that I really enjoy the calendar. Fun and learning stuff.
Also happy with the response of the ticket for the DIP Switch. :)
Hello
Just wanted to say that I really enjoy the calendar. Fun and learning stuff.
Also happy with the response of the ticket for the DIP Switch. :)
The Pi Hut
@David Brain – That’s quite normal and happened to us a few times too. This is why we suggest holding the body of the DIP switch with your other hand when changing the lever positions. These components are designed to be soldered into circuit boards where they can’t move around like that, so we have to hold things down manually when using them with a breadboard.
@David Brain – That’s quite normal and happened to us a few times too. This is why we suggest holding the body of the DIP switch with your other hand when changing the lever positions. These components are designed to be soldered into circuit boards where they can’t move around like that, so we have to hold things down manually when using them with a breadboard.
SIMON
Loving this more than I ever imagined. This is the perfect way to learn something new. What a great company you are, and what a great product
Loving this more than I ever imagined. This is the perfect way to learn something new. What a great company you are, and what a great product
David Brain
My only real issue today has been that the DIP levers are quite stiff, and quite often when I try to change one, the actual DIP switch pops out of the board. (Just pressing a button didn’t have this problem!) I honestly don’t know if this is just due to the stiffness or because I haven’t got it quite plugged correctly? The programs all work though, and it’s satisfying to change the effects.
My only real issue today has been that the DIP levers are quite stiff, and quite often when I try to change one, the actual DIP switch pops out of the board. (Just pressing a button didn’t have this problem!) I honestly don’t know if this is just due to the stiffness or because I haven’t got it quite plugged correctly? The programs all work though, and it’s satisfying to change the effects.
The Pi Hut
@Niclas Jacobsson – So sorry about that :( Please send us a quick message via support.thepihut.com and we’ll get a replacement out to you ASAP.
@Niclas Jacobsson – So sorry about that :( Please send us a quick message via support.thepihut.com and we’ll get a replacement out to you ASAP.
Niclas Jacobsson
My number 5 box is missing the DIP switch. :(
The cable was in the box but nothing else.
My number 5 box is missing the DIP switch. :(
The cable was in the box but nothing else.