

Let it Glow Maker Advent Calendar Day #11: Merry Membrane!
It’s day #11 of the Let it Glow Maker Advent Calendar!
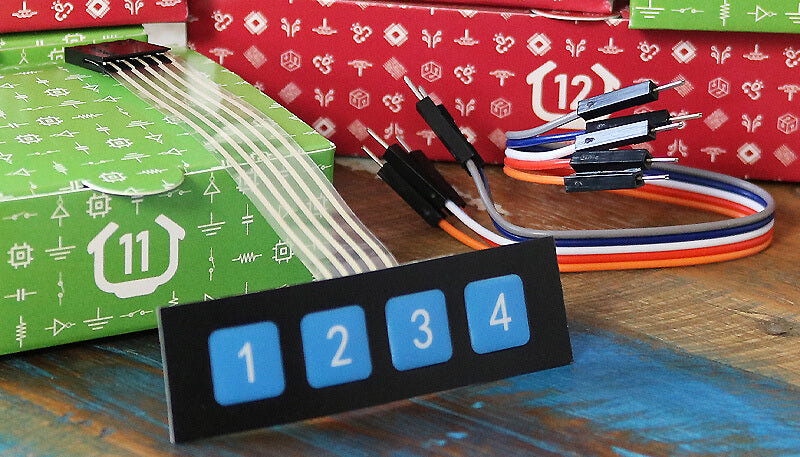
Today we have another control component to play with. The thing in your box today, that looks a little like the front of an ATM machine, is a membrane keypad (and this explains the weird title of today's article!).
These flexible friends are a great way to make fun projects with passcodes, program selection and more, and we've chosen this particular 4x1 version as it's much simpler to code than the larger versions.
To the projects!
Box #11 Contents
In this box you will find:
- 1x 4-way membrane keypad
- 1x 5-way extra-long header strip
- 5x Male to male jumper wires
Today’s Activities
Today we’re going to show you how to wire this membrane up including how the pins are connected, then work on some programs to make use of the numbers on the front including a secret present list passcode system!
We'll cover some more new topics today, so get your learning hats on!
What is a membrane keypad?
These keypads are a bit like having four regular buttons, but with a slightly different approach to the pins. They're compact, thin and have a handy adhesive backing for sticking to projects.
We love having the numbered keys to play with as we can create passcode programs and get all James Bond with our projects!
The keypad has 5 pins - 1 row pin and 4 column pins. You don't really need to worry too much about rows and columns though, just consider that the row pin is for 3.3V that feeds to one side of the keys, and the rest are for the GPIO pins to set as inputs and detect key presses.
When you press a key, that 3.3V row pin connects to the keypad pin, and sends a HIGH signal to the GPIO pin we have connected to it.
We specifically chose a 4x1 membrane keypad for this calendar as they are easier to wire, code and understand, as we can keep the code that drives them simple and familiar.
Construct the Circuit
As always, make sure your Pico is disconnected from the USB cable when working on the circuit.
Prepare the breadboard
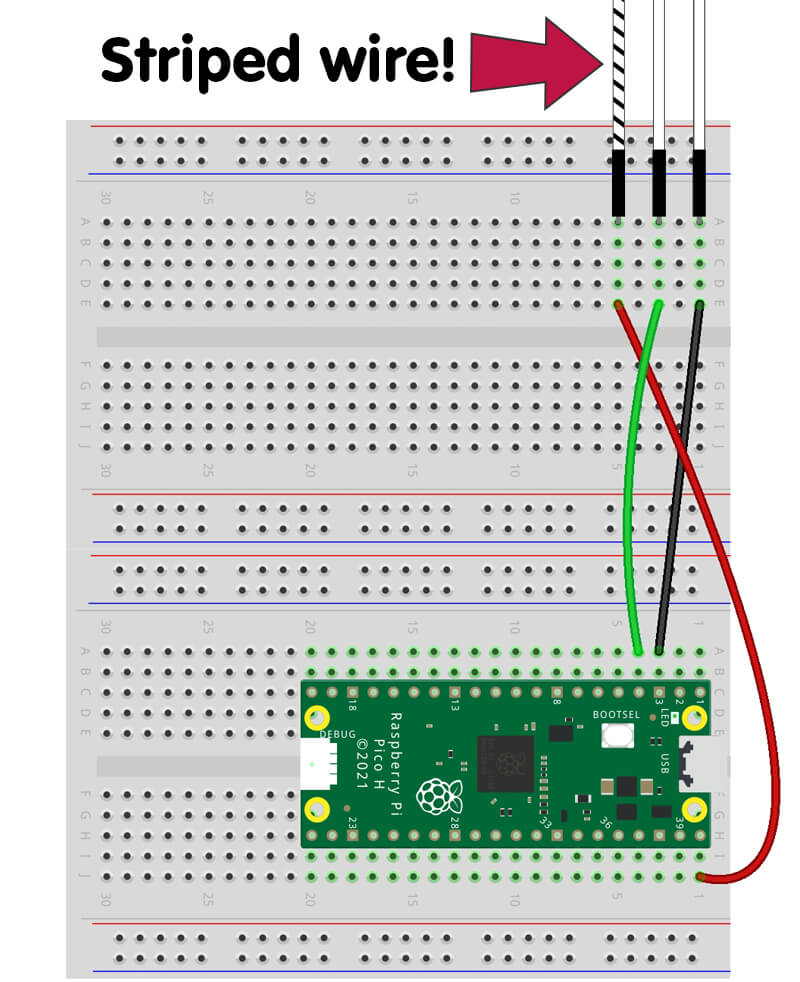
Remove the slider from yesterday but keep the RGB strand lights in place as we'll use them with some of today's activities.
Your starting point should look like this:
Fit the keypad
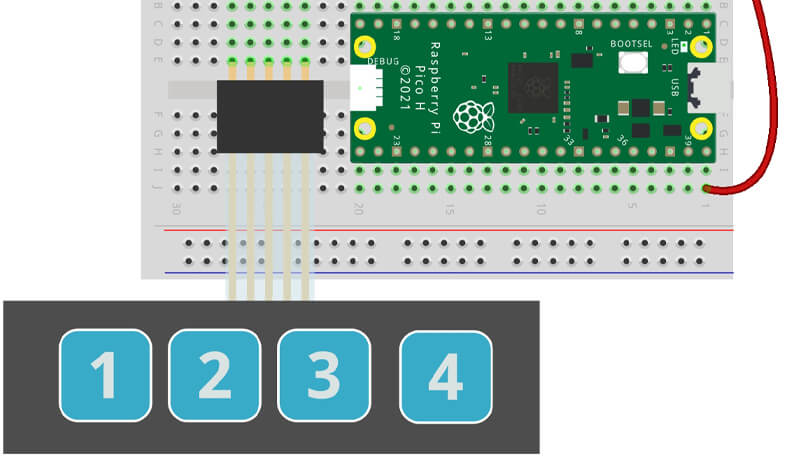
First, fit the 5-pin header into the female socket on the keypad. It won't go all the way in so don't force it if there's a gap.
Next fit the other side of that header into your breadboard. We've placed ours near to where our slider was, like this:
Now for the wires. You would expect the pins to be in the same order as the keys, but sadly not! It can make things a bit confusing when wiring up.
Here's a map of the keypad's pins, the GPIO pins we're using for them, and the keypad keys they relate to:
| Keypad Pins | 1 | 2 | 3 | 4 | 5 |
| Pico GPIO | 3V3 | 10 | 11 | 12 | 13 |
| Keypad Keys | 3.3V | 2 | 1 | 4 | 3 |
Hopefully this helps to clear things up. For example, the keypad 1 key is connected to the 3rd pin, which we'll use GPIO 11 with.
You can almost ignore the last row and just focus on which keypad pin connects to which GPIO pin. So, let's get wiring:
- Connect pin 1 (the left pin) to 3.3V (physical pin 36)
- Connect pin 2 to GPIO10 (physical pin 14)
- Connect pin 3 to GPIO11 (physical pin 15)
- Connect pin 4 to GPIO12 (physical pin 16)
- Connect pin 5 to GPIO13 (physical pin 17)
Here's how your breadboard should look so far:

Fit the Block LED
We'll bring back our trusty block LED from day #2 as well. We're fitting it in the same place but with a different GPIO pin, which is as follows:
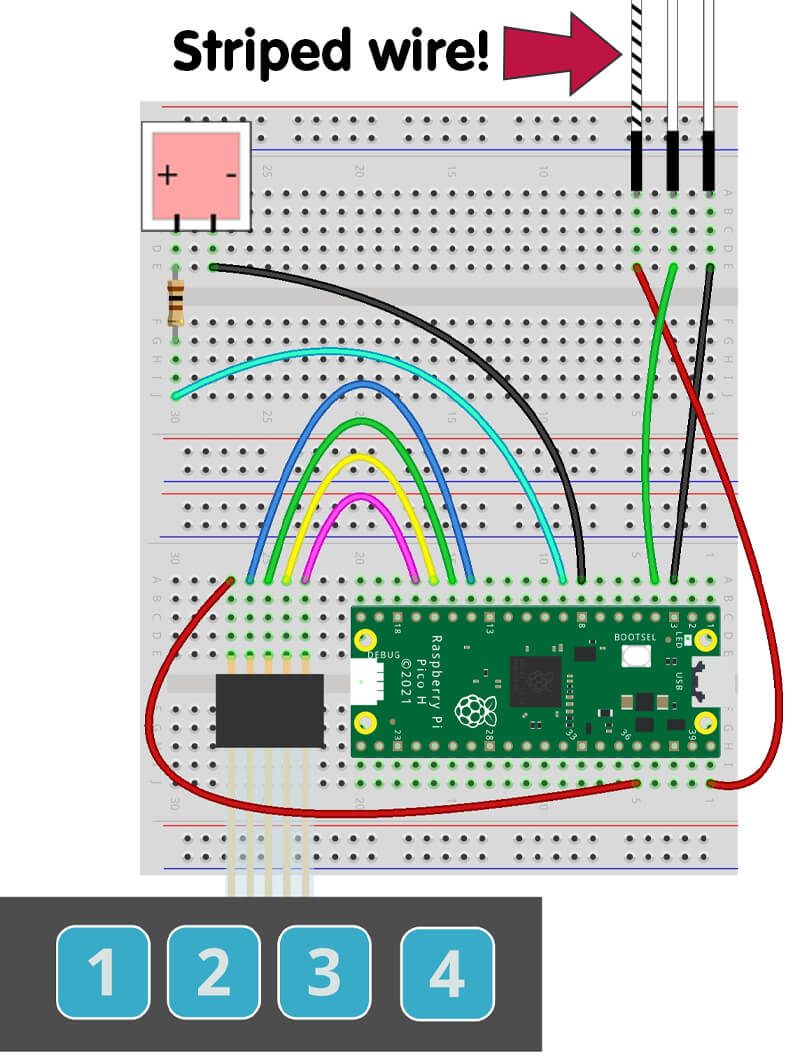
- LED fitted top-left in the breadboard (see image below)
- Resistor fitted between the left LED leg (anode +) and across the central break
- Connect the resistor leg to GPIO6 (physical pin 9)
- Connect the right LED leg (Cathode -) to GND (physical pin 8)
Here's how your completed circuit should look:
Activity 1: Basic keypad test
Let's run a super-simple test to make sure the buttons are registering properly.
The script below sets up the column pins as inputs, then start a simple while loop with some if statements to check if any are pressed.
Give this code a try and make sure everything's working properly:
from machine import Pin
import time

# Set up column pins (inputs)
key1 = Pin(11, Pin.IN, Pin.PULL_DOWN)
key2 = Pin(10, Pin.IN, Pin.PULL_DOWN)
key3 = Pin(13, Pin.IN, Pin.PULL_DOWN)
key4 = Pin(12, Pin.IN, Pin.PULL_DOWN)

while True:

    if key1.value() == 1:
        print("Button 1")

    if key2.value() == 1:
        print("Button 2")

    if key3.value() == 1:
        print("Button 3")

    if key4.value() == 1:
        print("Button 4")

    time.sleep(0.3)
Activity 2: LED strand colour selector
How about a project to set different colours for our RGB LED strand to use, with the keypad allowing us to change the colours whenever we choose?
Great for changing the mood of a backlight or decoration depending on how your day is going! We're basing it on the static odds n' evens code from yesterday.
To do this we're going to introduce something new with functions - passing arguments!
What are arguments in functions?
We've shown you functions before - blocks of code that we can call and use in our program whenever we want, handy for things we might want to repeat.
We can pass information in to these functions with arguments, which allow us to run the same function code but with the argument passed into it.
For example, the following basic function sets the colour to red, but there are no arguments here so we can't change that colour each time we call it:
def myfunction():
    strand.fill((255,0,0))
We can add an argument to the function, and give it a name. Here we're calling the argument colour. Notice the strand.fill line uses the same colour argument in the brackets:
def myfunction(colour):
    strand.fill((colour))
Now when we call the function, we can add the colour we want in the brackets, which means we can change the colour each time we call the argument:
myfunction(255,0,0)
You can add as many arguments as you want to a function, just separate them with a comma. Our code example below uses two arguments to allow each call to provide two colours for our LEDs.
The Code
Arguments aside, everything else in the script below should be familiar to you. We have a while loop that looks for button presses, and when a button is pressed, it calls the function and provides it with two arguments (colour variables).
The function runs a for loop which sets the colours, then the program watches for more button presses again.
We've used key 4 for OFF, and keys 1,2 and 3 for different colours.
Give it a spin:
from machine import Pin
import time

from neopixel import NeoPixel

# Set up column pins (inputs)
key1 = Pin(11, Pin.IN, Pin.PULL_DOWN)
key2 = Pin(10, Pin.IN, Pin.PULL_DOWN)
key3 = Pin(13, Pin.IN, Pin.PULL_DOWN)
key4 = Pin(12, Pin.IN, Pin.PULL_DOWN)

# LED details
GPIOnumber = 2
LEDcount = 15

# Define the strand pin number and number of LEDs
strand = NeoPixel(Pin(GPIOnumber), LEDcount)

# Colour variables
off = 0,0,0
green = 0,255,0
blue = 0,0,255
white = 255,255,255
yellow = 255,255,0
pink = 255,0,255
aqua = 0,255,255

# LED index list
ledindex = [0,1,2,3,4,5,6,7,8,9,10,11,12,13,14]

# Turn off all LEDs before program start
strand.fill((0,0,0))
strand.write()
time.sleep(1)

# Function with two arguments for colours
def blinky1(colour1,colour2):

    for led in ledindex:

        if (led % 2) == 0: #If the LED index is even
            strand[led] = (colour1)

        else: # If not (odd numbers)
            strand[led] = (colour2)

        strand.write()

while True:

    time.sleep(0.1)

    if key1.value() == 1:

        blinky1(aqua,green)

    elif key2.value() == 1:

        blinky1(white,blue)

    elif key3.value() == 1:

        blinky1(yellow,pink)

    elif key4.value() == 1:

        blinky1(off,off)
Activity 3: Push to flash
The other component we've used with multiple inputs is the DIP switch from day #5. We ran a program selection example with that, however the keypad might be a better choice for certain projects.
The DIP switch is better suited to something you want to set for a longer period of time. The keypad is more suitable for things you want to change or control constantly - like colours or speed.
We'll create a short, simple script that offers four different flash speed levels for our blocky LED via each key, however we'll use a bunch of while loops instead of if statements, allowing us to create a project that requires a key to be held down to run.
It's just another way to play, to show you the flexibility of these things.
The Code
We have a while loop that runs forever, and inside this we have nested while loops. Each while loop looks for a keypad to be pressed, and while it's being pressed, it will set a variable called flash to a different value.
We have a function (program1) which is then called. It uses that flash variable value as the time delay between turning the blocky LED ON and OFF.
It's as simple as that - give it a try and then hold your finger on one of the keys:
from machine import Pin
import time

# Set up column pins (inputs)
key1 = Pin(11, Pin.IN, Pin.PULL_DOWN)
key2 = Pin(10, Pin.IN, Pin.PULL_DOWN)
key3 = Pin(13, Pin.IN, Pin.PULL_DOWN)
key4 = Pin(12, Pin.IN, Pin.PULL_DOWN)

# Set up our LED
blockLED = Pin(6, Pin.OUT)

# Create the flash variable
flash = 0

# Create our simple function
def program1():

    blockLED.value(1) # LED ON
    time.sleep(flash)

    blockLED.value(0) # LED off
    time.sleep(flash)

while True:

    while key1.value() == 1:

        flash = 1
        program1()

    while key2.value() == 1:

        flash = 0.5
        program1()

    while key3.value() == 1:

        flash = 0.1
        program1()

    while key4.value() == 1:

        flash = 0.05
        program1()
Activity 4: No erroneous input!
The last activity required us to hold the buttons down, but sometimes that's a bad thing...
The problem with keypads/buttons, when used for a single click/input, is the risk of the program detecting more than one input/press if the user holds their finger down for too long. Try it on the first activity and you'll see the program print the same button over and over.
We added the short 0.3 delay to debounce the button in that activity, but it's not a perfect solution. There is a method in MicroPython called 'interrupts' that you can use, however it's a little complicated and we think that might be too much for your first twelve days of coding.
Instead we're going to take a simple approach which we like to use, because it's easy to read and understand, and works very well. If it works, it works!
Wait for all LOW
When we press a key, we send input pin HIGH. If we keep our finger on the key too long, the code keeps seeing that HIGH signal and causes multiple presses.
What we can do is make our code check that all four keys are depressed (i.e. LOW or 0) before we allow any further entry. We do this by creating a variable to 0 or 1 (state) and using this in our if statement.
It works like this (take a quick look at the code below first):
- If the state is 0, we allow our if statement to check for button presses. If a button is pressed, we set the state to 1
- With a state of 1 (i.e. a button was just pressed), our first if statement can no longer run and check for inputs (as it demands a state of 0)
- The elif statement will only set the state back to 0 if all four keys are LOW (0) and the state is 1
- Once you take your finger off of the key you just pressed, all keys are now low and the state is 1, allowing our elif statement to run and setting the state back to 1, meaning the first if statement is allowed to run again and check for key presses
How we check all keys are LOW
We should quickly mention something in the code below that you haven't seen before. Our elif statement checks that all keys are LOW (0) like this:
elif state == 1 and key1.value() == key2.value() == key3.value() == key4.value() == 0:
Specifically we're talking about this part:
key1.value() == key2.value() == key3.value() == key4.value() == 0:
It's pretty self explanatory, you just link together (with ==) anything you want to check has the same value, and place that desired value at the end. In our example we want them all to have the value of 0 (LOW).
You can also remove the value, which tells the code you want them all to be the same but you don't care what the value is, like this:
key1.value() == key2.value() == key3.value() == key4.value():
The Code
Copy this over to Thonny and try holding your finger down on a key. See, no duplicates!
from machine import Pin
import time

# Set up column pins (inputs)
key1 = Pin(11, Pin.IN, Pin.PULL_DOWN)
key2 = Pin(10, Pin.IN, Pin.PULL_DOWN)
key3 = Pin(13, Pin.IN, Pin.PULL_DOWN)
key4 = Pin(12, Pin.IN, Pin.PULL_DOWN)

state = 0

while True:

    time.sleep(0.1) # Short delay

    # If state = 0, allow checking for keypress
    if state == 0:

        if key1.value() == 1:
            print("Button 1")
            state = 1

        elif key2.value() == 1:
            print("Button 2")
            state = 1

        elif key3.value() == 1:
            print("Button 3")
            state = 1

        elif key4.value() == 1:
            print("Button 4")
            state = 1

    # Only runs if state = 1 AND all keys are LOW
    elif state == 1 and key1.value() == key2.value() == key3.value() == key4.value() == 0:

        state = 0
Activity 5: The secret present list (shh!)
This one has quite a lot going on!
We'll make a program that asks for a 4-digit passcode from the user, then compares what they have entered against a saved passcode. If the passcode is correct, the program prints our secret list of presents. We're using the method above to block duplicate key presses on this one too.
This is a busy code example, so let's outline what it does. Remember, there's usually a few ways to achieve the same thing with code - we've tried to show something easy to read, break down and understand, but feel free to comment below with your own scripts/methods.
Our program does the following:
- Creates two lists, one containing our passcode (passcode), and an empty one that we'll store our button presses in (userentry)
- Checks the length (len) of the userentry list with a while loop
- If it's less than 4 (the user has not finished keying) and state is 0, it will check for the next key press
- If a key is pressed, we use a function to add (append) that key to our userentry list, print an asterix (*) and change the state to 1
- If it is 4 characters, the user has finished keying, so this while loop is ignored and the code moves on to the if and else statement below it
- If the user's entered code matches our passcode, we light the LED and print the list of presents
- If not (else), we print a failure message
- The program ends after success or failure, either way
Let's quickly cover the new things we'll be using as part of this example...
Append
Our code starts with an empty list which we fill with the 4 numbers entered by the user, but how do we do this? We use the append method.
Our list is called userentry, and starts like this:
userentry = []
To add the next keyed number (our variable called key) to that list, we use a line with the format list_name.append(thing_to_add).
Our working example looks like this. You can append to any list, empty or not:
userentry.append(key)Len
We use len to return the number of items in a list. We simply use 'len' followed by the name of the list in brackets.
We have a while loop that checks the length of our userentry list, like this, to see if the user has keyed all 4 characters yet ("while the length is less than 4"):
while len(userentry) < 4:
Global variables
In one of our functions we use this line:
global stateIf you want to change an existing variable inside a function, we have to use global. If we don't, it'll consider it a local variable (only part of the function) and won't update it for the rest of our program.
The same goes if you create a variable inside a function with the same name as one outside of the function - It'll consider it local to the function only, unless you use global.
Print tricks
We're using two new tricks with our print functions:
end=""
We use this in our print to make the next print stay on the same line. For example, if we ran the code below with standard print lines:
print("*")
print("*")
print("*")
It would print like this:
*
*
*
However if we add end="" after a comma, like this:
print("*", end="")
print("*", end="")
print("*", end="")
The output stays on the same line - handy for that authentic password entry style:
***
\n
When we use \n at the front of our string of text, it creates a new line before the print.
Here's an example without it:
print("turkey")
print("turkey")
print("turkey")
print("turkey")
Which prints this:
turkey
turkey
turkey
turkey
And here's an example with the second line using \n before the text:
print("turkey")
print("\nturkey")
print("turkey")
print("turkey")
Which prints like this:
turkey

turkey
turkey
turkey
The Code
Have a good read through the code below, and the explanations above, then give it a try. There's a lot of commentary, but you can always delete those lines if you prefer:
from machine import Pin
import time

# Set up column pins (inputs)
key1 = Pin(11, Pin.IN, Pin.PULL_DOWN)
key2 = Pin(10, Pin.IN, Pin.PULL_DOWN)
key3 = Pin(13, Pin.IN, Pin.PULL_DOWN)
key4 = Pin(12, Pin.IN, Pin.PULL_DOWN)

# Set up our LED
blockLED = Pin(6, Pin.OUT)

# Create list of presents
presents = ["Train set","Furby","Boomerang","YoYo"]

# Set your passcode in a list
passcode = [1,2,3,4]

# Empty list for the entered password
userentry = []

# Create state variable
state = 0

# Create keypress variable
key = 0

# Append function
def appendkey():

    global state
    userentry.append(key)
    print("*", end="")
    state = 1

# Delay + print function
def myprint(mytext):
    print(mytext)
    time.sleep(0.5)

## Start our program ##
print("") # Empty line
print("Welcome to the Secret Present List system")
time.sleep(1)
print("Enter the passcode to continue: ", end="")

# While userentry length is less than 4
while len(userentry) < 4:

    time.sleep(0.1)

    if state == 0:

        if key1.value() == 1:
            key = 1
            appendkey()

        elif key2.value() == 1:
            key = 2
            appendkey()

        elif key3.value() == 1:
            key = 3
            appendkey()

        elif key4.value() == 1:
            key = 4
            appendkey()

    # If state is 1 and all keys are LOW
    elif state == 1 and key1.value() == key2.value() == key3.value() == key4.value() == 0:

        state = 0

    else:
        pass # Do nothing

# Program only gets this far if userentry is 4 characters long

# If the passcode is correct
if userentry == passcode:

    blockLED.value(1) # LED on

    print("\n") #Empty newline
    print("----------------------")
    print("*** ACCESS GRANTED ***")
    myprint("----------------------")
    myprint("Secret present list:")

    # Print each present from our list
    for i in presents:
        myprint(i)

    myprint("----------------------")

    blockLED.value(0) # LED off

# If the keyed code is incorrect
else:

    myprint("\n------------------")
    myprint("INCORRECT PASSCODE")
    myprint("ACCESS DENIED")
    time.sleep(1)
Day #11 Complete!
Hopefully you'll remembrane all of that...get it?
Despite being a relatively simple input device (the way we're using it), we hope you've enjoyed the different ways this membrane keypad can be utilised. Just having numbered keys can allow you to make exciting access code projects and more.
If you seek out larger keypads later on, such as some of the 8x8 options available, things will need to be coded a little differently as you would then need to get the row pins and column pins to talk to eachother...but that's something to consider for another day.
Recap time - today you have:
- Learnt what a membrane keypad is
- Created a membrane keypad circuit (including the confusing pin order!)
- Learnt about arguments in functions
- Used nested while loops to trigger buttons only when held down
- Identified a way to avoid erroneous key presses
- Feel free to research interrupts if you're feeling brave!
- Learnt how to check for multiple pin states at once (all LOW example)
- Learnt the append method, to add to a list
- Learnt about len, to return the length of an item
- Learnt about global variables
- Identified some new print tricks (end="" and \n)
Tomorrow is the last day :(
Leave everything where it is, and get some rest ready for our final component tomorrow. Have a great evening!
We used Fritzing to create the breadboard wiring diagram images for this page.


11 comments
carl
On the last exercise, I’d like to loop back to the input method after a failed input series. how could we do that? A brief search of the internet forums on the topic has frazzled my grey matter.
:)
On the last exercise, I’d like to loop back to the input method after a failed input series. how could we do that? A brief search of the internet forums on the topic has frazzled my grey matter.
:)
The Pi Hut
@formamac – It works both ways – either way you need those additional brackets as the library gets upset if you don’t use them. You can have them in the function or add the extra set when you call the function.
@formamac – It works both ways – either way you need those additional brackets as the library gets upset if you don’t use them. You can have them in the function or add the extra set when you call the function.
formamac
I’m sorry but I think there is a mistake :
This is not correct :
def myfunction(colour):
strand.fill((colour))
myfunction(255,0,0)
It should be :
def myfunction(colour):
strand.fill(colour)
myfunction((255,0,0))
I’m sorry but I think there is a mistake :
This is not correct :
def myfunction(colour):
strand.fill((colour))
myfunction(255,0,0)
It should be :
def myfunction(colour):
strand.fill(colour)
myfunction((255,0,0))
Vife
Let’s give a chance for several attempts ! Just in case you had to much hot X-mas wine and you can’t remember the code…
Let’s give a chance for several attempts ! Just in case you had to much hot X-mas wine and you can’t remember the code…
Geoff
Hi, I’m by no means a beginner, but I’m loving this series. I’ll admit that the first lighty-up things that I played with were thermionic valves… but that was a different age!
I just wanted to let you know that in today’s set, the red male-to-male jumper wire initially appeared to be male-to-female, but on closer inspection, I realised that it’s just lost its point. I’m not looking for a replacement, but I don’t know if you’re keeping track of the ‘miscreants’ for quality control purposes. ;)
Mark
@Giles
Impressive, I am going to have a crack at that!
@Giles
Impressive, I am going to have a crack at that!
The Pi Hut
@Giles – Loving your work! We link to your projects at the end day #12 :)
@David Brain – The resistor restricts current to the LED. Without it, you could blow the LED or even damage the Pico. Any resistor from 100Ω to ~330Ω will work (higher values are fine as they will just dim the LED more, lower values aren’t as they will allow too much current). But we love that you fixed it yourself by switching components, it’s totally what we’re aiming for here :D
David Brain
Alas, when I came to check my box #2 where I’d put stuff back away, I had apparently misplaced the resistor. As I was unsure what would happen if I didn’t use it, I had to use the main RGB strand for the other tests, which obviously worked fine. (I then tried the ring as well because, hey, that’s kind of the point, isn’t it? :))
Alas, when I came to check my box #2 where I’d put stuff back away, I had apparently misplaced the resistor. As I was unsure what would happen if I didn’t use it, I had to use the main RGB strand for the other tests, which obviously worked fine. (I then tried the ring as well because, hey, that’s kind of the point, isn’t it? :))
Giles
Thanks for a great calendar. I enjoyed this one even more than last year, mainly because it was possible to combine all the elements into a single project.
Here is my first draft of the ‘all things from 2023 PiHut Advent’ project: https://github.com/gilesknap/pico-xmas2
For comments and suggestions please see https://github.com/gilesknap/pico-xmas/discussions/4
The Pi Hut
@James – A time.sleep() is added as part of the function call. If you hold down button 3 for example, it will run our program1() function, and use the flash value for the delay.
@James – A time.sleep() is added as part of the function call. If you hold down button 3 for example, it will run our program1() function, and use the flash value for the delay.
james
Activity 3 needs a time.sleep(0.1) in the main while loop to work as intended
Activity 3 needs a time.sleep(0.1) in the main while loop to work as intended