

Let it Glow Maker Advent Calendar Day #10: ULTRA Blinky!
It’s day #10 of the Let it Glow Maker Advent Calendar!
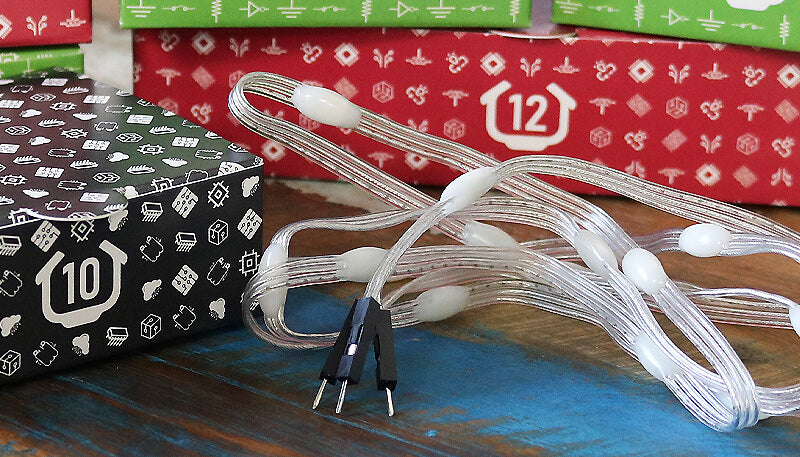
It's another blinky day today, and what a festival of blink today's box brings us! In your little black box you will find an addressable RGB LED dot strand, another format of RGB LED offering us new ways to play!
So far you've received RGB (GRB) diffused LEDs, an RGB ring, and now these ultra blinky RGB strand lights. This means you already have the knowledge to create programs for these lights - but we'll show you some new examples to give you more ways to play.
LET'S. GET. BLINKY!
Warning: Some of today's activities contain fast flashing lights which may not be suitable for those with photosensitive epilepsy.
Box #10 Contents
In this box you will find:
- 1x 15-LED addressable RGB dot strand
Today’s Activities
Today we’re going to show you how to wire up your dot strand and adjust your existing RGB LED code examples to make them work with it. We'll also give you some new examples using some of your components and a few real-life project ideas!
Before we get started, let's have a quick intro into our new favourite format of RGB LEDs!
What is an addressable RGB LED Dot Strand
These dot strands work in the exact same way as the LED ring from day #8, just in a different format.
Inside those little white blobs are the same style of addressable LED that your code can control, they just come in a much more flexible format for embedding into your own projects and decorations.
The custom strands in your box have just three wires - 5V, Data IN and GND (no DOUT pin) - and are fitted with jumper wire ends to make them ideal for breadboard prototyping.
Construct the Circuit
As always, make sure your Pico is disconnected from the USB cable when working on the circuit.
Prepare the breadboard
Let's start fresh again today - remove all components and wires, leaving just your Pico on the breadboards.
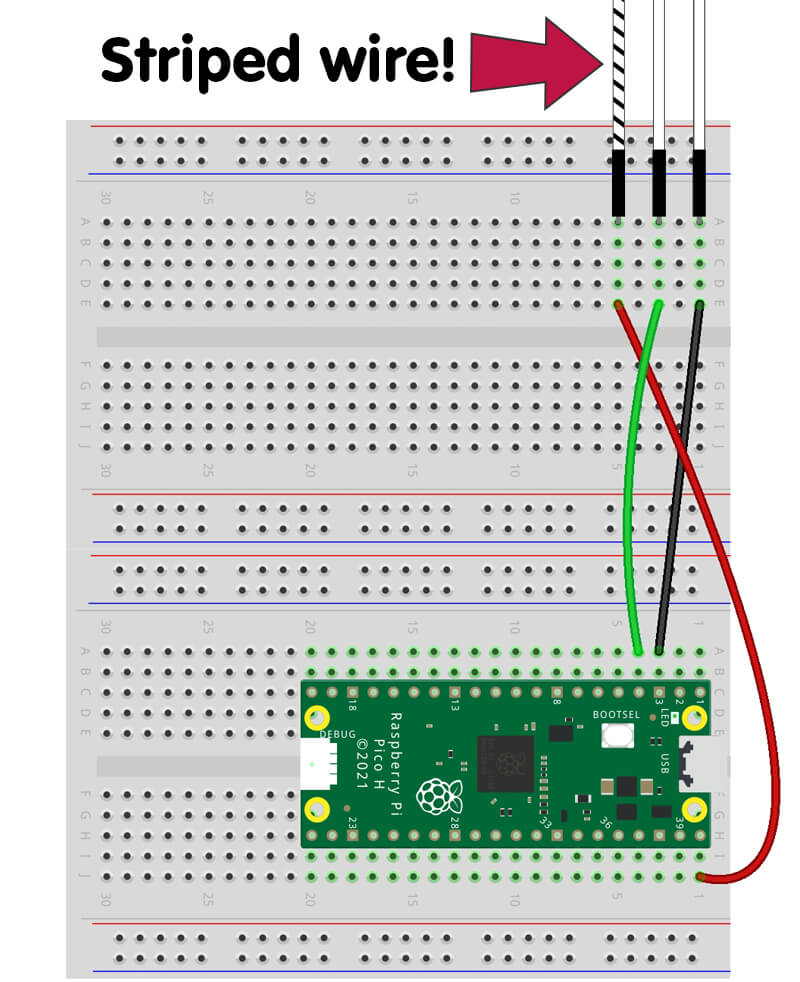
Fit the Dot Strand
IMPORTANT! The very first thing we need to do is find the striped wire. One of the wires has dashes along it, and this is the 5V pin. We really need to make sure we get the wiring of this pin right or we'll cause problems!
Here's a close-up of those stripes:

Put this striped 5V pin into your breadboard on the left side, then fit the other two, in order (they're stuck together), next to it with a space in-between (see image below).
We have lots of spare jumper wires now, so let's use them.
- Connect the left (striped) pin to VBUS (physical pin 40)
- Connect the middle pin to GPIO2 (physical pin 4)
- Connect the right pin to GND (physical pin 3)
Your breadboard should look like this so far:
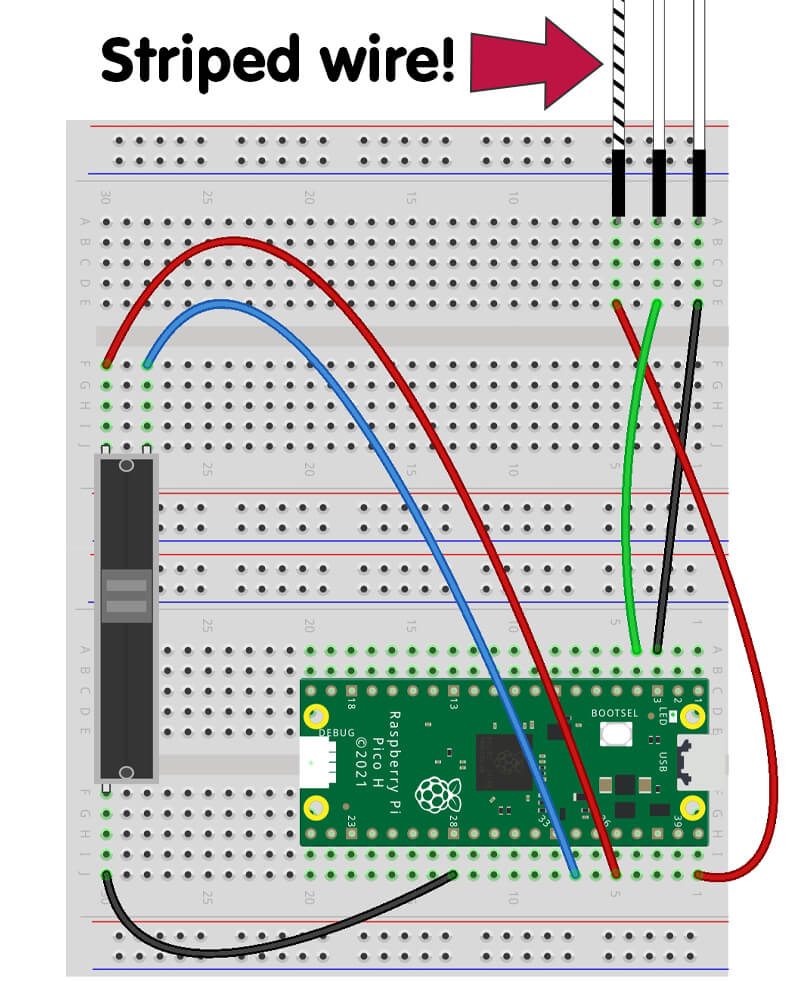
Fit the Slide Potentiometer
The slider is just too much fun to not bring back to the party, and it's a great partner for our dot strand, so let's get that back on our breadboard.
We're fitting it in exactly the same place as day #7, with the same pins used as well.
Here's a reminder of the pins used and their positions:
- Connect the lower single leg to a ground pin - we've used physical pin 28
- Now connect the top-left leg on the slider to the 3.3V pin - that's physical pin 36
- Lastly connect the top-right leg on the slider to GPIO28 (physical pin 34) - our ADC pin
Your breadboard should look like this:
Tip: You could wire this dot strand straight into the breadboard holes next to the Pico as 5V (VBUS), GND and a GPIO pin are all close together enough, however this adds some risk of wiring things up incorrectly as it's not as clear and visible.
Activity #1: Simple strand test
You already know your stuff when it comes to controlling RGB LEDs, so let's run a quick test to make sure everything's wired correctly and working as it should.
As you'd expect, we've imported the neopixel library, set our dot strand pin number up (GPIO2) and set the number of LEDs (15).
We then show red at low brightness (50,0,0) for 10 seconds, enough time to check everything's working.
Copy the code over to Thonny and give it a try:
# Imports
from machine import Pin
from neopixel import NeoPixel
import time

# Define the strand pin number (2) and number of LEDs (15)
strand = NeoPixel(Pin(2), 15)

# Fill with red for 10 seconds
strand.fill((50,0,0))
strand.write()
time.sleep(10)

# Turn off
strand.fill((0,0,0))
strand.write()
Activity #2: Re-using (and improving) LED ring programs
The cool thing about our addressable ring and strand is that they work in the same way and are both RGB. This means you can re-use any of the examples programs (and anything you've come up with yourself) just by setting the pin reference and number of LEDs.
Take our 'Bouncing Lights' program from day #8 for example - all we need to do is set this line to GPIO2 and 15 LEDs to address our strand:
strand = NeoPixel(Pin(2), 15)
However, we would also need to change any reference to 12 LEDs throughout the code too, because our strand has 15. Our Bouncing Lights code could have been better if we used variables for the number of LEDs, meaning changing this once would fix it everywhere each time we use a new type of RGB LED.
Variables for GPIO pin, LED count and colour
Let's improve our code to make it more re-usable!
We're going to make a variable called ledcount which we will set to 15 - the number of LEDs in our strand.
Then we change our set up line and range functions to us this variable instead of a fixed number, meaning we only have to change one value to update our entire program - which is really handy when your programs grow bigger and bigger.
We'll also do this for the GPIO pin number using variable GPIOnumber, just to make things more user-friendly when we return to old code later on.
Lastly, we've created a variable called mycolour - we can change this to whatever RGB code we like and it'll update our program where we've used it too.
With that changed, run the updated program below and you now have a bouncing light across your strand!
# Imports
from machine import Pin
from neopixel import NeoPixel
import time

# LED details
GPIOnumber = 2
LEDcount = 15

# Colour variable
mycolour = 255,0,0

# Define the strand pin number and number of LEDs from variables
strand = NeoPixel(Pin(GPIOnumber), LEDcount)

# Turn off all LEDs before program start
strand.fill((0,0,0))
strand.write()
time.sleep(1)

while True:

    for i in range(LEDcount):

        strand[i] = (mycolour)
        strand.write()

        # Show the light for this long
        time.sleep(0.09)

        #Clear the strand at the end of each loop
        strand.fill((0,0,0))
        strand.write()

    for i in reversed (range(LEDcount)):

        strand[i] = (mycolour)
        strand.write()

        # Show the light for this long
        time.sleep(0.09)

        #Clear the strand at the end of each loop
        strand.fill((0,0,0))
        strand.write()
Activity #3: Range start/stop/step
Let's try something more advanced with the range function to drive some different patterns with our dot strand.
So far, we've used the range function like this with RGB colour codes, which has allowed us to fade an LED in and out:
for i in range(255):
However you can add some arguments in those brackets to define a value to start the range at, a value to stop the range at, and the step to jump each time it loops.
The layout is as follows:
for i in range(start, stop, step):
Using RGB values as an example again, imagine we didn't want to fade all the way out to 0 (off), but in fact stop at a value of 10 to keep the LED on. To do that, we could use:
for i in range (255, 10, -1):
This starts the LED value at 255 (max brightness), ends the value at 10 (low brightness), and the step is -1 to make it run down from 255 to 10.
The Code
We've made an example program using exactly that! Our strand starts off with a low intensity red (10,0,0) then jumps into a while loop.
The while loop contains a for loop that runs through each LED in our index. We immediately then move into a nested for loop that sets the red intensity of each of these looped LEDs from 255 fading down to the original 10 with a very short delay.
This gives the effect of a constantly dim red strand with a bright red light pulsing through it! Have a go of the example below, and read the comments to understand what each part is doing:
# Imports
from machine import Pin
from neopixel import NeoPixel
import time

# LED details
GPIOnumber = 2
LEDcount = 15

# Define the strand pin number and number of LEDs from variables
strand = NeoPixel(Pin(GPIOnumber), LEDcount)

# LED index list
ledindex = [0,1,2,3,4,5,6,7,8,9,10,11,12,13,14]

# Start the strand red at low intensity
strand.fill((10,0,0))
strand.write()
time.sleep(1)

while True:

    # Iterate over each LED
    for led in ledindex:

        # Fade in/out each iterated LED
        for i in range(255,10,-1):

            strand[led] = (i,0,0) # Use i value for the R in RGB
            strand.write()
            time.sleep(0.001) # Fast delay
...or pulse with a different colour!
You can also add a couple of lines to the bottom of the program to make a different colour pulse through the red strand.
First change the nested for loop (the 'pulse) to use a different colour. We wanted to try white, so we've set the RGB colour to use i in all three values with strand[led] = (i,i,i) - yes, you can do that!
Then after the nested for loop ends, we can set the colour of that iterated LED back to the original low-intensity red.
Give it a try, and have some fun changing the colours:
# Imports
from machine import Pin
from neopixel import NeoPixel
import time

# LED details
GPIOnumber = 2
LEDcount = 15

# Define the strand pin number and number of LEDs from variables
strand = NeoPixel(Pin(GPIOnumber), LEDcount)

# LED index lists
ledindex = [0,1,2,3,4,5,6,7,8,9,10,11,12,13,14]

# Start the strand red at low intensity
strand.fill((10,0,0))
strand.write()
time.sleep(1)

while True:

    # Iterate over each LED
    for led in ledindex:

        # Fade in/out each iterated LED
        for i in range(255,10,-1):

            strand[led] = (i,i,i) # Use i for all values (white)
            strand.write()
            time.sleep(0.001) # Fast delay

        # Set the LED back to the original red
        strand[led] = (10,0,0)
        strand.write()
Activity #4: Static Odds n' Evens
We can create a classic old-school festive red/green pattern with our dot strand by telling our code to fish out the odd and even LED numbers in our index for us.
To do this, we use the modulo operator. Sounds like a bad 90's rock band right? Let's explain what it is...
The modulo operator
In MicroPython, the modulo operator is the percent symbol %.
When we use this in our code, it can give us the remainder of the division between two numbers.
For example:
- We know that 12 divided by 5 = 2.4
- We want to know how many times we can get 5 from 12, and what's left afterwards
- We can get 5 two times from 12, and this leaves us with 2 left over (the remainder)
We can use modulo to find that remainder for us, like this (we popped this into the shell):
>>> 12 % 5
2
OK...but how does the modulo operator help with LED strands?!
We can use the modulo operator to tell us if a number is divisible by 2. All even numbers are divisible by two, and will leave 0 as the remainder, so this test will tell us if a number is even.
We can tell our code to look at the led index from our list, and tell us if it's divisible by 2 ("is the remainder 0"). We can then use if statements to say "do this if it's even" and "do this if not".
The Code
The code example below includes a list for our LED index along with the usual setup lines.
We don't need a while loop here as we're just showing static colours. Instead we use a for loop to iterate over each LED in our index.
Inside that for loop is an if statement and an else statement.
- The if statement says "for each LED index we iterate over, if we divide it by 2, is the remainder 0?"
- If it is, it means the number is even, and it'll light those even LEDs red
- The else statement grabs anything that isn't even (odd numbers) and lights them green
Simple right? Try the code below and see for yourself:
# Imports
from machine import Pin
from neopixel import NeoPixel
import time

# LED details
GPIOnumber = 2
LEDcount = 15

# Define the strand pin number and number of LEDs from variables
strand = NeoPixel(Pin(GPIOnumber), LEDcount)

# Colour variables
red = 255,0,0
green = 0,255,0

# LED index list
ledindex = [0,1,2,3,4,5,6,7,8,9,10,11,12,13,14]

# Turn off all LEDs before program start
strand.fill((0,0,0))
strand.write()
time.sleep(1)

for led in ledindex:

    if (led % 2) == 0: #If the LED index is even
        strand[led] = (red)

    else: # If not (odd numbers)
        strand[led] = (green)

    strand.write()
Activity #5: Flashing Odds n' Evens
We can make the example above more snazzy by alternating the odd/even LEDs between red and green. Equally as old-school, just a little more fun!
We don't have to change a lot to achieve this, we simply need to:
- Put our for loops inside a while loop
- Add a second for loop to do the opposite colours to the first one
- Add a delay between each loop
None of this is new to you, it's just another for loop after the first one, so check out the example below and code commentary then give it a try:
# Imports
from machine import Pin
from neopixel import NeoPixel
import time

# LED details
GPIOnumber = 2
LEDcount = 15

# Define the strand pin number and number of LEDs from variables
strand = NeoPixel(Pin(GPIOnumber), LEDcount)

# Colour variables
red = 255,0,0
green = 0,255,0

# LED index list
ledindex = [0,1,2,3,4,5,6,7,8,9,10,11,12,13,14]

# Turn off all LEDs before program start
strand.fill((0,0,0))
strand.write()
time.sleep(1)

while True:

    # First loop runs red evens and green odds
    for led in ledindex:

        if (led % 2) == 0: #If the LED index is even
            strand[led] = (red)

        else: # If not (odd numbers)
            strand[led] = (green)

        strand.write()

    # Delay to show the colours before changing them
    time.sleep(0.5)

    # Second loop runs green evens and red odds
    for led in ledindex:

        if (led % 2) == 0: #If the LED index is even
            strand[led] = (green)

        else: # If not (odd numbers)
            strand[led] = (red)

        strand.write()

    # Delay to show the colours before changing them
    time.sleep(0.5)
Activity #6: Strand slider!
Let's bring our slide potentiometer back into the code and use it to run a fun program with our dot strand.
With our LED ring we used the slider to fade the LEDs and control the speed of the flashes, but we think it would be fun to slide the LEDs to light up and down the strand!
To do this, we need to get into the maths again, splitting the analogue range up across the number of our LEDs. Let's do it!
Code Breakdown
We'll of course need to make sure we import ADC again, as well as setting the right ADC pin up for the slider as we did before (GPIO28).
Now we want our slider with its range of 0 and 65535 to drive our LEDs, which we have 15 of. So we'll need to convert the analogue range to the LED range.
In our setup we use the following line to divide the analogue range (65535) by the number of LEDs (15), giving us a variable (LEDdivision) that we can use to divide our reading by:
# Divide the analogue range by the number of LEDs
LEDdivision = (65535/LEDcount)
Our while loop then takes an analogue reading from the slider, which we then divide by our LEDdivision variable to give us (almost) an LED number we can use in our code. However, we need this to be a round number, so we use the round function on this at the same time.
We decided to do this all in one line this time, rather than taking a reading separately and then manipulating that value (we've spaced it out to make it easier to read, MicroPython doesn't care):
reading = round( (potentiometer.read_u16()) / LEDdivision )
How does this work? Here's a working example:
- 65535 divided by 15 = 4369
- So roughly every 4369 of the analogue range will give us a 1, to light one of our LEDs
- We take a reading from the slider, which is between 0 and 65535.
- Let's say the reading is 15000 - we divide that number by the 4369 we got earlier = 3.43
- We round that 3.43, giving us 3
- We then tell our code to light up that many LEDs
We use two for loops to set which LEDs should be on and which should be off, as we need our code to turn LEDs off again when we slide back down.
The first loop is straightforward - it uses the value from the calculation above as the range, and we turn these LEDs on with a colour:
# Set which LEDs should be ON
for ledon in range (reading):
    ring[ledon] = (0,0,255)
The second for loop uses the start/stop/step options we covered earlier, to help it identify all of the LEDs that should be OFF.
We use the reading as the start value, and the LED count as the stop value, with a step of 1. This gives us all the LEDs that shouldn't be on.
# Set which LEDs should be OFF
for ledoff in range ((reading),LEDcount,1):
    ring[ledoff] = (0,0,0)
All that's left to do is write to the LED strip after both of these for loops have set the LEDs to be lit, with a short delay to ensure smooth motion with the LEDs when we slide.
The full program is below, give it a go
# Imports
from machine import Pin, ADC
from neopixel import NeoPixel
import time

# LED details
GPIOnumber = 2
LEDcount = 15

# Define the strand pin number and number of LEDs
ring = NeoPixel(Pin(GPIOnumber), LEDcount)

# Set up the slider on ADC pin 28
potentiometer = ADC(Pin(28))

# Make sure the strip is cleared before we start
ring.fill((0,0,0))
ring.write()
time.sleep(1)

# Divide the analogue range by the number of LEDs
LEDdivision = (65535/LEDcount)

while True:

    # Take a reading
    # Divide the reading by LED division
    # Round the reading
    reading = round( (potentiometer.read_u16()) / LEDdivision )

    # Set which LEDs should be ON
    for ledon in range (reading):
        ring[ledon] = (0,0,255)

    # Set which LEDs should be OFF
    for ledoff in range ((reading),LEDcount,1):
        ring[ledoff] = (0,0,0)

    # Write the data
    ring.write()
    time.sleep(0.1)
...and using random makes everything more fun!
We can tweak our example above to fill the strand with random colours instead of that fixed blue value - because the random function is the best thing ever when it comes to LEDs!
It creates a great effect because it's constantly looping with a 0.1 second time delay, meaning you get to slide the LEDs whilst it twinkles lots of different colours when lit.
All we need to do is import random, borrow the random RGB colour code we used in Day #7 (Activity #4), pop that into our while loop, then set the first for loop to use the r, g and b variables for the LED colour.
Here's the code:
# Imports
from machine import Pin, ADC
from neopixel import NeoPixel
import time
import random

# LED details
GPIOnumber = 2
LEDcount = 15

# Define the strand pin number and number of LEDs
ring = NeoPixel(Pin(GPIOnumber), LEDcount)

# Set up the slider on ADC pin 28
potentiometer = ADC(Pin(28))

# Make sure the strip is cleared before we start
ring.fill((0,0,0))
ring.write()
time.sleep(1)

# Divide the analogue range by the number of LEDs
LEDdivision = (65535/LEDcount)

while True:

    # Take a reading
    # Divide the reading by LED division
    # Round the reading
    reading = round( (potentiometer.read_u16()) / LEDdivision )

    # Create random RGB code variables
    r = random.randint(0,255)
    g = random.randint(0,255)
    b = random.randint(0,255)

    # Set which LEDs should be ON
    for ledon in range (reading):
        ring[ledon] = (r,g,b) # Use the random RGB variables

    # Set which LEDs should be OFF
    for ledoff in range ((reading),LEDcount,1):
        ring[ledoff] = (0,0,0)

    # Write the data
    ring.write()
    time.sleep(0.1)
Tip: If that last activity was a bit too bright for you, just drop the maximum intensity range of the random variables to a lower number, such as 50. For example, r = random.randint(0,50)
Day #10 Complete!
Is there anything more fun than RGB LEDs?!
Today we've shown you more ways to play with addressable LEDs, including some new tricks and examples you can apply to your LED ring and any other addressable LED you might play with in the future.
We particularly like these flexible strands as they can be used to make great decorations and lighting projects:
- Stuff them into a glass jar for a cool bedroom light
- Use blu-tack to stick them behind a monitor or under a desk
- Wrap them around shapes to make custom decorations
- ...or simply place them on a small Christmas tree!
Recap time - today you have:
- Created a circuit with an addressable RGB dot strand
- Learnt how to re-use programs, and best practices to make this easier (with variables)
- Expanded your knowledge of the range function with start/stop/step arguments
- Learnt about the modulo operator
- Used maths to convert ranges (analogue range to LED range)
- Re-used many skills from previous days (including the random function, because it's awesome!)
Tomorrow we have another control component to play with, giving us even more ways to drive our blinky bits to make even cooler projects!
See you all bright and early!
We used Fritzing to create the breadboard wiring diagram images for this page.


23 comments
The Pi Hut
@Richard @Si @Dale McCarthy – Yes, it seems some GBR strips have made it into the batches for the calendars. Sorry about this – luckily an easy fix as you have discovered, just swap the value positions around.
@Richard @Si @Dale McCarthy – Yes, it seems some GBR strips have made it into the batches for the calendars. Sorry about this – luckily an easy fix as you have discovered, just swap the value positions around.
Dale McCarthy
For some reason, my LED string isn’t RGB, but GBR. If I enter a value (255,0,0) it lights green, (0,255,0) lights blue an (0,0,255) lights it red. It’s been fun transposing the values to get the right colours listed in the examples
For some reason, my LED string isn’t RGB, but GBR. If I enter a value (255,0,0) it lights green, (0,255,0) lights blue an (0,0,255) lights it red. It’s been fun transposing the values to get the right colours listed in the examples
Si
Not an issue as such, I moved the numbers around, but my LED string seems to be GBR instead of RGB. Have I wired something incorrectly or is it just the string?
Not an issue as such, I moved the numbers around, but my LED string seems to be GBR instead of RGB. Have I wired something incorrectly or is it just the string?
Richard
Hey, why are my dots green when code says they’re red? Ohhh…, I see what’s probably happened, the strand supplied in my kit is GREEN BLUE RED, which is ok, but a tad confusing at first.
Hey, why are my dots green when code says they’re red? Ohhh…, I see what’s probably happened, the strand supplied in my kit is GREEN BLUE RED, which is ok, but a tad confusing at first.
Anj
Hello there, my Pico does not seem to be connecting to Thonny. It has been working every day until today. Earlier today it was working and connecting but now it is not. I’ve tried restarting the computer, re-downloading Thonny and removing it from the breadboard but it does not seem to work. Any ideas? Yesterday, the LED Ring stopped working aswell.
Hello there, my Pico does not seem to be connecting to Thonny. It has been working every day until today. Earlier today it was working and connecting but now it is not. I’ve tried restarting the computer, re-downloading Thonny and removing it from the breadboard but it does not seem to work. Any ideas? Yesterday, the LED Ring stopped working aswell.
Sean
Loving the quantity of addressable LEDs we’re getting in these boxes. My strand doesn’t use the same RGB LEDs as the ring though. They’re not even GRB like the first ones we got… these are GBR!
They still work though, and it’s nothing a bit re-coding can’t fix. :)
Loving the quantity of addressable LEDs we’re getting in these boxes. My strand doesn’t use the same RGB LEDs as the ring though. They’re not even GRB like the first ones we got… these are GBR!
They still work though, and it’s nothing a bit re-coding can’t fix. :)
BK322935
That’s strange: it seems the strand I received is GBR encoded. Is that normal? It doesn’t match the example programs.
That’s strange: it seems the strand I received is GBR encoded. Is that normal? It doesn’t match the example programs.
James Knox
LED strand I received was GBR instead of RGB ???
LED strand I received was GBR instead of RGB ???
Oliver Jane
Either I’ve received the wrong LED strip or todays guide is wrong. My strip is GBR, not RGB.
Either I’ve received the wrong LED strip or todays guide is wrong. My strip is GBR, not RGB.
Trevor
I seem to have a GBR string not RGB, everytime you say Red, I get Green!
Easily swapped around in the code though now I know how!
This calender and introduction to electronics and coding has been great fun, I even have the other calendar to start after this one 😄
I seem to have a GBR string not RGB, everytime you say Red, I get Green!
Easily swapped around in the code though now I know how!
This calender and introduction to electronics and coding has been great fun, I even have the other calendar to start after this one 😄
Patrick
Odd, I know (and I’ve double-checked the wiring) but mine appears to be GBR nor RGB. We had GRB LEDs a couple of boxes ago, but ….?
Odd, I know (and I’ve double-checked the wiring) but mine appears to be GBR nor RGB. We had GRB LEDs a couple of boxes ago, but ….?
Paxo Parrot
Yeah, blue was plugged into pin33 not 34.
My bad.
Yeah, blue was plugged into pin33 not 34.
My bad.
The Pi Hut
@Paxo Parrot – Sounds like the “magic blue smoke”🔥 possibly due to things being wired the wrong way. Not to worry – if you send us a quick message via support.thepihut.com, we’ll get a replacement sent out to you ASAP.
@Paxo Parrot – Sounds like the “magic blue smoke”🔥 possibly due to things being wired the wrong way. Not to worry – if you send us a quick message via support.thepihut.com, we’ll get a replacement sent out to you ASAP.
Paxo Parrot
Activity 6 began with the lighting of only 5 blue leds followed by the oh so distinctive scent of a burning pot. Oh well.
Activity 6 began with the lighting of only 5 blue leds followed by the oh so distinctive scent of a burning pot. Oh well.
Sam
I’m still here 10 months after Christmas! Loving these little kits!
I’m still here 10 months after Christmas! Loving these little kits!
Will
I’m trying to play with the string with the PICO C-sdk. Is there any specifications on the light string? I can’t find an exact match for sale on the PiHut website.
I’m trying to play with the string with the PICO C-sdk. Is there any specifications on the light string? I can’t find an exact match for sale on the PiHut website.
Luke R
Have done this to celebrate the 12 days of christmas, startion g on the 25 ending on the 5th, its been so fun, and im sad its near the end
Have done this to celebrate the 12 days of christmas, startion g on the 25 ending on the 5th, its been so fun, and im sad its near the end
Luke R
from machine import Pin
from neopixel import NeoPixel
import time
import random LED details
GPIOnumber = 2
LEDcount = 15 Define the strand pin number and number of LEDs from variables
strand = NeoPixel(Pin(GPIOnumber), LEDcount) LED index lists
ledindex = [0,1,2,3,4,5,6,7,8,9,10,11,12,13,14] Start the strand red at low intensity
strand.fill((10,0,0))
strand.write()
time.sleep(1)
while True:
Iterate over each LEDfor led in ledindex: Fade in/out each iterated LED
for i in range(255,10,-1): strand[led] = (i,i,i) # Use i for all values (white) strand.write() time.sleep(0.001) # Fast delay Set the LED back to the original red
r=random.randint(0,255)
g=random.randint(0,255)
b=random.randint(0,255)
strand[led] = (r,g,b)
strand.write()
activity 3 but it turns a random colour after
The Pi Hut
@Vife – Correct! We changed that value right before publishing and didn’t change the text. Fixed – thanks!
@Jerry Sayers – Sorry about that Jerry, please contact our support team via support.thepihut.com and we’ll arrange for that to be sent out to you.
@Terry Mitchell – It can be a little confusing so we didn’t go too much into the u16 line, but this may help. The read_u16 part gives us the value from the ADC input pin as a 16-bit unsigned integer. Let’s explain those two parts. unsigned just means we know it will always have a positive/non-negative value, so it doesn’t need a + or – ‘sign’ (hence ‘unsigned’). 16-bit means the value will be in a range between 0 and 65,535, as this is the 16-bit range (more on that here: https://en.wikipedia.org/wiki/16-bit_computing). FYI the Pico’s ADC pins are actually 12-bit, but the MicroPython library scales this up to 16-bit so we use this.
@James – Nice work, thanks for the code example!
James
Problem with the time.sleep() at the end is if you increase the time so the flash is slower, you decrease the responsiveness of the slider.
I’ve removed comments on original code and commented the additions, I’ve also removed the final time.sleep as the flash delay is handled using the delay variable.
from machine import Pin, ADC
from neopixel import NeoPixel
import time
import random
GPIOnumber = 2
LEDcount = 15
#delay of the flash in seconds, must be int
delay = 2
ring = NeoPixel(Pin(GPIOnumber), LEDcount)
potentiometer = ADC)
LEDdivision = (65535/LEDcount)
#used to keep track of time to determine when to change the LED colours
count = time.time()
#initilise the LED colours list
LEDColours = [(0,0,0)] * LEDcount
#function to update the LED colours
def newColour():
for i in range(0,LEDcount,1):
r = random.randint(0,255)
g = random.randint(0,255)
b = random.randint(0,255)
LEDColours[i] = (r,g,b)
ring.fill((0,0,0))
ring.write()
time.sleep(1)
while True:
#when the time reaches the count, generated new colour values for the LEDs and sets a new count using delay if count <= time.time(): newColour() count = time.time() + delay for ledon in range (reading): ring[ledon] = (LEDColours[ledon]) for ledoff in range ((reading),LEDcount,1): ring[ledoff] = (0,0,0) ring.write()reading = round( (potentiometer.read_u16()) / LEDdivision )
Terry Mitchell
Hi thoroughly enjoying this “trip” towards Christmas especially as we get further along and the tasks get a little more challenging!
I have a question regarding reading the input from the potentiometer in line 29 of activity 6 of Day 10:
I understand the “potentiometer.read” but why the “_u16”?
Hi thoroughly enjoying this “trip” towards Christmas especially as we get further along and the tasks get a little more challenging!
I have a question regarding reading the input from the potentiometer in line 29 of activity 6 of Day 10:
I understand the “potentiometer.read” but why the “_u16”?
Jerry Sayers
Loving the tutorials so far – great for a novice like me.
Very disappointed today though, no RGB LED string in the box, just another ‘Day 4’ bar graph LED :(
Loving the tutorials so far – great for a novice like me.
Very disappointed today though, no RGB LED string in the box, just another ‘Day 4’ bar graph LED :(
Vife
I think there’s an error in this explanation : This starts the LED value at 255 (max brightness), ends the value at 10 (low brightness), and the step is -1 to make it run down from 255 to 20. 20 is false, it should be 11 if I’m correct.
I think there’s an error in this explanation : This starts the LED value at 255 (max brightness), ends the value at 10 (low brightness), and the step is -1 to make it run down from 255 to 20. 20 is false, it should be 11 if I’m correct.