
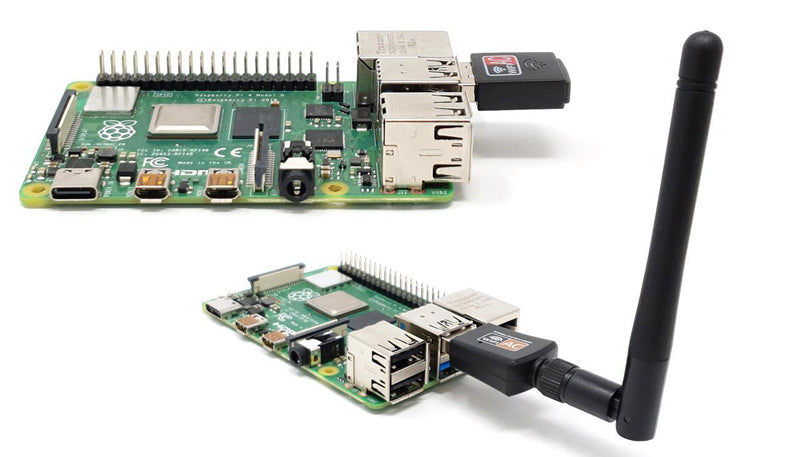
How to setup a RTL881cu USB WiFi adapter with the Raspberry Pi 4
Despite the Raspberry Pi 4 having built-in dual-band WiFi, many of our customers choose to purchase Dual-band USB WiFi adapters to improve their range or locate the ariel on an enclosure or similar.
Whilst many USB WiFi adapters are supported by drivers already installed within the Raspberry Pi OS, some newer drivers require manual setup.
Both of our dual-band WiFi adapters use the RTL881cu driver, and here's how you can get them working on a Raspberry Pi 4 (also works with the Raspberry Pi 3 - we tested it!).
Important notes
It's important to note that these instructions are working as of the very latest Raspberry Pi OS at the time of writing (18/09/2023) but as we have no control over Raspberry Pi OS, the kernel used or even the Github repository used in these instructions...so things may not work in the future (we'll do our best to keep this page updated with the latest working process).
We've also heard that kernel 6.2 includes support for these WiFi adapters, but we're not convinced Raspberry Pi OS will be moved to 6.2 any time soon!
The Driver Repository
We're going to be using this Github library as this was recommended by our helpful customers (see comments below) after our original instructions/library stopped working.
There are well-detailed instructions on the Github page, but we're showing you each step here to show you what worked for us, especially as (currently) some other changes are currently required to make this work on your Raspberry Pi.
Setting up a RTL881cu USB WiFi adapter with the Raspberry Pi
Turn your Raspberry Pi on, connect to WiFi, open a new terminal window and follow the steps below.
You can also plug in your WiFi USB adapter now (we had it plugged in throughout the installation and it was fine).
1. Update your Raspberry Pi
Make sure your Raspberry Pi is up to date before beginning, by using the following commands:
sudo apt-get update
sudo apt full-upgrade
2. Edit the config file
WARNING: This step is only required if you're using a 32-bit OS on a 64-bit processor. If you're using a 64-bit OS, skip this step and move on to step 3.
Thanks to Zach in the comments section for this. Currently you'll need to make an edit to the config.txt file on your Raspberry Pi before you attempt the driver installation (or it'll fail).
Open a terminal window and use the following command:
sudo nano /boot/config.txt
Then anywhere in that file enter the following new line:
arm_64bit=0
Then enter Ctrl+X and hit Y to save.
Now reboot your Pi with:
sudo reboot
3. Install the required software
You may already have the following packages installed, however it's best to check. Enter the following command in your terminal window and follow the promts to install any missing ones:
sudo apt install -y raspberrypi-kernel-headers build-essential bc dkms git
4. Create a directory for the driver
Create a new directory for the driver by using the following command:
mkdir -p ~/src
5. Access the directory
Access your new directory using the following command:
cd ~/src
6. Download the driver repository
Enter the following command to download the repo to your Raspberry Pi in your new directory:
git clone https://github.com/morrownr/8821cu-20210916.git
7. Access the downloaded repository
Enter the following command to access the downloaded driver repository:
cd ~/src/8821cu-20210916
8. Run the driver installation
Use the following command to install the driver:
sudo ./install-driver.sh
At the end of the installation it will ask you if you want to edit the setup file. Whilst it recommends this, we chose not to and everything worked fine. If you have a specific use case for the driver/dongle, you may want to have a dig around this.
9. Reboot
Reboot your Raspberry Pi using the following command, and once you've booted back up you should be able to select the WiFi icon on the Raspberry Pi desktop and see two instances available (the built-in WiFi and the dongle adapter):
sudo reboot
17 comments
MESAL
Does it work on OpenWRT?
Does it work on OpenWRT?
ilker etlik
Is this product compatible with Raspberry Pi OS Lite?
Is this product compatible with Raspberry Pi OS Lite?
epic1772
does anyone know if this works with octoprint?
i’ve tried to install the drivers, and i’m pretty sure theyre sucessfully installed, however the dongle still isn’t connecting
it recognises the wifi, but doesn’t connect and i’m 100% sure i’ve put the right details in
on pi 3 B
does anyone know if this works with octoprint?
i’ve tried to install the drivers, and i’m pretty sure theyre sucessfully installed, however the dongle still isn’t connecting
it recognises the wifi, but doesn’t connect and i’m 100% sure i’ve put the right details in
on pi 3 B
The Pi Hut
@Neal – Thanks for the heads-up, we’ve updated the article :)
@Neal – Thanks for the heads-up, we’ve updated the article :)
Neal
Like several others here in the comments, I also broke my installation by following step 2 on a 64-bit processor and ended up with a Pi that wouldn’t boot until I’d re-imaged my SSD. I imagine lots of people will be following the instructions well before they get around to reading the comments section…
@The Pi Hut, please could you update step 2 of the guide to make it clear that you only need to follow that step if you’re using the 32-bit OS on a 64-bit processor, and if you have the 64-bit OS you can skip that part. A 30-second edit on your side could save several collective hours of wasted time on your customers’ side…! :D
Mick Farris
Can this be used with a different high gain arial
Can this be used with a different high gain arial
Gary Barnes
Worked for me with with Pi 3 Model B V1.2
Broke it by with step 2 (doh! – thought it looked odd for a 64 bit machine) but fixed it by taking out the SD card and editing the /boot/config.txt file on another computer to remove the line added, reinstalled the card, booted and all good.
Worked for me with with Pi 3 Model B V1.2
Broke it by with step 2 (doh! – thought it looked odd for a 64 bit machine) but fixed it by taking out the SD card and editing the /boot/config.txt file on another computer to remove the line added, reinstalled the card, booted and all good.
Henry
The instructions above do work for the 64-bit os, you just need to skip the edit to the config file if you’re on the 64-bit os (if on 32-bit ignore this post and follow the guide exactly). Rest of the guide works fine – driver and antenna currently fully installed and works great
The instructions above do work for the 64-bit os, you just need to skip the edit to the config file if you’re on the 64-bit os (if on 32-bit ignore this post and follow the guide exactly). Rest of the guide works fine – driver and antenna currently fully installed and works great
Raven Code
For raspberry pi OS bookworm, you need to follow the Debian install instructions on the repo I believe
For raspberry pi OS bookworm, you need to follow the Debian install instructions on the repo I believe
Henry
Won’t recommend editing config file to arm_64bit=0 on 64 bit os (bookworm 64 bit) as this breaks it
Won’t recommend editing config file to arm_64bit=0 on 64 bit os (bookworm 64 bit) as this breaks it
Eggert
This is the first guide that got me to a working wlan0 with this driver, thank you! After half a dozen failures.
It works for me on Raspberry OS 12 on raspberry pi 4, 64bit.
Only one problem left, even when DHCP gives an address like 192.168.1.0/24, ifconfig shows an address like 169.254.0.0/16.
This is the first guide that got me to a working wlan0 with this driver, thank you! After half a dozen failures.
It works for me on Raspberry OS 12 on raspberry pi 4, 64bit.
Only one problem left, even when DHCP gives an address like 192.168.1.0/24, ifconfig shows an address like 169.254.0.0/16.
The Pi Hut
@Zach @Bobert – thanks for sharing your findings! We had a lot of issues with the original driver we used for these adapters, and this new driver repo + the header config.txt edits seem to be working well now.
We’ve updated the article and will keep an eye on it, as we have no control over changes to other Pi OS or the driver repo…so there’s a chance it could break again in the future (unless Pi OS moves to kernel 6.2 which apparently has drivers for the RTL88XX chips built-in).
Zach
As of the most recent updates to OS kernel 6.1.x, The 32-bit OS runs on a 64-bit kernel, which will cause issues with re-installation using any of the known repositories, including here:
https://github.com/morrownr/8821cu-20210916
To fix this, add “arm_64bit=0” (no quotes) to the following file:
sudo nano /boot/config.txt
sudo reboot
Then follow the re-sintallation instructions using dkms or manual installation methods on your preferred repository.
Bobert
Neither worked for me however I used the same one that I used for my Kali box and it works great! Here is the link…
https://github.com/morrownr/8821cu-20210916
Neither worked for me however I used the same one that I used for my Kali box and it works great! Here is the link…
https://github.com/morrownr/8821cu-20210916
Mr Jellyfin
before the make command, do a reboot.
before the make command, do a reboot.
Joe
at make I get
~/usbwifi/rtl8821CU $ make
make ARCH=arm CROSS_COMPILE= -C /lib/modules/5.15.61-v8+/build M=/home/gvpi/usbwifi/rtl8821CU modules
make1: * /lib/modules/5.15.61-v8+/build: No such file or directory. Stop.
make: * [Makefile:1923: modules] Error 2
at make I get
~/usbwifi/rtl8821CU $ make
make ARCH=arm CROSS_COMPILE= -C /lib/modules/5.15.61-v8+/build M=/home/gvpi/usbwifi/rtl8821CU modules
make1: * /lib/modules/5.15.61-v8+/build: No such file or directory. Stop.
make: * [Makefile:1923: modules] Error 2
Abid
This no longer works on bulleye
Use
https://github.com/morrownr/8821cu-20210118
This no longer works on bulleye
Use
https://github.com/morrownr/8821cu-20210118