
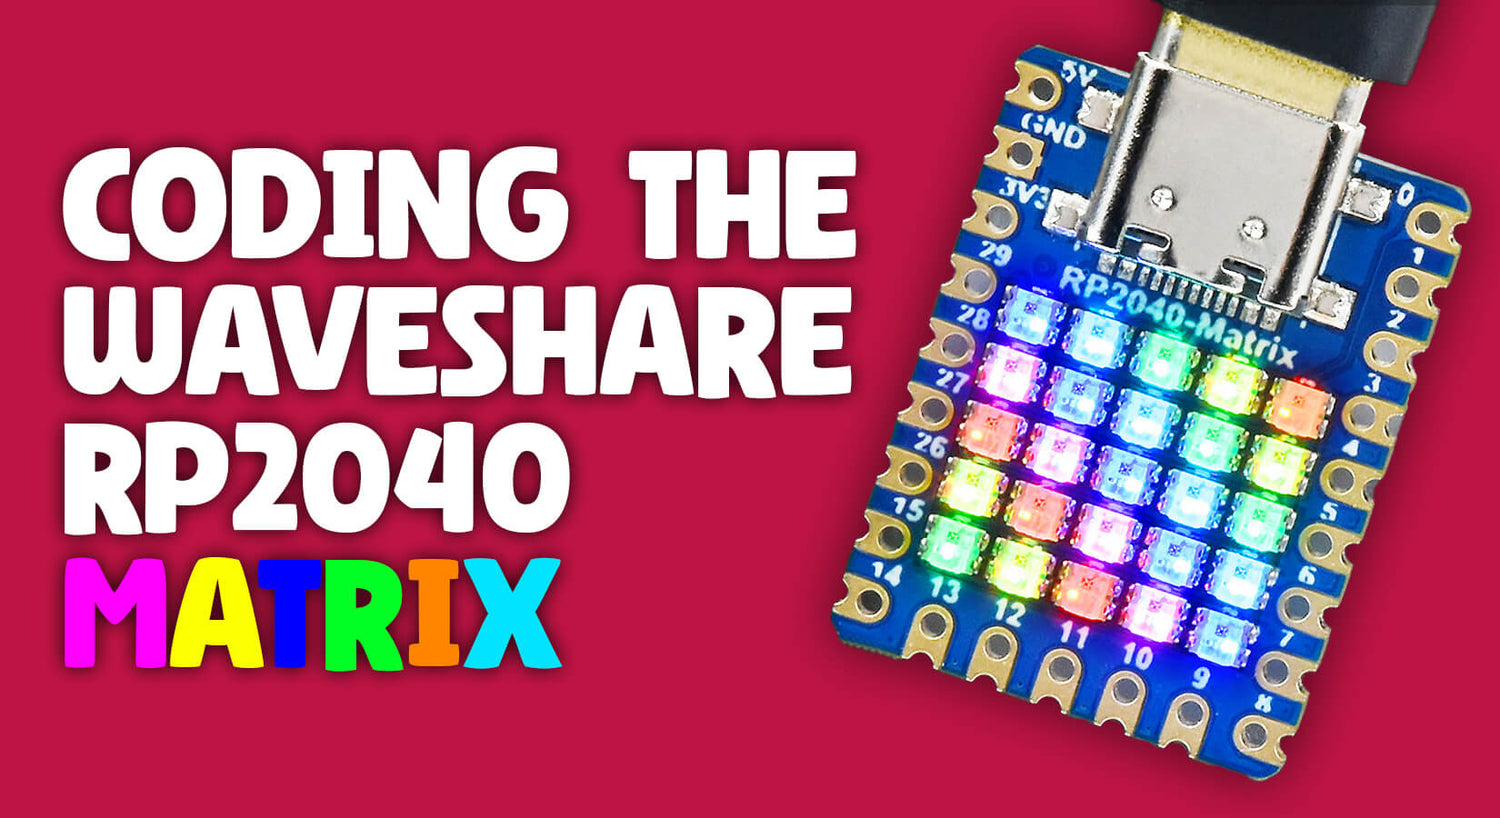
Coding the Waveshare RP2040 Matrix
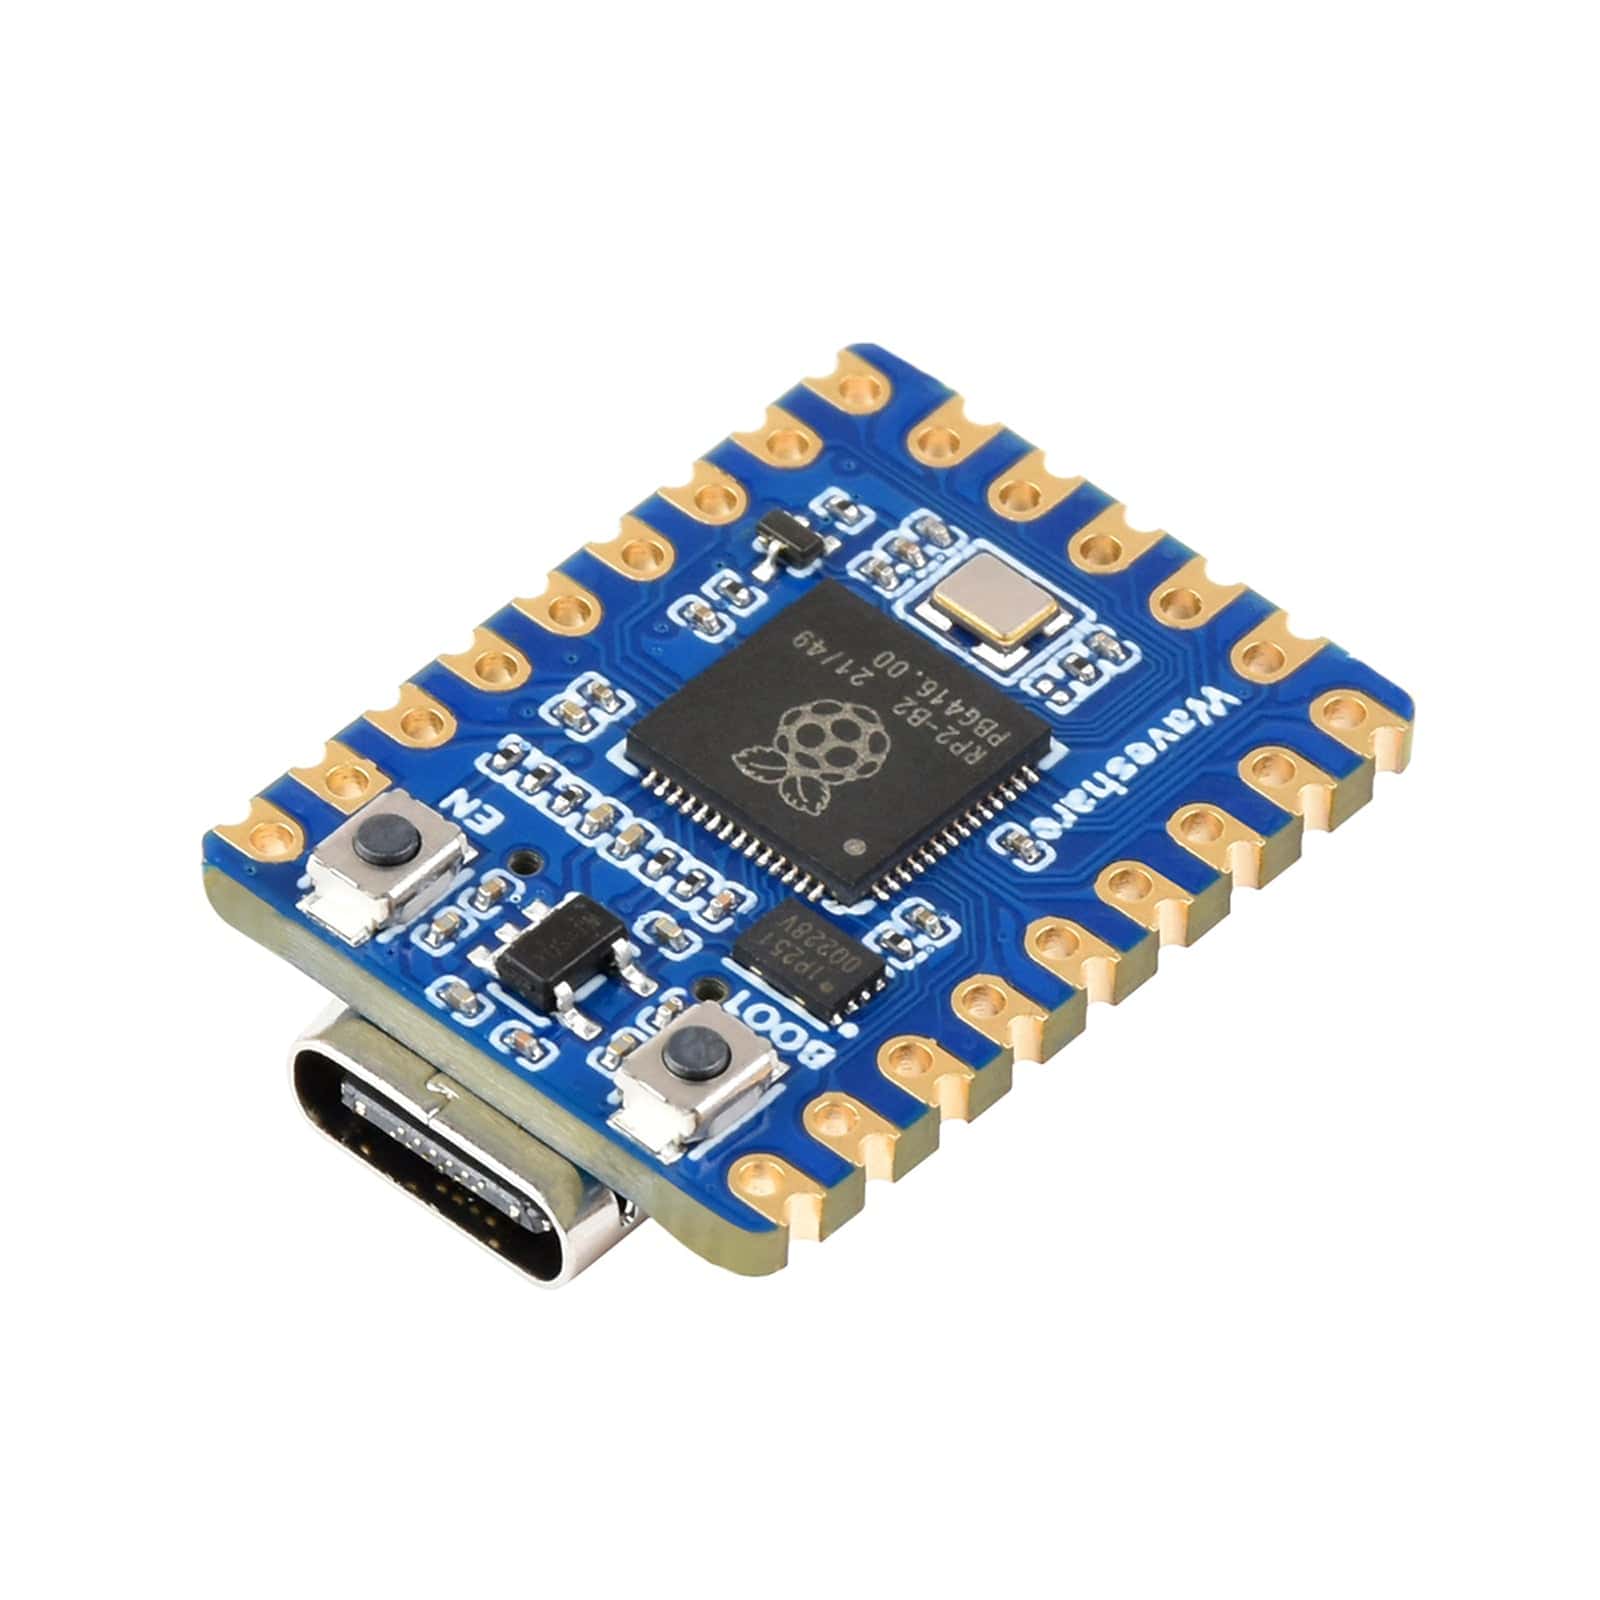
The Waveshare RP2040 Matrix development board is an inexpensive, super-compact RP2040 microcontroller with a tiny 5x5 addressable RGB LED matrix on the front.
This tiny development board is packed with interesting features including:
- 25 RGB LEDs (WS2812) in a 5x5 array – very bright!
- USB-C for power and programming
- BOOT and RESET buttons
- RP2040 processor – works like a Raspberry Pi Pico
- Plenty of GPIO connections with ADC, SPI, I2C and UART available
It makes an ideal board for learning about addressable RGB LEDs, and in this tutorial Tony will demonstrate how to program it using MicroPython.
Before we start, let's show you a range of possibilities with this great little matrix:
Note: this an intermediate/advanced skills project.
What you will need
We assume that you have installed Thonny on your computer and set up your Raspberry Pi Pico with the most recent MicroPython firmware (UF2). If not, check out our Raspberry Pi Pico Getting Started Guide where this is covered in detail.
For this quick intro and matrix coding, all you'll need are:
Board Setup
Install the latest UF2
If you plug the USB-C cable into the socket on the board and power it from your computer you will find that it has a test only UF2 (firmware) installed.
We need to replace the installed UF2 with the current RP2040 MicroPython version which you can download here. As mentioned above, we have assumed that you know how to install a new UF2 file.
Programming the matrix
LED pins (and a warning!)
Our product page for this board provides links Waveshare's wiki and a pinout guide. This wiki tells us that the addressable RGB LEDs are connected to GPIO 16. There are 25 LEDs, numbered 0 to 24 and each can be set to a wide variety of colours by providing red, green and blue (RGB) values in the range 0 to 255.
We have found that values in the range 0 to 20 are sufficient for most purposes. Waveshare warn against prolonged use of high values which could damage the device as it overheats - you've been warned!
Code Library
Luckily we can use the Neopixel library which is now built-in to MicroPython.
This makes it very easy to get up and running. The following code imports the library and initialises the LEDs:
# Waveshare RP2040-MATRIX with 5x5 grid of Neopixels
# NB colours (green, red, blue)
# Tony Goodhew for the pihut.com - 25 Aug 2023
import time
from machine import Pin
from neopixel import NeoPixel

# Set up 25 Neopixels on GPIO 16
np = NeoPixel(Pin(16), 25, bpp = 3) # bpp = bytes per pixel (GRB)
These LEDs are slightly different from Adafruit Neopixels and the colour order is green, red, blue (GRB rather than RGB). It doesn't make a lot of difference, we just need to add our colour values in the right places.
We can set the colour of a pixel by adding the line below:
np[2] = (0, 10, 10) # Set the third pixel to MAGENTA
Red and blue (the '10' values) mixed make a purple colour, called magenta, and the LEDs are counted from zero to 24.
This only stores the values in a buffer - the instruction np.write() sends the contents of the buffer to the LEDs which updates the colours. This is very fast!
Try running the code below with the added lines. You should find the centre pixel on the top line lights up purple:
# Waveshare RP2040-MATRIX with 5x5 grid of Neopixels
# NB colours (green, red, blue)
# Tony Goodhew for the pihut.com - 25 Aug 2023
import time
from machine import Pin
from neopixel import NeoPixel

# Set up 25 Neopixels on GPIO 16
np = NeoPixel(Pin(16), 25, bpp = 3) # bpp = bytes per pixel (GRB)

np[2] = (0, 10, 10) # Set the third pixel to MAGENTA

np.write()
Now try the following code and see what happens. Note the extra brackets in the fill instructions. Colour is defined with a tuple and the brackets are essential:
# Waveshare RP2040-MATRIX with 5x5 grid of Neopixels
# NB colours (green, red, blue)
# Tony Goodhew for the pihut.com - 25 Aug 2023
import time
from machine import Pin
from neopixel import NeoPixel

# Set up 25 Neopixels on GPIO 16
np = NeoPixel(Pin(16), 25, bpp = 3) # bpp = bytes per pixel (GRB)

time.sleep(2)

np.fill((0,10,0)) # Fill display with RED
np.write()
time.sleep(2)

np.fill((0,0,0)) # Fill display with BLACK
np.write()
Some things to try
- Set pixel[0] green, pixel[21] blue and pixel[24] yellow
- Write a procedure to clear the screen and test it
- Fill the screen with randomly coloured pixels in a random order
Using coordinates - (x, y) or (col, row) values
Time to step it up a gear! We're now going to use coordinates to drive the LEDs, but before we explain anything, copy the code example below and give it a spin:
# Waveshare RP2040-MATRIX with 5x5 grid of Neopixels
# NB colours (green, red, blue)
# Tony Goodhew for the pihut.com - 25 Aug 2023
import time
from machine import Pin
from neopixel import NeoPixel

# Set up 25 Neopixels on GPIO 16
np = NeoPixel(Pin(16), 25, bpp = 3) # bpp = bytes per pixel (GRB)

def clear():
    np.fill((0,0,0))
    np.write()

def wait(t):            # Delay t seconds
    time.sleep(t)

for i in range(25):  # 'Natural' order 0-24, as connected on board
    np[i] = (10,10,0)   # Yellow ON
    np.write()
    wait(0.15)
    np[i] = (0,0,0)     # Black OFF - Single blink
    wait(0.2)

clear()
wait(0.6)

for row in range(5): # Row at a time
    for col in range(5):
        np[5 * row + col] = (5,5,5) # White
        np.write()
        wait(0.15)
    wait(0.1)
clear()

for col in range(5): # Column at a time
    for row in range(5):
        np[5 * row + col] = (0,0,5) # Blue
        np.write()
        wait(0.15)
    wait(0.2)
clear()

def sq(x,y,n,r,g,b):
    for col in range(x,x+n):  # Top and Bottom
        np[5 * y + col] = (g,r,b)
        np[5 * (y+n-1) + col] = (g,r,b)

    for row in range(y,y+n):  # Sides
        np[5 * row + x] = (g,r,b)
        np[5 * row + x + n -1] = (g,r,b)
    np.write()

tt = 0.6
sq(0,0,5,4,0,0)
wait(tt)
sq(0,0,4,0,4,0)
wait(tt)
sq(0,0,3,0,0,4)
wait(tt)
sq (0,0,2,4,4,0)
wait(tt)
sq(0,0,1,0,4,4)
wait(tt)
clear()
So what does it do? Look through the code along with the points below to get an understanding of what it's doing and where:
- It sets up the RGB LEDs
- Defines procedures to clear the screen and wait a short period
- Blinks each of the LEDs in turn with yellow in the ‘natural order’ 0 - 24
- Slowly fills the display row by row with white
- Slowly fills the display column by column in blue
- Defines a procedure to draw squares and then draws a series of squares.
Example coordinate usage
Let's look at a simple example:
col = 3
row = 1
np[5 * row + col] = (0,0,5) # Blue
These instructions will turn LED 8 blue, because we're referencing the LED on column 3, row 1, as you can see from the grid below:

Characters and text
Explaining how characters and scrolling works is probably worthy of an article of its own, so we won't go into the detail of 'how' today, but you can download our example code, which is fully commented and easy to use, and try it for yourself.
You don't need to understand how it works to make use of the of the instructions which follow – just treat the code like a library!
There are two instructions:
- display(n,rr,gg,bb) # (ASCII value, red, green, blue) = Single stationary character
- scroll(s,rr,gg,bb) # (message string, red, green, blue) = Scrolled message
Check out the video to see it in action.
Things to try
- Scroll your name across the display
- Use a 10k potentiometer as an input device (range 0 to 9) and display the value on the LEDs
- Draw a red heart shape on a blue background
- Use 3 potentiometers to control the red, green and blue values of pixels at three corners of the display and their mixed colour on a square in the centre
Bonus Game – Zap it
Let's have a little fun! This is a hand and eye co-ordination game and just needs a simple button/switch (momentary type) connecting GPIO 14 to GND.
How to play
- A white target runs round the edge of the display
- A player has three goes in a game
- The player starts with 100 points and tries to zap the target while it is to the right of the red target marker by pressing the button
- If the player hits the button too early, too late or misses a rotation past the target position a point is lost
- A hit is registered with the target turning yellow and a green, go counter, pixel is lit
- A point lost by a missed hit is indicated by a short blue flash
- The score is shown at the end of the game
Can you score 100?
Zap it code
Here's the code for the game. As usual, copy it over to Thonny (use the copy button on the right, it's easier!) and run it like any other code:
# WS RP2040 'Zap it' Game
# Needs a button switch between GPIO 14 and GND
# Tony Goodhew 28th Aug 2023 (Author)
# How to play:
#   A white target runs round the edge of the display.
#   The player starts with 100 points and tries zap the target while it is
#   to the right of the red target marker.
#   If the player hits the button too early, too late or misses a rotation
#   past the target position a point is lost.
#   A hit is registered with the target turning yellow and a green pixel is lit.
#   A point lost is indicated by a short blue flash.
#   The score is shown at the end of the go.

import time
from machine import Pin
from neopixel import NeoPixel

# Set up 25 Neopixels on GPIO 16
np = NeoPixel(Pin(16), 25, bpp = 3) # bpp = bytes per pixel (GRB)

def clear():
    np.fill((0,0,0))
    np.write()

def wait(t):            # Delay t seconds
    time.sleep(t)

# =========== START OF FONT LIBRARY ===========
# Instructions:
# display(n,rr,gg,bb) # (ASCII value, red, green, blue)  = stationary character
# scroll(s,rr,gg,bb)  # (string, red, green, blue) = Scrolled message

# Character codes ASCII 32 - 127 5x5 pixels
# 5x5 font - Tony Goodhew 26th August 2023 (author)
# 5 columns of 5 bits = LSBs [@ == 00000]
q = [
    "@@@@@", #    32
    "@@]@@", #  ! 33
    "@X@X@", #  " 34
    "J_J_J", #  # 35
    "IU_UR", #  $ 36
    "QBDHQ", #  % 37
    "JUJA@", #  & 38
    "@@X@@", #  ' 39
    "@NQ@@", #  ( 40
    "@@QN@", #  ) 41
    "@J~J@", #  * 42
    "@DND@", #  + 43
    "@@BC@", #  , 44
    "@DDD@", #  - 45
    "@@A@@", #  . 46
    "ABDHP", #  / 47
    "NQQN@", #  0 48
    "@I_A@", #  1 49
    "IS_I@", #  2 50
    "UUUJ@", #  3 51
    "^BGB@", #  4 52
    "]UUR@", #  5 53
    "NUUF@", #  6 54
    "PSTX@", #  7 55
    "JUUJ@", #  8 56
    "LUUN@", #  9 57
    "@@E@@", #  : 58
    "@@BC@", #  ; 59
    "DJQ@@", #  < 60
    "@JJJ@", #  = 61
    "@QJD@", #  > 62
    "HPUH@", #  ? 63
    "_QUU]", #  @ 64
    "OTTO@", #  A 65
    "_UUJ@", #  B 66
    "NQQQ@", #  C 67
    "_QQN@", #  D 68
    "_UUQ@", #  E 69
    "_TTP@", #  F 70
    "NQUV@", #  G 71
    "_DD_@", #  H 72
    "@@_@@", #  I 73
    "BAA^@", #  J 74
    "_DJQ@", #  K 75
    "_AAA@", #  L 76
    "_HDH_", #  M 77
    "_HD_@", #  N 78
    "NQQN@", #  O 79
    "_TTH@", #  P 80
    "NQSO@", #  Q 81
    "_TVI@", #  R 82
    "IUUR@", #  S 83
    "PP_PP", #  T 84
    "^AA^@", #  U 85
    "XFAFX", #  V 86
    "~C~C~", #  W 87
    "QJDJQ", #  X 88
    "PHGHP", #  Y 89
    "QSUY@", #  Z 90
    "@_Q@@", #  [ 91
    "PHDBA", #  \ 92
    "@Q_@@", #  ] 93
    "@HPH@", #  ^ 94
    "AAAA@", #  _ 95
    "@@X@@", #  ` 96
    "BUUO@", #  a 97
    "_EEB@", #  b 98
    "FIII@", #  c 99
    "BEE_@", #  d 100
    "NUUH@", #  e 101
    "@_TP@", #  f 102
    "HUUN@", #  g 103
    "@_DG@", #  h 104
    "@@W@@", #  i 105
    "@AAV@", #  j 106
    "_DJA@", #  k 107
    "@_A@@", #  l 108
    "OHDHO", #  m 109
    "@GDG@", #  n 110
    "FIIF@", #  o 111
    "OJJD@", #  p 112
    "DJJG@", #  q 113
    "OHHD@", #  r 114
    "IUUR@", #  s 115
    "@H_I@", #  t 116
    "NAAN@", #  u 117
    "HFAFH", #  v 118
    "LCLCL", #  w 119
    "@JDJ@", #  x 120
    "@LEO@", #  y 121
    "@KMI@", #  z 122
    "@DNQ@", #  { 123
    "@_@@@", #  | 124
    "@QND@", #  } 125
    "HPHP@", #  ~ 126
    "@HTH@", #   127
    ]

# This procedure converts the font codes to a string
# of 25 ones and zeros characters - 5 cols of 5 rows
def decode(qq):
    powers = [16,8,4,2,1]
    str25 = ""
    for p in range(5):
        n = ord(qq[p])
        if n == 126:
            n = 92 # replace ~ with \
        str5 = ""
        for c in range(5):
            if ((powers[c] & n)/powers[c]) == 1:
                str5 = str5 + "1"
            else:
                str5 = str5 + "0"
        str25 = str25 + str5
    return str25

# Display a single character
def display(n,rr,gg,bb): # ASCII value, red, green blue
    qq = decode(q[n])    # get coded character pattern
    clear()              # Clear the display to BLACK
    for c in range(5):      # Loop through the 5 columns
        for r in range(5):  # Loop through the rows
            cc = qq[r + 5 * c] # current 'bit' at (c, r) coordinate
            if cc == "1":      # Is current 'bit' a one?
                np[5 * r + c] = (gg,rr,bb) # If so, set to colour
    np.write()  # Update the display

# Display a 'frame' of 25 bits - Used in scroll
def display_frame(ss,rr,gg,bb): # Message string of chars and colour
    clear()
    for c in range(5):          # Columns
        for r in range(5):      # Rows
            cc = ss[r + 5 * c]  # Get the 'bit' at (c,r)
            if cc == "1":       # Is it a one?
                np[5 * r + c] = (gg,rr,bb) # If so, set to colour
    np.write()          # Update display

def scroll(s,rr,gg,bb):
    long = ""
    s = " " + s + "  "           # Add a space character at the end
    l = len(s)                   # Length of string
    for p in range(l):           # Loop through the characters
        i = ord(s[p])-32         # Adjusted ASCII No of character
        temp = decode(q[i])      # get coded character code
        long = long + temp       # Concatenate char to long string
        last5 = temp[-5:]        # Get last 5 characters
        if last5 != "00000":     # Is there a "1" in last column?
            long = long +"00000" #   If so, add an extra space column (W and M are wider)

    # We now have a very long string of ones and zeros to send to
    # the display in small 'frames' of 25 bits each to fill the pixels

    p = 0
#    print(s," Buffer: ",len(long))
    while p < len(long)-25:           # Have we reached the end?
        frame = long[p:p + 25]        # Extract the 'frame' of 25 bits
        display_frame(frame,rr,gg,bb) # Show the frame on the Neopixels
        p = p + 5                     # Move pointer forward by 1 column
        wait(0.17)                    # Short delay - reduce to speed up scrolling
# ========== END OF FONT LIBRARY =============

# ======= MAIN ===================
sw = Pin(14, Pin.IN,Pin.PULL_UP)      # Set up button - Zero when pressed
# Title
scroll("Zap it",5,5,0)
clear()
np.write()
score = 0            # Targets zapped!
opps = 0             # Zap opportunities = pass the target area
p = 0                # Position of target on circuit (0-15)
errors = 0
err = 0
running = True       # Loop control variable
loops = 4000         # Delay loop variable - reduce to increase speed - harder!
route = [10,5,0,1,2,3,4,9,14,19,24,23,22,21,20,15] # By pixel numbers
p = 0
err = 0
while score < 3:     # You have 3 goes
    running = True
    display(17 + score,0,0,5) # Display the 'Go' number - 1 to 3
    np.write()
    time.sleep(0.3)
    clear()
    np[13] = (0,5,0)     # Display Red 'Target marker'
    if score > 0:
        np[6] = (3,0,0)
    if score == 2:
        np[7] =(3,0,0)
    np.write
    while running:
        np[route[p]] = (3,3,3) # White target
        np.write()
        for w in range(loops):
            if sw.value() == 0:            # Read switch
                if p != 8 :                # Off target ?
                    # Missed! - too early or too late
                    err = 1                # Increment errors
                    np[16] = (0,0,5)       # Err Flag set - blue
                    np.write()
                if (p == 8) and (err == 0):# On target?
                    # Zapped!
                    w = loops+10 #         # Halt w loop
                    running = False        # Halt outer loop
                    np[14] = (5,5,0)       # Hit flag set  = yellow
                    score = score + 1           # Increment score
                    np[score + 5] = (3,0,0)     # Hit score incremented - green
                    np.write()
                    time.sleep(1)
        if p == 8:
            opps = opps + 1                # Increment opportunities counter
        np[route[p]] = (0,0,0)             # Clear current target position
        np.write()
        p = (p + 1) % 16                   # Increment loop pointer
        if p == 0:
            errors = errors + err          # Update errors
            err = 0
            np[16] = (0,0,0)               # Turn off blue err flag

    np.write()

print(score, opps, errors)
result = 103 - opps - errors
print(result)
scroll("Score: " + str(result),5,5,0)
About the Author
This article was written by Tony Goodhew. Tony is a retired teacher of computing who starting writing code back in 1968 when it was called programming - he started with FORTRAN IV on an IBM 1130! An active Raspberry Pi community member, his main interests now are coding in MicroPython, travelling and photography.

9 comments
sd
Traceback (most recent call last):
File “C:\Users\sam\mp.py”, line 5, in
from machine import Pin
ModuleNotFoundError: No module named ‘machine’
Traceback (most recent call last):
File “C:\Users\sam\mp.py”, line 5, in
from machine import Pin
ModuleNotFoundError: No module named ‘machine’
S P
Hello,
None of the examples can work locally in a python environment (even in a venv) due to this error:
>>> %Run RP2040_test_colors.py
Traceback (most recent call last):
File “C:\RP2040_test_colors.py”, line 8, in
from machine import Pin
ModuleNotFoundError: No module named ‘machine’
>>>
It seems machine cannot be installed since pycrypto is not installed. pycrypto cannot be installed (even within a venv) since it has been deprecated and needs some VC++ binary which is not available.
So what’s the solution to enable debug for these examples on a local version of python (Windows 11, Python 3.10+, venv)?
MAX
Awesome tutorial! With a joystick I made a snake game, and with YK-04 RC fitness time assistant
Awesome tutorial! With a joystick I made a snake game, and with YK-04 RC fitness time assistant
Psycho
That’s great, good tuto, but… if you want to code in C/C++ instead of Python?
That’s great, good tuto, but… if you want to code in C/C++ instead of Python?
S P
Excellent, thank you!
Excellent, thank you!
KimZ
Great stuff, thanks!
Great stuff, thanks!
Paul
As above, Excellent Tutorial. Thanks so much for helping out the new bloke.
As above, Excellent Tutorial. Thanks so much for helping out the new bloke.
Tony Goodhew
Here is a simple piece of code to use 5×5 icons
Neopixel ICONs Waveshare RP2040-MATRIX with 5×5 grid of RGB LEDs NB Order of colours (green, red, blue) Tony Goodhew – 12 Oct 2023import time
from machine import Pin
from neopixel import NeoPixel Set up 25 Neopixels on GPIO 16
np = NeoPixel(Pin(16), 25, bpp = 3) # bpp = bytes per pixel (GRB)
def clear():
np.fill((0,0,0))
np.write()
def wait(t): # Delay t seconds
Define some colourstime.sleep(t)
red = (0,20,0)
grn = (20,0,0)
blu = (0,0,20)
blk = (0,0,0)
wit = (20,20,20)
cyn = (20,0,20)
yel = (20,20,0)
mag = (0,20,20)
colours = [blk,red,grn,blu,yel,cyn,mag,wit]
Colour fills‘’’
for i in range(1,len(colours)):
np.fill(colours[i])
np.write()
time.sleep(1)
clear()
‘’’ Define some icons
heart_l = [ # large heart – icon def
2,1,2,1,2,
1,1,1,1,1,
1,1,1,1,1,
2,1,1,1,2,
2,2,1,2,2
]
heart_s = [ # small heart – icon def
2,2,2,2,2,
2,1,2,1,2,
2,1,1,1,2,
2,2,1,2,2,
2,2,2,2,2
]
happy = [
0,0,0,0,0,
0,3,0,3,0,
0,0,0,0,0,
0,1,0,1,0,
0,0,1,0,0
]
sad = [
Beating heart0,0,0,0,0,
0,3,0,3,0,
0,0,0,0,0,
0,0,1,0,0,
0,1,0,1,0
]
def show_icon(pic): # Display an icon
for p in range(25): # Loop through pixels in order
pp = pic[p] # Get colour pointer
col = colours[pp] # Get colour
np[p] = col # Colour the current pixel
np.write() # Show the result
clear()
for count in range (10):
show_icon(heart_s)
time.sleep(0.5)
show_icon(heart_l)
time.sleep(0.5) Faces
show_icon(sad)
time.sleep(1.5)
show_icon(happy)
time.sleep(1.5)
clear()
David
Excellent tutorial, I’m looking forward to exploring the game and it’s code!
Excellent tutorial, I’m looking forward to exploring the game and it’s code!