
Auto-Starting Programs on the Raspberry Pi
There are multiple ways of auto-starting programs on the Raspberry Pi when it boots or you log in. There’s ‘cron’, ‘init’, Gnome Scheduler amongst others. However, the latest version of Raspbian includes another one, called ‘systemd’.
systemd
‘systemd’ is actually a suite of applications used for managing the operating system. The reason I like it is because you can set up a ‘service’ (your program) that systemd will automatically manage for you. So if, for example, your program crashes, systemd can restart it. This is especially useful if your Raspberry Pi is being used for monitoring something or logging measurements it is taking and you don’t want to miss anything, or you are using a Raspberry Pi based robot in a competition and the control program crashing would mean losing points!
Set-Up
In this example we are going to run a python script every time your Raspberry Pi boots. This script just happens to be used for controlling a robot which does not have a screen or keyboard input so having the control program starting when the Raspberry Pi boots is essential. I have put the script in ‘pi’ users home directory:
/home/pi/DriveRobot.py
systemd uses configuration files, called ‘unit’ files to tell it what to do. Let’s create one for our robot. Open a terminal window and type the following:
sudo nano /lib/systemd/system/driverobot.service
Now type in this:
[Unit]
 Description=DriveRobot Service
 After=multi-user.target

 [Service]
 Type=idle
User=pi
 ExecStart=/usr/bin/python3 /home/pi/DriveRobot.py
Restart=always
 RestartSec=0
 [Install]
 WantedBy=multi-user.target
There are three sections in this unit file:
- The [Unit] section contains two values:
- The name of the service (‘Description’)
- When in the boot process the service should be started (‘After’). In this case it will be run after the ‘multi-user’ systemd process has completed. i.e. at the stage where user accounts are available to the system. This is before the Raspbian Desktop has loaded, so if you have your Raspberry Pi booting into Desktop mode, and you want your program to display a user interface on the desktop, you would need to change this to ‘graphical.target’.
- The [Service] section configures what is going to run and what to do if your program crashes or exits.
- The ‘Type’ option of ‘idle’ tells systemd to wait until all other services have completed. This is so the boot is not slowed down.
- The ‘User’ defines which user the program will run under. In this case, the standard ‘pi’ user.
- ‘ExecStart’ is the executable to start. In this case, python3 running the DriveRobot.py script. Note that you must give the full path of both the program you are running (python3) and the script.
- ‘Restart’ set to ‘always’ tells systemd to monitor the process it has started, and if it stops, systemd will restart it.
- ‘RestartSec’ tells systemd to wait 0 seconds before restarting the program if it exits.
- The final section, [Install], has a ‘WantedBy’ directive. This indicates that the driverobot service will be loosely linked to the multi-user service - it will be run once the multi-user service has started successfully.
Once saved, you need to change the permissions of the unit file with:
sudo chmod 644 /lib/systemd/system/driverobot.service
Which will make it readable by all, and only writable by the owner.
Configuring systemd
Now that you have created the unit file, you need to make systemd aware of it and enable it so that the driverobot service is started each time the Raspberry Pi boots. Do this with:
sudo systemctl daemon-reload
 sudo systemctl enable driverobot.service
After which you may reboot your Raspberry Pi.
Checking the status of the driverobot service
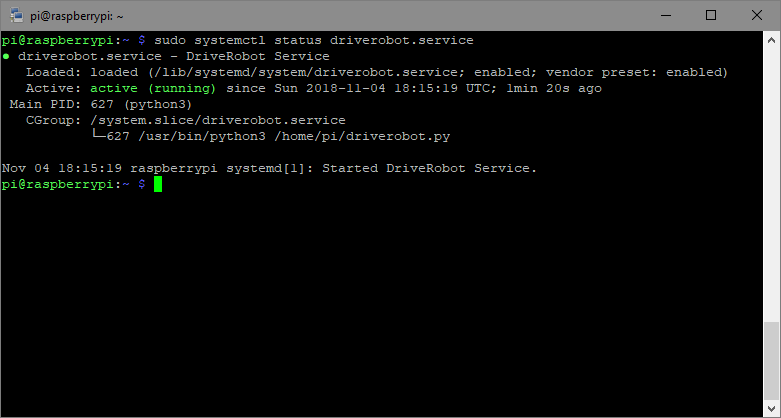
Once your Raspberry Pi has finished rebooting, your script should now be running. You can check it with the systemctl command:
sudo systemctl status driverobot.service
This should return something like this:

Testing a ‘Crash’
It’s useful to test whether systemd is going to handle a code crash. To simulate that you need to ‘kill’ the python process that is running your script. To find the process identity, run this:
ps -ax | grep driverobot
This should return two lines - one for the python3 process, and one for the ‘grep’ you have just run. The process identity (pid) is the first number on the line.

To stop your code, run the following:
kill -9 xxx
Where xxx is the process identity you just found.
Now check whether your code has been restarted by running this again:
ps -ax | grep driverobot

If systemd has been doing its job correctly, you should see a python3 process running still, but this time with a different process identity.
Summary
You now have the ability to run your code, or any program, every time your Raspberry Pi is booted, and keep it running all the time!


1 comment
Philip
This is very useful, thank you. What is the best way of disabling the feature if you no longer want to auto start a particular program?
This is very useful, thank you. What is the best way of disabling the feature if you no longer want to auto start a particular program?