
Backing up and Restoring your Raspberry Pi's SD Card
![]() As with all computers, it is a good idea to back up your Raspberry Pi's SD (or microSD) card from time to time; I'm just going to call them 'SD cards' from here on. This is especially true when you first get a pre-installed card from a retailer or friend.
As with all computers, it is a good idea to back up your Raspberry Pi's SD (or microSD) card from time to time; I'm just going to call them 'SD cards' from here on. This is especially true when you first get a pre-installed card from a retailer or friend.
You will need a second computer, or a second Raspberry Pi operating system on an SD card. How you back it up will depend on the computer you have. Whatever computer you have, you will need an SD or microSD card reader.
Using Windows
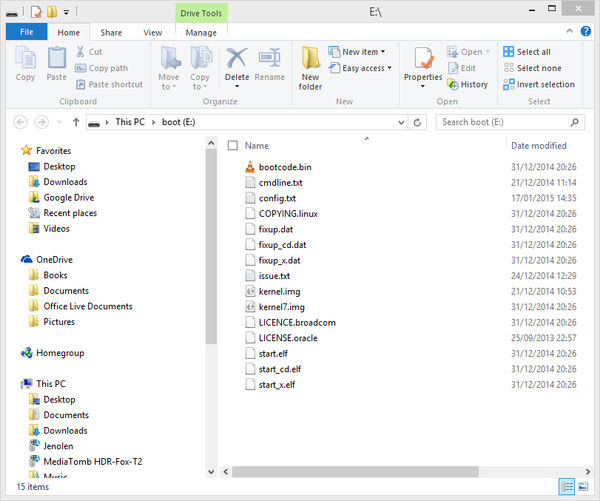
One of the best tools to backup and restore SD cards is Win32 Disk Imager. Download it from SourceForge and install it. BEFORE starting the software, insert your SD card into the SD card reader on your PC. Often this will open the file explorer showing you the contents of part of your SD card, which should look something like this:
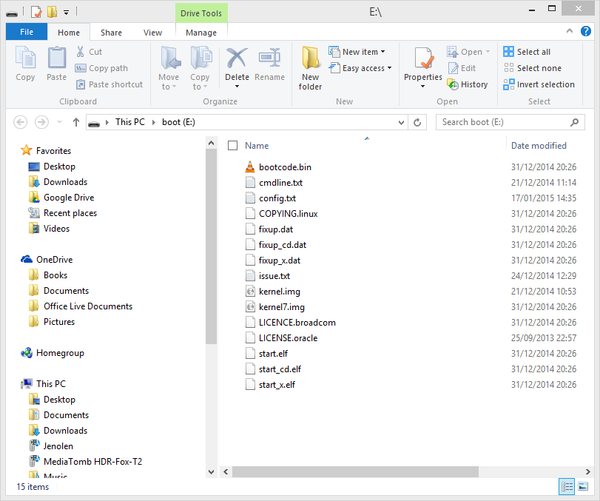
This is not the whole of the contents of your SD card - only part of the card contents is readable by Windows. The rest is not readable by your PC.
Once you open Win32 Disk Imager, use the blue folder icon to choose the location and the name of the backup you want to take, and then choose the drive letter for your SD card.
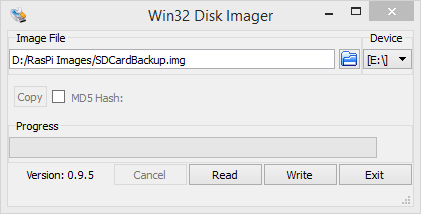
Click on the Read button. The card will then be backed up to your PC.
If you have a problem with your sD card and it becomes unreadable for any reason (e.g. it becomes corrupted), just follow the above instructions, choosing the image you created as the image file, and click on Write to write it back to the SD card. In fact, you can write it back to another SD card of the same size, giving you an exact duplicate.
Using OSX
Insert the SD Card into a card reader on your Mac. Open Terminal and enter the following command to locate your SD Card:
diskutil listAll your disks will be listed, and will look something like below:
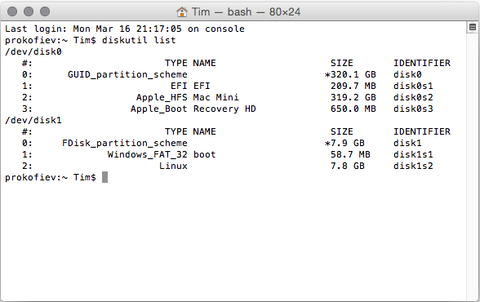
Look for your SD card by looking for a disk of the right size and name. In the above example, the SD Card is /dev/disk1.
Next, in Terminal, enter the following command to create a disc image (.dmg) of your SD Card in your home directory.
sudo dd if=/dev/disk1 of=~/SDCardBackup.dmgWait until the SD card has been completely read; the command does not show any feedback, so wait for the command prompt to reappear in the terminal window once it is complete.
Again, if you corrupt your SD card or need to make a copy at any time, you can restore it by following the same approach as above to locate your SD card. Before you can write to the card you have to 'unmount' it so that the operating system does not try to write to it at the same time. Use the following in the Terminal:
diskutil unmountDisk /dev/disk1Then use the this to write the image back to the SD card:
sudo dd if=~/SDCardBackup.dmg of=/dev/disk1Once it has finished writing the image to the SD card, you can remove it from your Mac using:
sudo diskutil eject /dev/rdisk3Using Linux
Before inserting the SD card into the reader on your Linux PC, run the following command to find out which devices are currently available:
df -hWhich will return something like this:
Filesystem 1K-blocks Used Available Use% Mounted on
rootfs 29834204 15679020 12892692 55% /
/dev/root 29834204 15679020 12892692 55% /
devtmpfs 437856 0 437856 0% /dev
tmpfs 88432 284 88148 1% /run
tmpfs 5120 0 5120 0% /run/lock
tmpfs 176860 0 176860 0% /run/shm
/dev/mmcblk0p1 57288 14752 42536 26% /boot
Insert the SD card into a card reader and use the same df -h command to find out what is now available:
Filesystem 1K-blocks Used Available Use% Mounted on
rootfs 29834204 15679020 12892692 55% /
/dev/root 29834204 15679020 12892692 55% /
devtmpfs 437856 0 437856 0% /dev
tmpfs 88432 284 88148 1% /run
tmpfs 5120 0 5120 0% /run/lock
tmpfs 176860 0 176860 0% /run/shm
/dev/mmcblk0p1 57288 14752 42536 26% /boot
/dev/sda5 57288 9920 47368 18% /media/boot
/dev/sda6 6420000 2549088 3526652 42% /media/41cd5baa-7a62-4706-b8e8-02c43ccee8d9
The new device that wasn't there last time is your SD card.
The left column gives the device name of your SD card, and will look like '/dev/mmcblk0p1' or '/dev/sdb1'. The last part ('p1' or '1') is the partition number, but you want to use the whole SD card, so you need to remove that part from the name leaving '/dev/mmcblk0' or '/dev/sdb' as the disk you want to read from.
Open a terminal window and use the following to backup your SD card:
sudo dd if=/dev/sdb of=~/SDCardBackup.imgAs on the Mac, the dd command does not show any feedback so you just need to wait until the command prompt re-appears.
To restore the image, do exactly the same again to discover which device is your SD card. As with the Mac, you need to unmount it first, but this time you need to use the partition number as well (the 'p1' or '1' after the device name). If there is more than one partition on the device, you will need to repeat the umount command for all partition numbers. For example, if the df -h shows that there are two partitions on the SD card, you will need to unmount both of them:
sudo umount /dev/sdb1
 sudo umount /dev/sdb2
Now you are able to write the original image to the SD drive:
sudo dd bs=4M if=~/SDCardBackup.img of=/dev/sdbThe bs=4M option sets the 'block size' on the SD card to 4Meg. If you get any warnings, then change this to 1M instead, but that will take a little longer to write.
Again, wait while it completes. Before ejecting the SD card, make sure that your Linux PC has completed writing to it using the command:
sudo syncPre-Installed Images
You can, of course, buy pre-installed images on SD cards from The Pi Hut. But remember to back them up in case something goes wrong!


5 comments
Bogdan Vosnjak
Win32 Disk Imager is a great tool and it works fine, but it has a bug. On sourceForge page it is written “Known issues:
Currently, the program will crash if you are using a Ramdisk. This is being debugged.” In my case (on Windows 11), I needed to shut down Google Drive agent. After that, it worked fine.
Lindsay Fowler
Has the author tried sudo dd if=/dev/disk1 of=~/SDCardBackup.dmg on a Mac??
I don’t think the dd command works with ~ to represent the home directory. It will say “No such file or directory”.
Instead, use
sudo dd if=/dev/disk1 of=/users/fredflinstone/SDCardBackup.dmg
Has the author tried sudo dd if=/dev/disk1 of=~/SDCardBackup.dmg on a Mac??
I don’t think the dd command works with ~ to represent the home directory. It will say “No such file or directory”.
Instead, use
sudo dd if=/dev/disk1 of=/users/fredflinstone/SDCardBackup.dmg
Dean
The recommended software, Win32 Disk Imager is working perfectly fine on Windows 11. I backed up an 8GB CF card in 6m:21s. I issues with Virtual Drives active.
Thanks!
The recommended software, Win32 Disk Imager is working perfectly fine on Windows 11. I backed up an 8GB CF card in 6m:21s. I issues with Virtual Drives active.
Thanks!
Rich Weinkauf
For Paul, unless you’re running Pis under very old version, like Wheezy, you should probably use the SD Card Copier utility on your Pi. I happen to have three Pi3Bs that are running some automated digital amateur radio software, and they’re on Wheezy. To back up these I have to use the .img technique with Win32DiskImager running on Windows 11. For all other Pis I have I use the SD Card Copier, which is so much more convenient.
For Paul, unless you’re running Pis under very old version, like Wheezy, you should probably use the SD Card Copier utility on your Pi. I happen to have three Pi3Bs that are running some automated digital amateur radio software, and they’re on Wheezy. To back up these I have to use the .img technique with Win32DiskImager running on Windows 11. For all other Pis I have I use the SD Card Copier, which is so much more convenient.
Paul White
Raspberry Pi System Backups:
The recommended software, Win32 Disk Imager will not run on my Windows 10 machine.
Apparently, this is a well known problem and arises when virtual drives are active.
I shut down OneDrive and Google Drive but have not yet succeeded running the imager.
This is infuriating and should be acknowledged in all the official RPi backup documentation.