How to setup WiFi on the Raspberry Pi - Raspbian
In this tutorial we will show you how to setup WIFI on the Raspberry Pi. This particular tutorial will be focusing on the Raspbian operating system. Tutorials for other Raspberry Pi operating systems, such as OpenELEC, RaspBMC and Arch can be found below:
 That should be all we need to do to get things going! Reboot your Raspberry Pi with
- How to setup WIFI on Raspbian
- How to setup WIFI on OpenELEC XBMC
- How to setup WIFI on RaspBMC
- How to setup WIFI on Arch
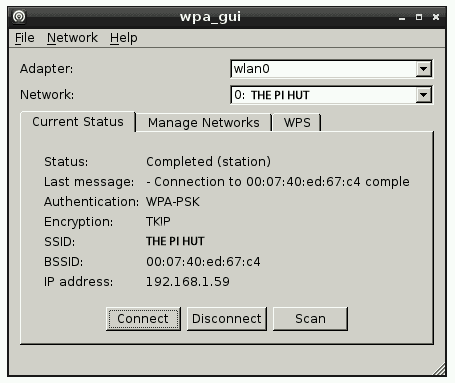
- Launch "WIFI Config" from the desktop, this will launch the GUI application for easily configuring wireless networks
- Click "Scan"
- Double click your desired network, This will bring up another window containing some more advanced options for connecting to your network. For this example, we are assume you have a simple network setup.
- In the "PSK" field, enter your wireless password. All keyboard entries here will be converted into *'s for security purposes
- Once done, click "Add". This will take you back to the previous scan screen, which you can now close. If everything has been done correctly, the WIFI config application will show you as connected

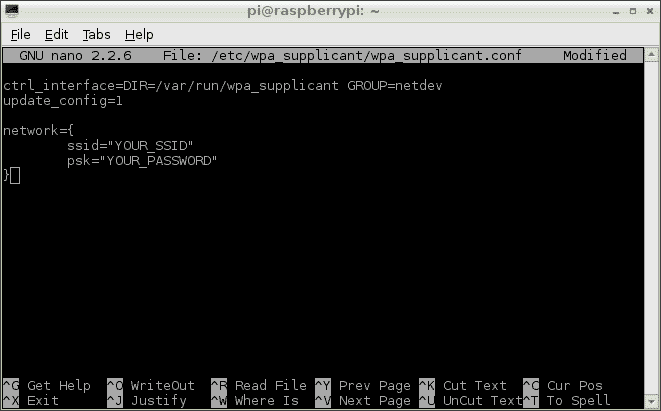
sudo apt-get update sudo apt-get upgrade sudo apt-get autoremove We'll want to take a backup of the WIFI configuration file before we start to make changes. sudo cp /etc/wpa_supplicant/wpa_supplicant.conf /etc/wpa_supplicant/wpa_supplicant.conf.bak Next up we can edit the file with the "nano" editor. sudo nano /etc/wpa_supplicant/wpa_supplicant.conf We want the file to look like the screenshot below. You'll need to swap "YOUR_SSID" and "YOUR_PASSWORD" for your WIFI name and password. Once done, save and close the nano editor  That should be all we need to do to get things going! Reboot your Raspberry Pi with
 sudo reboot Once your Raspberry Pi is back up and running, we can run sudo ifconfig to see if the change we have made has worked. The screenshot below shows that it has worked and that our WLAN adapter has been assigned an IP address (192.168.3.19 in this example) 
While you're here, why not check out the WiFi dongles we have available..

