
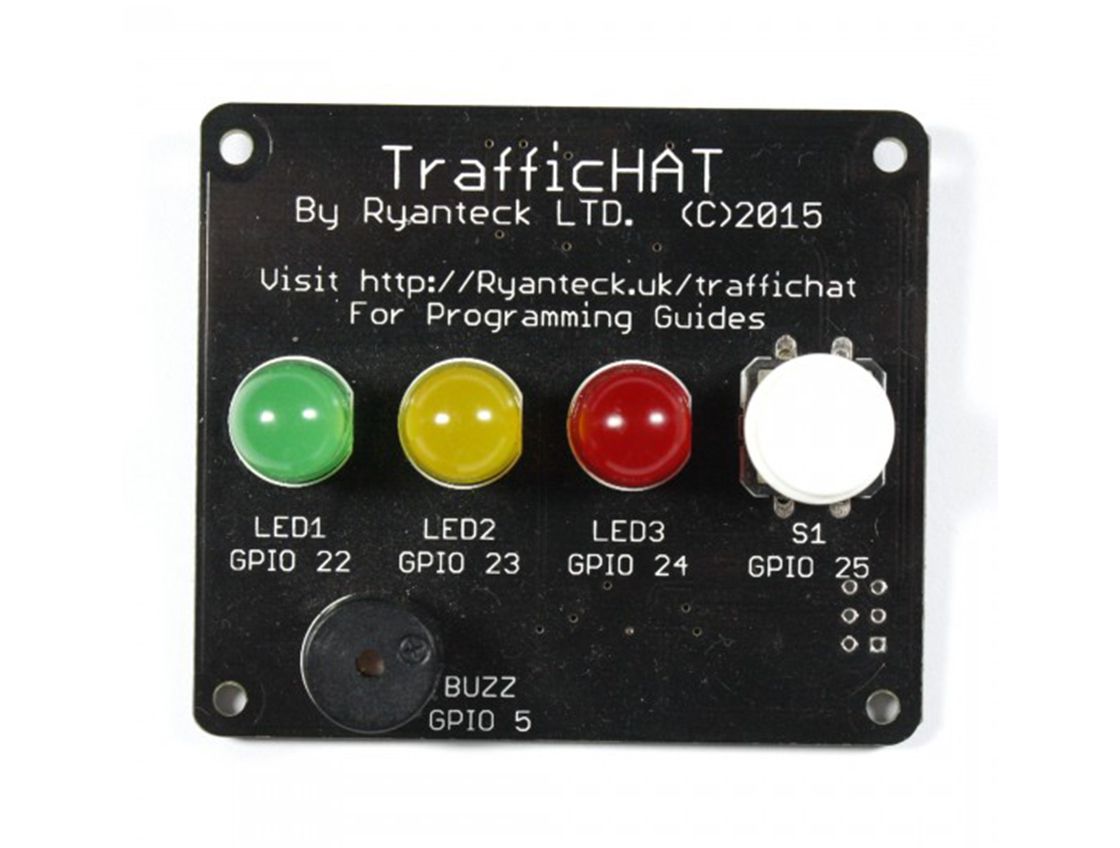
Ryanteck Traffic HAT - GPIO Zero
Following on from the previous tutorial of blinking an LED using GPIO Zero we're going to expand into creating a traffic light program.
However instead of using the separate modules for the LED And buzzer there is a neater way that we can do it using the TrafficHAT Add-on function.
Begin by adding the following code to setup the TrafficHAT replacing Ryan Walmsley with your name.
#TrafficHAT Program

#TrafficLight By Ryan Walmsley


from gpiozero import TrafficHat

from time import sleep


th=TrafficHat()
Next save it as traffichat-trafficlight.py to your home directory (/home/pi as standard). Keep saving along the way.
The main difference here is that instead of importing an LED, Button or Buzzer we are instead importing TrafficHat.
This means that the Red, Green and Amber LEDs are already pre-assigned so instead of having to do the following for the amber LED:
amber = LED(23)


amber.on()
We can just do the following:
#Amber on

th.amber.on()
Or to blink it multiple times in a row like the previous tutorial:
#Amber blink

th.amber.blink(1,1,10,False)
As of this building the rest of the program is very simple.
We want to begin by outlining the basis of the program. Add the following to the bottom of your current program.
try:

	while True:

		#TrafficLight Code


except KeyboardInterrupt:

	exit()
This basis of code will forever run the program until Ctrl-c is pressed. Once Ctrl-c is pressed it will close the program correctly making all the LEDs and buzzer turn off.
Next all of the following code will go underneath the #TrafficLight Code line instead of at the bottom and should be indented to the same level
Now we want to do the following for our program:
- Turn the Green LED On
- Wait until the button is pressed
- Turn the Green LED Off
- Turn the Amber LED On
- Wait 2 seconds
- Turn the Amber LED Off
- Turn the Red LED On
- Buzz or "Blink" the buzzer 15 times with a 0.1 second delay.
- Sleep for 1 second
- Turn the Red LED Off
- Blink the Amber LED 6 times with a 0.5 Second Delay.
Let's get started!
To turn the green LED On add the following line to your code
th.green.on()
Using the GPIO Zero library has made this really easy to do. We just start with the object for the TrafficHAT which is th , address the green' LED and then use the green LED's on function.
Next we want to wait until the button is pressed. We use a neat little bit of code to do this.
while(th.button.is_pressed == False):

			#While not pressed do nothing

			pass

		#Button has been pressed!
Let's go through what this bit of code does: First it checks that while the button is not pressed is correct. We do this by checking to see if the is_pressed variable of the button is False. When the button is not pressed it will be False hence the statement being True. When the button is pressed the TrafficHAT Will return True and making the statement false.
While the statement is true the python program runs the pass command which just does nothing. However if we don't put pass there then the program will not work.
Once the button is pressed the while loop is exited and the program will continue.
Next we want to turn the Green LED Off. We do this very much the same as we turned it on however instead of using on we use off'
th.green.off()
And then turn the amber LED On. You can do this by modifying the code for the Green LED.
Next we then want to make the program wait or sleep for 2 seconds. We do this using the following code:
sleep(2)
You can also change the 2 for any number of seconds for the delay.
Now the amber LED has been on for 2 seconds we want to then turn it off and then turn on the red LED.
Now the Red LED is turned on we then want to buzz the buzzer. To do this we use the blink function.
Here's the line of code:
th.buzzer.blink(0.1,0.1,15,False)
As you can see we've set some variables for the blink function. They are: The on time: The amount of time the buzzer or LED is on for. In this case 0.1 Seconds The off time: The amount of time the buzzer or LED is then off for. In this case also 0.1 Seconds. N - Iterations: The amount of times the buzzer or LED blinks or buzzes. In this case it will loop 15 times. Threaded / Background: The final variable is weather it blinks or buzzes in the background. Say that you wanted it to buzz while your program is still doing something you would set this to True. However we want our program to pause while this happens so we set it to False.
Next we then want to sleep again for 1 second and then turn the red led off.
Finally we then want to repeat the same blink function for the buzzer but instead of using the buzzer we want to change it to amber.
And your program should now be ready to go!
Save it and run the program by opening a terminal window and typing "python3 traffichat-trafficlight.py".
If your program isn't working then you can compare it to our demo code located here:
#TrafficHAT Program

#TrafficLight by Ryan Walmsley


from gpiozero import TrafficHat

from time import sleep

th = TrafficHat()


try:

	while True:

		#TrafficLight Code

		#First turn the Green LED On

		th.lights.green.on()

		#Next we want to wait until the button is pressed.

		while(th.button.is_pressed == False):

			#While not pressed do nothing

			pass

		#Button has been pressed!

		th.lights.green.off()

		#Amber on for a couple of seconds

		th.lights.amber.on()

		sleep(2)

		th.lights.amber.off()

		#Turn the red on

		th.lights.red.on()

		#Buzz the buzzer 20 times with 0.1 second intervals

		th.buzzer.blink(0.1,0.1,20,False)

		sleep(1)

		th.lights.red.off()

		#Red off and blink amber 4 times with 0.5 second intervals

		th.lights.amber.blink(0.5,0.5,4,False)


except KeyboardInterrupt:

	exit()


