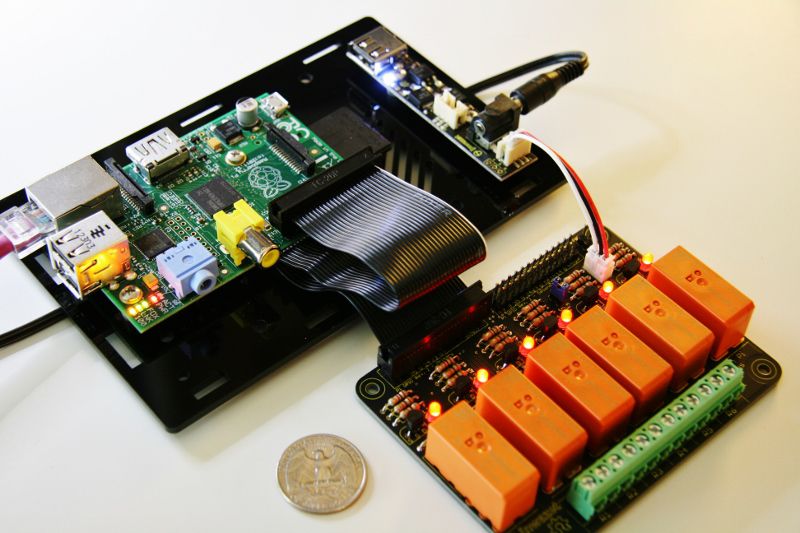
Nwazet Pecan Pi Relay assembly and sample code
PCB Specifications
- Copper weight: 2oz
- Material: FR4
- Board thickness: 2.3622mm (0.093")
Bill of Materials
|
PCB Designator |
Description |
Part # |
Quantity |
|---|---|---|---|
| N/A | Schrack Relay | RZ03-1A4-D005 | 6 |
| R1-6 | Wire contacts | Phoenix Contact 1935174 | 4 |
| SGD1-6 | MOSFET N-CHANNEL 60V 200mA | 2N7000 | 6 |
| PDR1-6 | 10K OHM 1/4W 5% CARBON FILM | CF14JT10K0 | 6 |
| LR1-6 | 1K OHM 1/4W 5% CARBON FILM | CF14CT52R102J | 6 |
| BR1-6 | 100 OHM 1/4W 5% CARBON FILM | CF14JT100RTR-ND | 6 |
| L1-6 | Red 3mm Round LED (2v, 35mA) | LED3R | 6 |
| D1-6 | 1N4001 Series 50V 1A | 1N4001-E3/54 | 6 |
| PCB | FR4, ENIG, black / yellow | Nwazet Pecan Pi Relays | 1 |
| N/A | 40 0.1" pin headers | N/A | 1 |
Assembly Directions and Time
- About orienting the LEDs on the board: the shortest leg of the LED (cathode) corresponds to the ground (GND) as indicated by a dot on the silkscreen.
- Please note that the resistors have different values even though they almost all look the same. Be sure to check their values before stuffing the board or the relays will not work properly.
- Check the placement of the components against the Bill of Materials above.
- Make sure the band on the diodes matches the silkscreen on the PCB.
- Please be very careful when manipulating the MOSFETs, as these components are very sensitive to electrostatic discharge.
For best results:
- Use a 30 Watt soldering iron
- Use a fine soldering iron tip
- Use fine rosin-core solder (0.022")
- Use masking tape to hold parts in place as needed while soldering
- Assembly time is around an hour
Troubleshooting
If a relay fails to switch, please check the following:
- Check the orientation of the corresponding diode D1-6, ensuring that the silver band on the diode is pointing to the left (when facing the wire contacts) according to the silkscreen.
- Make sure that the resistors (LR1-6, PDR1-6 and BR1-6) are in their proper locations. They don't all have the same value and will prevent the circuit from operating if mismatched.
- Triple check your soldering of the parts on that section of the circuit.
- Check that you're actually addressing the correct relay through the correct BCM pin number in your code, matching the PCB silkscreen on the GPIO connector.
- Check that your code actually defines the GPIO pin number as an output.
- It could also be that the MOSFET for this relay has been damaged (MOSFETs are very sensitive to ESD).
Sample Code
- The following Bash script shows how to use the wiringPi gpio command to switch the relays ON / OFF indefinitely. We used this script for stress-testing the board and relays ;)
For reference, the relays are mapped to the GPIOs of the Pi as follows:
- Relay # 1: GPIO 25
- Relay # 2: GPIO 17
- Relay # 3: GPIO 27
- Relay # 4: GPIO 22
- Relay # 5: GPIO 23
- Relay # 6: GPIO 24
#!/bin/bash
# Export the pins as outputs using the BCM pin numbering
# The script assumes a Raspberry Pi Model B GPIO Rev. 2 connector
# For Raspberry Pi Model B GPIO Rev. 1 connector, replace GPIO 27 by GPIO 21
gpio -g mode 25 out
gpio -g mode 17 out
gpio -g mode 27 out
gpio -g mode 22 out
gpio -g mode 23 out
gpio -g mode 24 out
count=0
while true
do
echo "Count=${count}"
count=$((count+1))
#ON
gpio -g write 25 1
gpio -g write 17 1
gpio -g write 27 1
gpio -g write 22 1
gpio -g write 23 1
gpio -g write 24 1
# OFF
gpio -g write 25 0
gpio -g write 17 0
gpio -g write 27 0
gpio -g write 22 0
gpio -g write 23 0
gpio -g write 24 0
done
Loading I2C, SPI and 1-Wire drivers
If you need to control these relays through an I2C or SPI I/O expander, you may need to ensure that the appropriate drivers are loaded on your Raspberry Pi. Please check this tutorial for details..
Original author: Fabien Royer, nwazet.com


