
Nwazet Go Pro Kit Assembly Instructions
Assembly time: approximately 20 minutes.
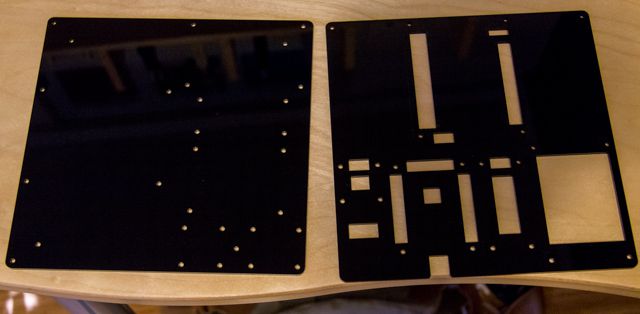
The nwazet Pro Kit is built around two black acrylic plates laser cut to receive the modules. The plate with only 3mm screw holes is the bottom plate, and the plate with the larger windows goes on top. We'll mount the modules one by one, starting with the touch screen and finishing with the power supply.
All modules but the power supply are assembled first on the top plate, and will then be fastened to the bottom plate as the last step of the assembly procedure.

Touch Display
To mount the display, and all the other modules, as the procedure will be identical for each (except for the power supply), you will need 4 male/female standoffs, 4 round spacers, and 4 black screws (the 4 nuts won't be used until later in the procedure when we add the bottom plate).

First, locate the display's window in the top plate, and insert each of the 4 black screws. The window should be on the bottom-right of the plate, as on the photo above. You may need to flip the plate if it doesn't look like the photo. Insert the screws with the head under the plate. Use sticky tape to secure the screws in place (this is a very useful trick, believe us, you're in for a world of frustration if you don't follow these simple instructions). Then, put a spacer on each of the screws. The display module can be added at this point, with the screen facing down. The screen should be aligned with the window, which puts the Go connector on the inside and the ribbon connector on the outside. Add the M/F standoffs on top of this. Your touch display is now securely in place.
7-Segment Display Module
The second module we're going to mount is the 7-segment display module. The procedure is the same as for the Touch Display. The Go connector still goes on the inside. Do not forget to connect a 5cm Go cable before you mount the display.


Data Acquisition Module
The procedure for the DAQ module is the same. Again, don't forget the 5 cm cable and put the Go connector on the inside.


Potentiometer
The potentiometer module is mounted following the same procedure, with the Go connector on the left when looking at the kit from above. Do not forget to connect a 10cm cable before you mount the module.


Netduino Go
Before we mount the Netduino (following the same procedure as the previous three modules), we need to connect all the modules to the Netduino. This is when the 10cm cable for the display should be added.


Power Supply
The power supply is mounted slightly differently from the other modules. It will be mounted on the bottom plate.

Start by inserting one nylon screw into each of the holes in the power supply, with the head on the top side. Secure each screw with a nut on the bottom.

Insert the power supply onto the bottom plate. Make sure the plate is oriented so that it corresponds to the top one. Secure the power supply in place with 4 other nuts.

Putting it all together
All the modules are now in place. We still have two empty screw holes on the corners. Insert a black screw in each, head on top of the top plate. Secure each with a nut right under the plate. Then, add a spacer and a M/F standoff on each.


Before you put the two plates together, you may want to route your USB power cord so that it mostly disappears into the kit.Mount the bottom plate onto the top plate.

You can now start adding nuts to secure each of the screw ends protruding through the bottom plate. You are almost done.

You may now add the rubber feet to the bottom of the bottom plate.
Adding the knob

Drop the knob onto the potentiometer and secure it in place with the small screw on its side.

Breadboards
Peel off the protection from the back of the breadboards and carefully stick them onto the top plate within the engraved rectangles on the top plates. Orient the breadboards so that the small interlocking tabs point outward. This will ensure that the tabs sticking out of the breadboards don't cover the small holes placed above the DAQ module's LEDs.

You're done! Have fun with the Go Pro Kit and don't forget to send us your creations.
Original author: Fabien Royer, nwazet.com


