Renaming your Raspberry Pi's Hostname
If, like me, you have more than one Raspberry Pi on your network, then it is a good idea to give each one a unique name. If you use Raspbian, then that name is 'raspberrypi' by default. It is really easy to change that name to (almost) whatever you like. This name is known as the 'hostname'.
First, log onto your Raspberry Pi and open a terminal window. Your Raspberry Pi's name is in a file called 'hostname' in the /etc directory. Edit that file as superuser with:
sudo nano /etc/hostnameThis file contains only one line - the name of your Raspberry Pi. Change the name to whatever you like, but only use the letters 'a' to 'z' (upper or lower), digits '0' to '9', and the dash '-'.
Save the file using Ctrl+x, then Y followed by Enter.
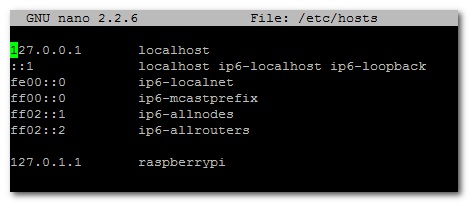
There is a second file that also contains the hostname, but it is only there as a workaround for some software. Therefore you should also edit that file:
sudo nano /etc/hostsFind the line starting with 127.0.1.1, and change the name following it to your new hostname. Save the file using Ctrl+x, then Y followed by Enter.
Once you have rebooted your Raspberry Pi, all other computers on your network should see it with the new hostname. On the Raspberry Pi itself, you can check your hostname by issuing the following command in a terminal window:
hostname
3 comments
artur
it works – thank you
it works – thank you
The Pi Hut
@Kev Thanks for the heads-up, we’ve updated the article to reflect the correct line to change.
@Kev Thanks for the heads-up, we’ve updated the article to reflect the correct line to change.
Kev
This is clearly incorrect and misleading. In /etc/hosts, the line 127.0.0.1 is reserved for localhost. The line that should be changed is 127.0.1.1.
This is clearly incorrect and misleading. In /etc/hosts, the line 127.0.0.1 is reserved for localhost. The line that should be changed is 127.0.1.1.