Raspberry Pi Roundup - A music sequencer, Minecraft maps from LIDAR data and a dog treat machine
Music Box Looper

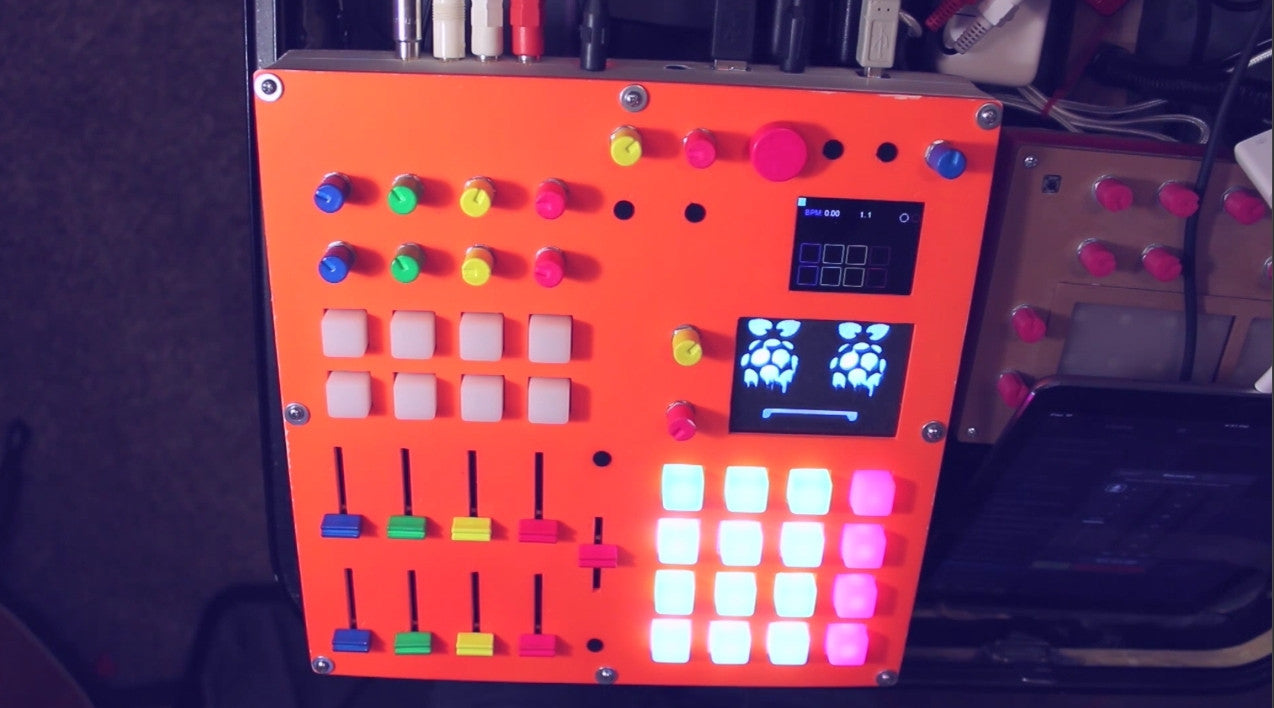
Music artist otem rellik (Toby Hendricks) has built an amazing musical instrument. It is a music samples looper that he created to replace his iPad for live performances. It features a Raspberry Pi 3 running Pure Data and a Teensy 3.6 for handling the controls, the screen and communications with the Pi, which it achieves over a serial link.
At the bottom right are the instrument buttons. Normally, these play sounds but by pressing a small button to the left, he can choose which instrument he is playing. The screen at the top right shows the instrument selection and other menus.
Top-right of the box are the loop buttons, for recording and playing back of the loop sequences and volume controls for them. Bottom left is where effects are handled such as delay, reverb, cut-off, feedback and beat repetition.
Above the instrument buttons, there is a large screen (which is actually a Nintendo DS touch screen) where post-loop effects are created – he can create these effects by drawing on the screen with his finger.
There is a large rotary encoder on the top right which allows him to save, load and delete loop sequences, the menu for which is also displayed on the small screen.
Along the back (the top in the photograph) are various external inputs and outputs, including a USB link to his girlfriend’s instrument so that data like beats-per-minute can be synchronised between the two.
The whole box has a strip of Neopixels round the bottom edge (you can’t see them in the photo) which change in reaction to the music being played.
You can see a walk-through video of the instrument, as well as a demo live-Jam session, by viewing the video below. You can also see more photos from the build on Instagram. I take my hat off to him – this is marvellous and is something I’d love to make myself, after my experiences with my own Music Box project.
LIDAR

In 2015, the Environment Agency released it’s LIDAR data to the general public. LIDAR (Light Detection & Ranging) uses a laser “to scan and map the landscape from above and is widely considered to be the best method for collecting very dense and accurate elevation data across the landscape.” [source]
Stefan Janusz from Defra Digital has posted a way of using this data on a Raspberry Pi (not to mention Macs and Windows machines) to generate 3D terrain maps based on this data. In particular, Minecraft Pi Edition is used to generate these maps in a live environment. It’s all very ‘big data’-y and exciting, and fun! You can explore this method of using the LIDAR data here. Make sure you read the whole thing and get to the Pi instructions, which are a little way down the page.
Dog Treats!

Pickles is one lucky dog. Not only does he have two owners who dote on him (and miss him when they’re not there!), one of those owners, Eric Page, decided to build a Raspberry Pi-controlled treat dispenser. The idea is that when they’re not there, Eric and his fiancee Shirin can connect to the Pi over the internet and tell the dispenser to do its stuff. The machine is called, rather adorably, the Pickles Loves His Mom Treat Machine.
The Pi controls a stepper motor which rotates a cylinder with a cut-out. The cut-out allows the treats to fall out onto the floor, which Pickles gratefully chomps up! It also plays a sound clip of Shirin’s voice (which has developed a lovely Pavlovian effect!) and then takes a picture if the Pi detects motion (which it inevitably does – Pickles gets hungry, after all) and emails it to the person who submitted the dispense request. Apparently, Eric went to a lot of effort to ensure that just the right amount of treats were dispensed to avoid Pickles developing a weight problem!
The software uses Adafruit’s IO MQTT interface to transmit messages to the dispenser. This can be triggered either over the web or via voice through an Alexa device. The back end on the Pi is written in Python and it also monitors a Gmail account occasionally for email requests.
Here’s the dispenser in action and you can find out how Eric did it by viewing the Instructable here.


