Skip to content
The Raspberry Pi 3 Tutorial - A Beginner’s Guide
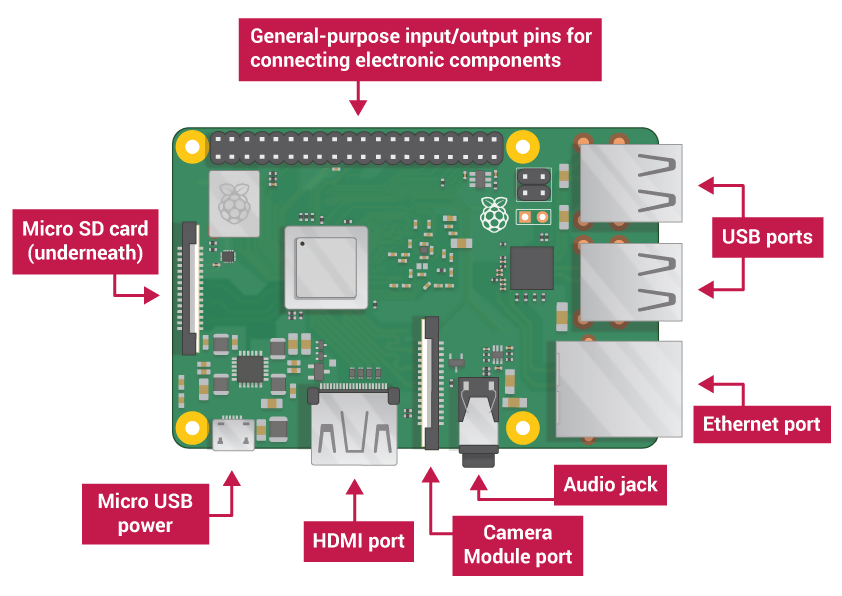
The Raspberry Pi has a number of ports which you will use to control the Raspberry Pi, and it can use to control other devices. Your Raspberry Pi will have the following ports:
- USB – USB ports are used to connect a wide variety of components, most commonly a mouse and keyboard.
- HDMI – The HDMI port outputs video and audio to your monitor.
- Audio – The audio jack allows you to connect standard headphones and speakers.
- Micro USB – The Micro USB port is only for power, do not connect anything else to this port. Always connect the power after you have already connected everything else.
- GPIO – The GPIO ports allow the Raspberry Pi to control and take input from any electronic component.
- SD card slot – The Raspberry Pi uses SD cards the same way a full-size computer uses a hard drive. The SD card provides the Raspberry Pi with internal memory, and stores the hard drive.

What you will need to get started
In addition to the micro-USB provided to power the Raspberry Pi, you are going to need a keyboard and mouse to control it, and a screen so you can see what you are doing.
You will also need an SD card, we will have provided one with Raspbian already loaded onto it.
Setting up your Raspberry Pi for the first time
Getting your Raspberry Pi up and running is a very easy process, just follow these simple steps:
- Insert an SD card with a Linux operating system on it. We strongly recommend using Raspbian or another OS designed specifically for the Raspberry Pi, at least until you are more familiar with its capabilities. We provide our Raspberry Pis with a Raspbian installation already on the SD card, so if you got yours from us you can skip this step. If you bought your Raspberry Pi elsewhere, please read our NOOBS tutorial below.
- Connect a monitor to the HDMI port. Make sure the monitor is connected to a wall socket and is powered on. The Raspberry Pi is still off, so you won’t see anything yet. If you are connecting a non-HDMI monitor, use an adapter that won’t block access to the USB ports.
- Connect a mouse and keyboard to the USB ports. High-end equipment such as ‘gaming’ mice can drain power, put unnecessary load on the processor and may need software and drivers to work properly. To avoid complications, stick to simple ‘plug-and-play’ devices.
Your Raspberry Pi should now look like this:

- If you want to connect to the Internet via Ethernet instead of WiFi, you should also plug in an Ethernet cable. If you want to hear sound through speaker or headphones, you should also plug those in now. Neither of these are necessary to start up the Raspberry Pi.
- Finally, connect the power supply to a wall socket and plug in the micro USB cable. A red LED will light up on the Raspberry Pi, and on the monitor you will see the Raspberry Pi booting up. In a few moments you will see a desktop screen.
Final steps
If this is the first time you have loaded up your Raspberry Pi, you will see a welcome screen asking you to provide some basic settings.
Click Next to begin:

- Choose your Country, Language and Timezone. You can also set whether you are using a US keyboard layout. If you want to use an AZERTY keyboard or any other layout, we will cover how to change this in the Terminal section. Click Next to continue.

- Next you will be asked to create a password. The default password is ‘raspberry’ and unless you want anyone to be able to log in, you should definitely change this. Click Next to continue.

- On the next screen the Raspberry Pi will display a list of the wireless networks it can pick up. If your model does not have WiFi, this screen will not appear and you can skip this step. Select your network, enter your WiFi password and click Next.

- The Raspberry Pi will now check for any software updates, and download newer versions if available. If you don’t have WiFi or did not set up in the previous screen, but still want to check for updates, plug in an Ethernet cable before starting. The Raspberry Pi might prompt you to reboot it after this stage, in order to complete an update it installed.
Congratulations, your Raspberry Pi is now set up and ready to use!
Exploring the Raspberry Pi

Clicking the Raspberry icon in the top right of the screen will open the menu. From here you can find a wide variety of lightweight open-source programs packaged with Raspbian. These include basic text and image editing tools as well as programming and educational tools such as Scratch and Squeak.
Also along the top right of the screen, you should see a globe icon for Chromium. This is your Internet browser, and if you set up your network settings you can browse the web here.
Next along is the file manager, which allows you to browse the files on your SD card and external USB storage.
Finally the black icon opens up Terminal. This allows you to type commands directly, and for advanced users can be a faster and more flexible way to perform certain tasks.
Using Raspberry Pi remotely
As long as your Raspberry Pi is connected to your network, you can control it remotely through your desktop or laptop using SSH.
- Connect the SD card to your computer and create an empty file in the boot folder, which is inside the Volumes folder. Name the file ssh and make sure it contains the line touch ssh.
- Put the SD card back in the Pi and power the Raspberry Pi on. If you have not setup WiFi on the Raspberry Pi yet, you will need to plug in an Ethernet cable.
- Open Terminal in Mac or Linux, or Command Prompt in Windows. Type ssh pi@raspberrypi. If you have changed the username, enter your username instead of You can also replace raspberrypi with the Raspberry Pi’s IP address.
- Enter your password when prompted, then type yes if you encounter an authenticity warning.
- You should now be able to enter Linux Terminal commands to operate the Raspberry Pi.
Terminal
Raspberry Pi uses a Linux-based operating system, so if you are familiar with using Linux command lines you already know how this works. If not, here are some of the most basic commands to get you started:
man – Manual. This command requests the manual page for a given command. This will tell you what the command does, any options or modifiers, and what kind of a value that command expects, if any. Use this command by typing man followed by the command you are unsure of, for example man cd
cd – Change Directory. This command tells the Raspberry Pi where to perform the commands you enter. For example, cd Desktop would open the desktop in Terminal. Most commands are applied to the current directory unless otherwise specified. Use cd to set the current directory.
pwd – Print Working Directory. Not sure where you are? pwd will tell you what the current directory is.
ls – List. This command returns a list of all the files and folders in the current directory.
nano – nano is one of several text editors available through Terminal, and allows you to edit settings and files through Terminal. Type nano to create a new file in the current directory, or nano filename to open a specific file within the current directory. You can also open files in other directories, for example nano /Documents/ filename.
tree – This command will show you the current directory and all the subdirectories and files it contains, displayed in an indented file structure.
find – This searches the Raspberry Pi for any files or folders matching your search term. find has a lot of modifiers to help narrow your search, use man find to check what each of them does.
kill – This command terminates a specified process. This can be very useful if a process or program is frozen and you need to get rid of it. There are three main variants of this command you need to know:
- kill terminates the process with a given PID or Process ID. Often you will not know the PID you need to terminate.
- pkill terminates the process with a matching name.
- killall terminates all instances of a process and any processes subordinate to that process.
localectl – This command sets the system locale and keyboard layout. If you are not using a QWERTY keyboard you will need to use this command to set your country, for example localectl fr would tell the Raspberry Pi to expect a French AZERTY keyboard layout.
These are just a few of Linux’s hundreds of commands, and most users rely on search engines to find the commands they need, particularly for uncommon or obscure tasks. Not all commands are intended to work on any system, for example if a command operates hardware you do not have such as a disc drive.
Installing Raspbian with NOOBS
NOOBS is an operating system installer, for use with Raspbian and a variety of other Linux systems for Raspberry Pi. If your Raspberry Pi did not come with Raspbian already installed on an SD card, NOOBS is the easiest way to set it up. Just follow these simple steps:
- Download a ZIP folder containing NOOBS

- Download and install SD Formatter 4.0. When you insert you SD card into your computer, it will be assigned a drive letter. Use SD Formatter to format this drive letter. You will lose everything that was on the SD card, so back up any files you want to save first.

- Find the NOOBS ZIP folder you downloaded earlier, and extract the contents to a new folder. Right-click and copy the contents of the new folder, then open your SD card and paste the files onto the SD card. When this has completed, eject the SD card.

- Put the SD card into your Raspberry Pi, and plug in the micro-USB to power it on. Once loaded, the installer will ask you which operating system you want to install. Select Raspbian, and click Yes when a warning box appears.

- Installing Raspbian will take a few minutes. A dialogue box will appear telling you the installation was successful. When you click OK the Raspberry Pi will restart and load up Raspbian.