 Skip to content
This guide is a simple setup guide for beginners; for more information on setting up the Raspberry Pi, or if you have any problems – Google is your friend.
Required Items
- Power supply - Make sure you use a good quality one! Do not attempt to power your Raspberry Pi by plugging it into a computer.
- microSD card - Loaded with the operating system of your choice.
- USB keyboard and mouse or a Mini Keyboard with Touchpad
- HDMI Cable, or HDMI to DVI cable, or HDMI to VGA, or a Composite cable, depending on the connector on your screen
Hardware Setup
It is recommended that you connect the power supply to the Pi last, so follow these steps in order:
- Plug the preloaded SD Card into the Raspberry Pi
- Plug the USB keyboard and mouse into the Raspberry Pi
- Plug the HDMI cable into the Raspberry Pi
- (optional) Plug in the network cable or Wifi Adaptor if you want to connect to the internet
- Plug the power supply into the mains socket
- With your screen on, plug the power supply into the Raspberry Pi microUSB socket.
- The Raspberry Pi will now boot
Using the Raspberry Pi
What you see first will depend on the operating system you have on your (micro)SD card.
NOOBs
Your Raspberry Pi will boot, and a window will appear with a list of different operating systems that you can install. We recommend that you use Raspbian. Tick the box next to Raspbian and click on Install.
Raspbian will then run through its installation process as shown below.
Raspbian Wheezy Linux
Please note that the Raspberry Pi will take a while to boot for the first time.
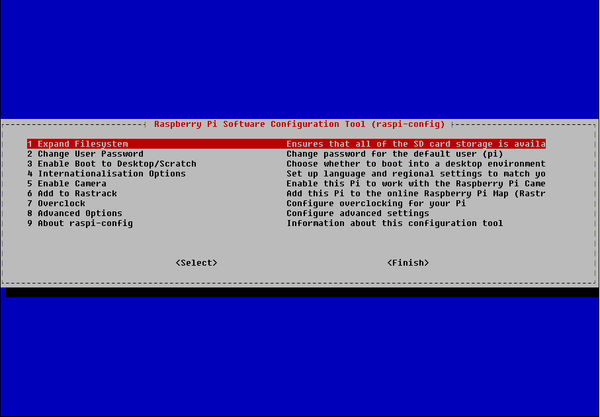
The first time the Raspberry Pi boots from the SD card it will automatically configure itself, and then displays the menu below. All of these options are completely up to the user. We suggest running the option "Expand Filesystem" to expand the image to fill your SD card, and also "Enable Boot to Desktop/Scratch" so that your Pi auto-boots into the GUI (graphical user interface).
The default username for Raspbian Wheezy Linux is pi and the password is raspberry. To manually load the GUI desktop environment simply enter startx.
If you are using a network cable, the IP address will be set automatically. If you are using a WiFi Adaptor, use the Wifi Config application to configure your network settings.
Enjoy your new Raspberry Pi!