 Skip to content
Sensors - Pressure, Temperature and Altitude with the BMP180
If you are familiar with the CamJam EduKits, then you will already be familiar with a few sensors, like the 1-wire temperature sensor, a light dependent resistor, and movement with the passive infrared (PIR) sensor. In this tutorial we are going to learn how to sense the outside world using a set of digital sensors on the tiny BMP180 board.
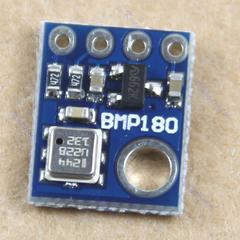
The diagram on the left shows the BMP180 from Adafruit, and the one on the right shows the type of BMP180 used in this tutorial. They do exactly the same as each other, although the Adafruit item can be used on both 5V and 3.3v systems. If you are using the Adafruit BMP180 ensure please use the 3v3 pin and not the VIN pin of the BMP180.

The BMP180 is an i2c board, which means that it uses the i2c (pronounced 'eye two see' or 'eye squared see') protocol to communicate with your Raspberry Pi. The advantage of i2c is that it only uses two pins on the Raspberry Pi (plus power and ground) to communicate with a lot of different devices. One pin carries a clock signal, and the other carries the data. If you would like to know a little more about how i2c works, there is a description on the Wikipedia site.
The diagram below shows the location of the i2c pins on the Raspberry Pi.

Using i2c on your Raspberry Pi
The first thing you need to do is configure the Raspberry Pi to use i2c. Simon Monk has written very good instructions about how to set up your Raspberry Pi to be able to use i2c on the Adafruit site. Follow the full instructions, including checking that everything has worked by going through the manual instructions too.
Plugging in the BMP180
To connect your BMP180 to your Raspberry Pi, you will need a breadboard and four female to male jumper wires. It is always best to turn your Raspberry Pi off before connecting anything to it, so issue the following and wait for the green light to go off:
sudo shutdown -h now
Now follow the diagram below to connect the BMP180 to your Raspberry Pi. Please note that there are actually a few different designs for the BMP180 boards. The BMP180 actually refers to the chip, not the whole board itself, so you may find that your board has 4, 5 or six pins.
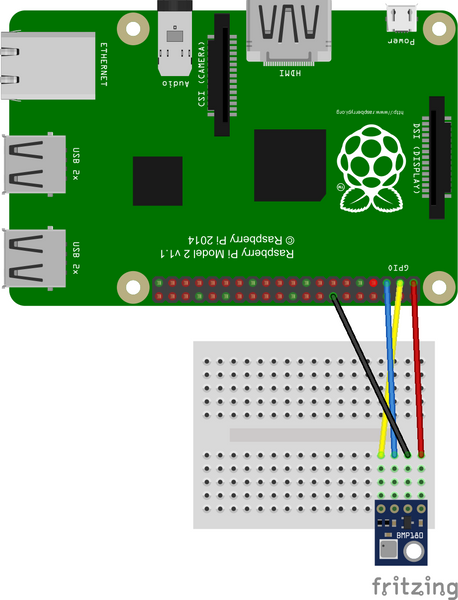
In this diagram, the jumper wires are connected as follows, viewing the Raspberry Pi orientated as shown above:
- The red jumper goes from the 3v3 (3.3 volt power supply) pin of the Raspberry Pi to the VCC pin of the BMP180.
- The yellow jumper goes from the second pin from the right on the top row of the Raspberry Pi to the SDA pin of the BMP180. The BMP180 uses this wire to communicate with the Raspberry Pi.
- The blue jumper goes from the third pin from the right on the top row of the Raspberry Pi to the SCL pin of the BMP180. This pin supplies a clock signal (it turns on and off at regular intervals) that is used by i2c devices to time their communication to the Raspberry Pi.
- The black jumper goes from any of the ground (GND) pins of the Raspberry Pi to the GND pin on the BMP180.
Before you turn anything on, double check your connections. It is unlikely that anything bad will happen, but it is best to check twice before applying power.
Using the BMP180
If everything has been installed okay, and everything has been connected okay, you are now ready to turn on your Raspberry Pi and start seeing what the BMP180 is telling you about the world around you.
The first thing to do is to check that the Raspberry Pi sees your BMP180. Try the following in a terminal window:
sudo i2cdetect -y 1
If you receive an error message and have a very early Raspberry Pi Model B, try:
sudo i2cdetect -y 0
If the command worked, you should see the following:

This is showing that the BMP180 is on channel '77'.
Now we need to install some libraries so that Python knows how to read the output of the BMP180. The libraries were actually written by Adafruit for use with the predecessor of the BMP180, the BMP085, but since the chips were designed to be compatible with each other, the libraries work with this newer device.
To install these libraries and required Python libraries, type the following into a terminal window on your Raspberry Pi:
- Install the GIT application which will be able to retrieve code from the GitHub (a website that is used to store and version control code):
sudo apt-get update
sudo apt-get install git build-essential python-dev python-smbus
- Create and move to a directory that will contain your code. This directory can be called anything you like:
mkdir ~/BMP180Code
cd ~/BMP180Code
- Download the GIT repository for the BMP180. This will download the contents of the Adafruit Python library to the current location:
git clone https://github.com/adafruit/Adafruit_Python_BMP.git- The library now needs compiling so that you can use it. In the same terminal window as above, run the following:
cd Adafruit_Python_BMP
sudo python setup.py install
Now you are ready to use the BMP180.
Simple Code
The code to use your BMP180 is very simple. The following example code can be found (with more comments) in Adafruit_Python_BMP/examples/simpletest.py. You can edit it using:
nano ~/BMP180Code/Adafruit_Python_BMP/examples/simpletest.pyLet's examine the code. Remember that the BMP085 is compatible with the BMP180. The library refers to the BMP085
#!/usr/bin/python

 import Adafruit_BMP.BMP085 as BMP085 # Imports the BMP library

 # Create an 'object' containing the BMP180 data
sensor = BMP085.BMP085()
print 'Temp = {0:0.2f} *C'.format(sensor.read_temperature()) # Temperature in Celcius
print 'Pressure = {0:0.2f} Pa'.format(sensor.read_pressure()) # The local pressure
print 'Altitude = {0:0.2f} m'.format(sensor.read_altitude()) # The current altitude
print 'Sealevel Pressure = {0:0.2f} Pa'.format(sensor.read_sealevel_pressure()) # The sea-level pressureAnd that's it! Now you can include this little sensor into your own projects. It is definitely going into my current project.
1 comment
matrixmike
The above mentioned GitHub repository is deprecated – (archived) . I plan to modify this tutorial – for my own purposes – sometime (but might not be soon).
The above mentioned GitHub repository is deprecated – (archived) . I plan to modify this tutorial – for my own purposes – sometime (but might not be soon).