How to setup a static IP address on your Raspberry Pi
So, you want to connect remotely to your Raspberry Pi? For that you’ll need its IP address! There are two main forms of IP address, dynamic and static. By default, your Raspberry Pi will have a dynamic IP address. This means that the IP address can change at any time - not ideal if you want to run your Raspberry Pi headless, as you’ll need to keep checking and updating the IP address in your system. A static IP address however will not change, it assigns your Raspberry Pi a permanent address on your network - so you know exactly where it is at all times.
Setting up a static IP address on your Raspberry Pi can seem like a daunting task, but fear not, we’ll walk you through it one step at a time in this tutorial.
For this guide, we’re going to assume that you are running the latest version of the Raspbian operating system as it is the most common amongst Raspberry Pi owners.
Step 1. Check your connection!
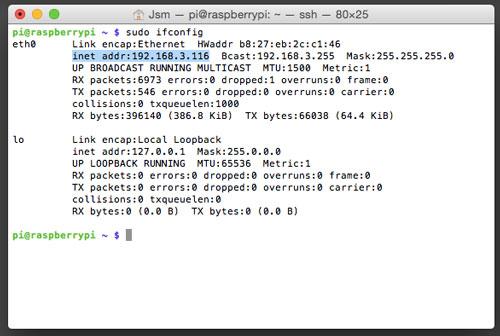
First up we’ll need to double check that your Raspberry Pi is happily connected to your network. A great way to do this is to run sudo ifconfig

As you can see in the above screenshot, our Raspberry Pi is connected to our network and has been given the IP address 192.168.3.116 (yours will likely be different!)
Step 2. Make some notes!
Before we can begin applying a static IP address to your Raspberry Pi we’ll need to gather the necessary data from it! We can get a lot of this from the “ifconfig” command we ran earlier. Make a note of the following data:
Current IP Address (inet addr)
Broadcast Range (Bcast)
Subnet Mask (Mask)
so, from our example, I would get the following information.
Current IP Address = 192.168.3.116
Broadcast Range = 192.168.3.255
Subnet Mask = 255.255.255.0
Different networks will give you different data, so make sure you don't just copy our results!
With those noted down, run sudo route -n, this will give us information from your router.
Make sure you note down the following information given from this command:
- Gateway
- Destination
So from the example, I would get the following
Gateway = 192.168.3.1
Destination = 192.168.3.0
OK, so we’ve now obtained all of the data that we need to setup our Raspberry Pi with a shiny new static IP address, it’s time to save it to a config file.
Step 3. Edit the files
Time to run sudo nano /etc/network/interfaces . This opens the configuration file for the network settings in the nano text editor. If you’re more confident with an alternative text editor that’s fine too!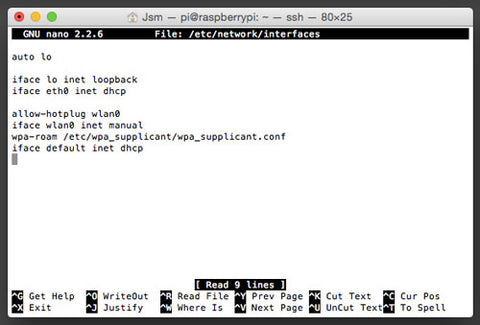
the line that reads “iface eth0 inet dhcp” is telling the ethernet “eth0” networking interface to use “dhcp” (dynamic IP). Firstly, replace “dhcp” with “static”.
Next up, add the following lines directly below the line you just altered, filling the []’s with the date you obtained above.
address [your chosen IP address]
netmask [your netmask]
network [your destination]
broadcast [your broadcast range]
gateway [your gateway]
Don't forget to save your file!
Here’s how my file turned out:
Step 5. Reboot!
run sudo reboot to restart your Raspberry Pi with its new static IP address. The changes we have made will only take effect after a reboot.